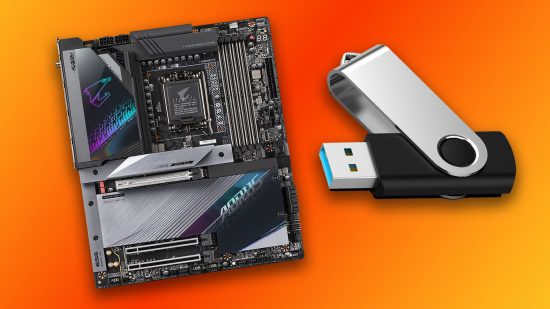
In this guide, I’ll show you how to perform a BIOS update on your PC motherboard. Flashing your BIOS is a relatively simple process, but it’s one that you’ll need to get absolutely right if you don’t want to brick your motherboard. You’ll need a USB flash drive, and you’ll also need to make sure you know the exact name and revision number (if there is one) of your motherboard.
In our example, we’re going to update the BIOS on an old Gigabyte B660 motherboard from 2021, so it will support the best gaming CPU options from the Intel 14th gen lineup. This is an update you’ll need to do if you want to upgrade an old 12th gen system to use one of the latest CPUs. Our example board is a Gigabyte B660 Aorus Master DDR4, but we’ll cover how to flash the BIOS on other makes of motherboard in the guide as well.
Before we delve into the process of updating your motherboard, let’s cover the basics. A BIOS, or Basic Input Output System, is the lowest level software you can access on your PC. It detects your hardware, such as your CPU, RAM, and SSD, and its interface enables you to make sure they’re running at the right settings.
The other term you’ll see used is EFI, which stands for extensible firmware interface, sometimes with a U at the start, which stands for Unified. This standard was introduced a few years ago to update the humble BIOS for the modern era, bringing support for new features, such as large storage partitions and, unlike the largely text-based BIOS setups of old, they usually have user-friendly graphical interfaces as well. When it comes to PC motherboards today, though, the terms BIOS and EFI are largely interchangeable.
There are several ways to flash your motherboard BIOS – and we’ll take you through three of them here. However, one method that we absolutely advise against taking is using one of the Windows-based flash utilities that are sometimes supplied in motherboard software suites.
It only takes one wobble in Windows – an unexpected shutdown, or a lock-up – during the flashing process to render your motherboard unusable. Trust us – the drop in your stomach when you realize you’ve murdered your motherboard is horrible – don’t risk it. Also, if your board is working fine, and you don’t want to upgrade to a new CPU, leave the BIOS alone – the risk isn’t worth it.
1. Identify your motherboard
Before you even think about downloading a BIOS update, make sure you know the exact name of your motherboard, as well as its revision number if it has one. This will be clearly stated on your motherboard box, but if your board’s packaging has already been sent to the great recycler in the sky, there are other ways to find out your motherboard’s model name.
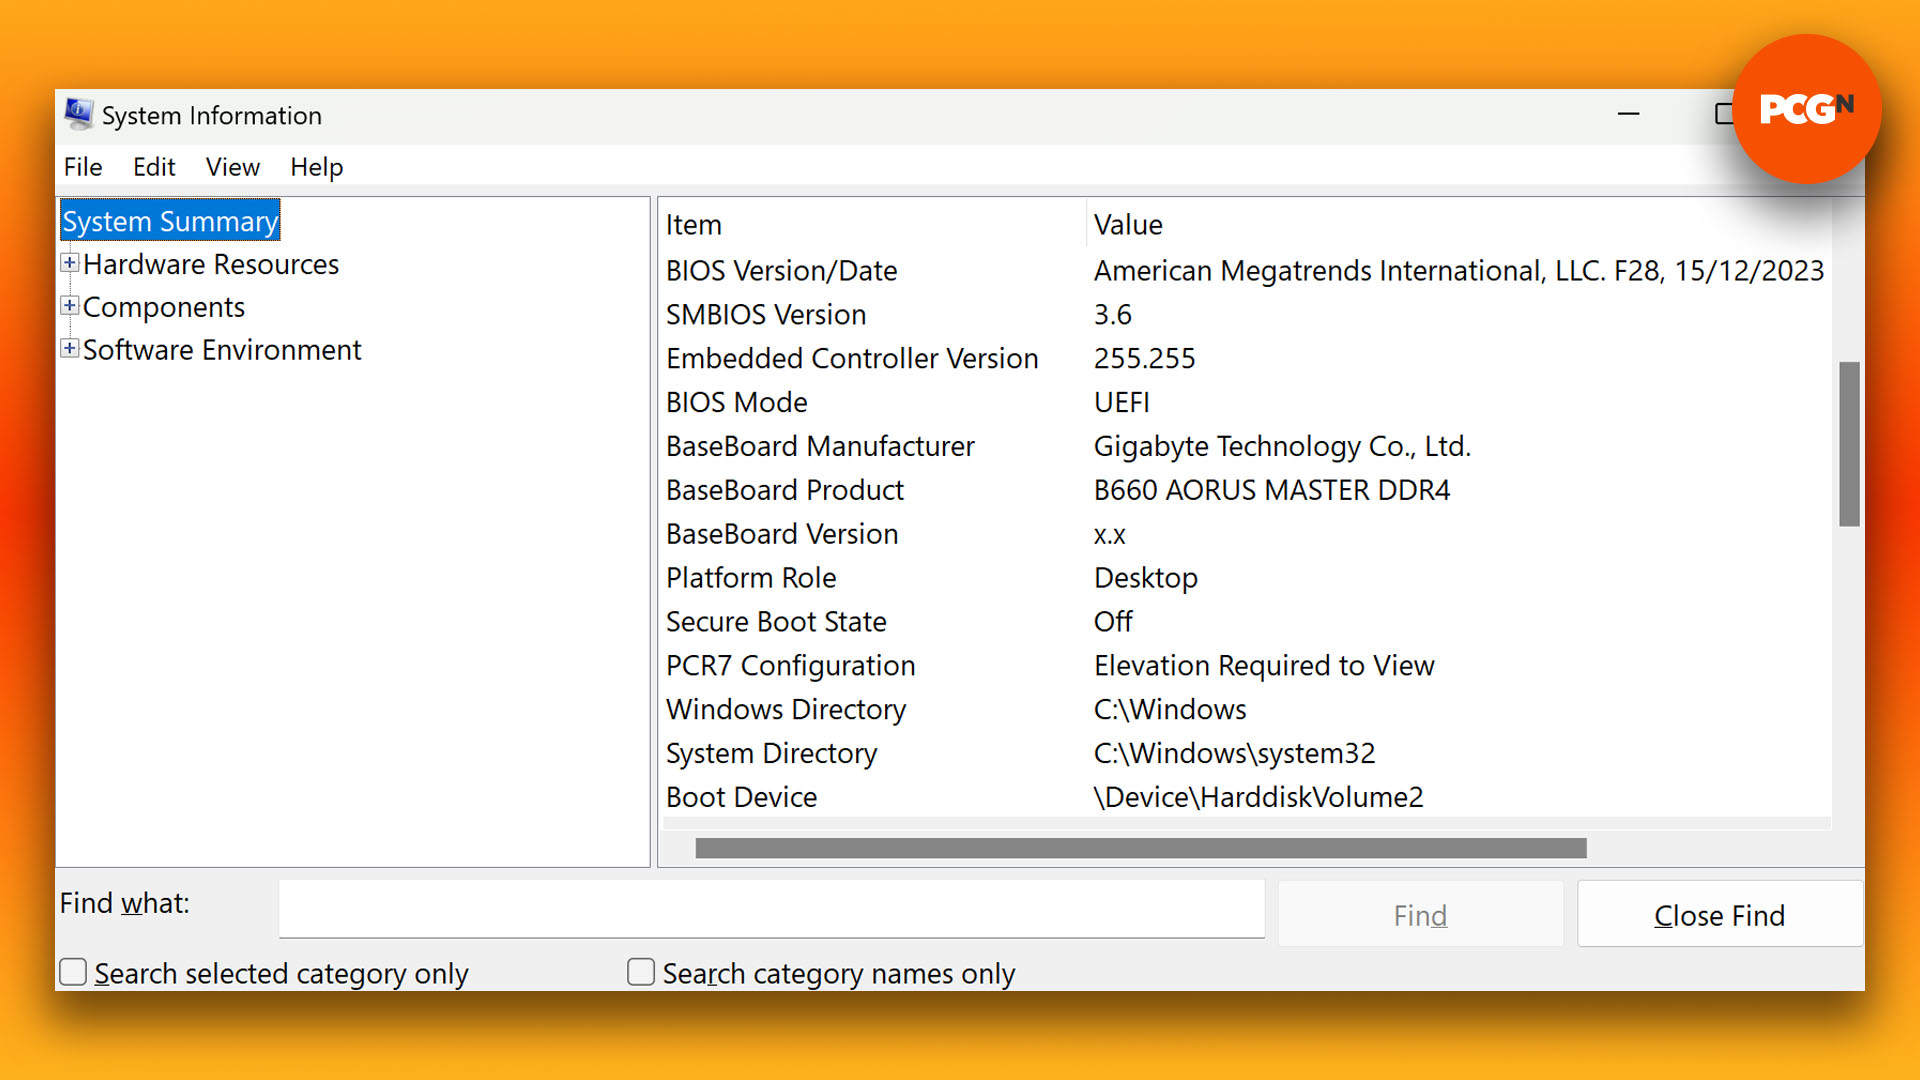
In many cases, it will be prominently written on the PCB, for example. If all else fails, you can get a helping hand from Windows. Bring up the Start menu (press the Windows key), type “msinfo” into the search bar, hit Return, and you’ll be presented with a list of all the gear in your rig.
You can find your motherboard’s name under the BaseBoard Manufacturer and BaseBoard Product fields. While you’re here, you’ll also be able to check the version of your current BIOS, in the BIOS VERSION/DATE field.
2. Download the latest BIOS update
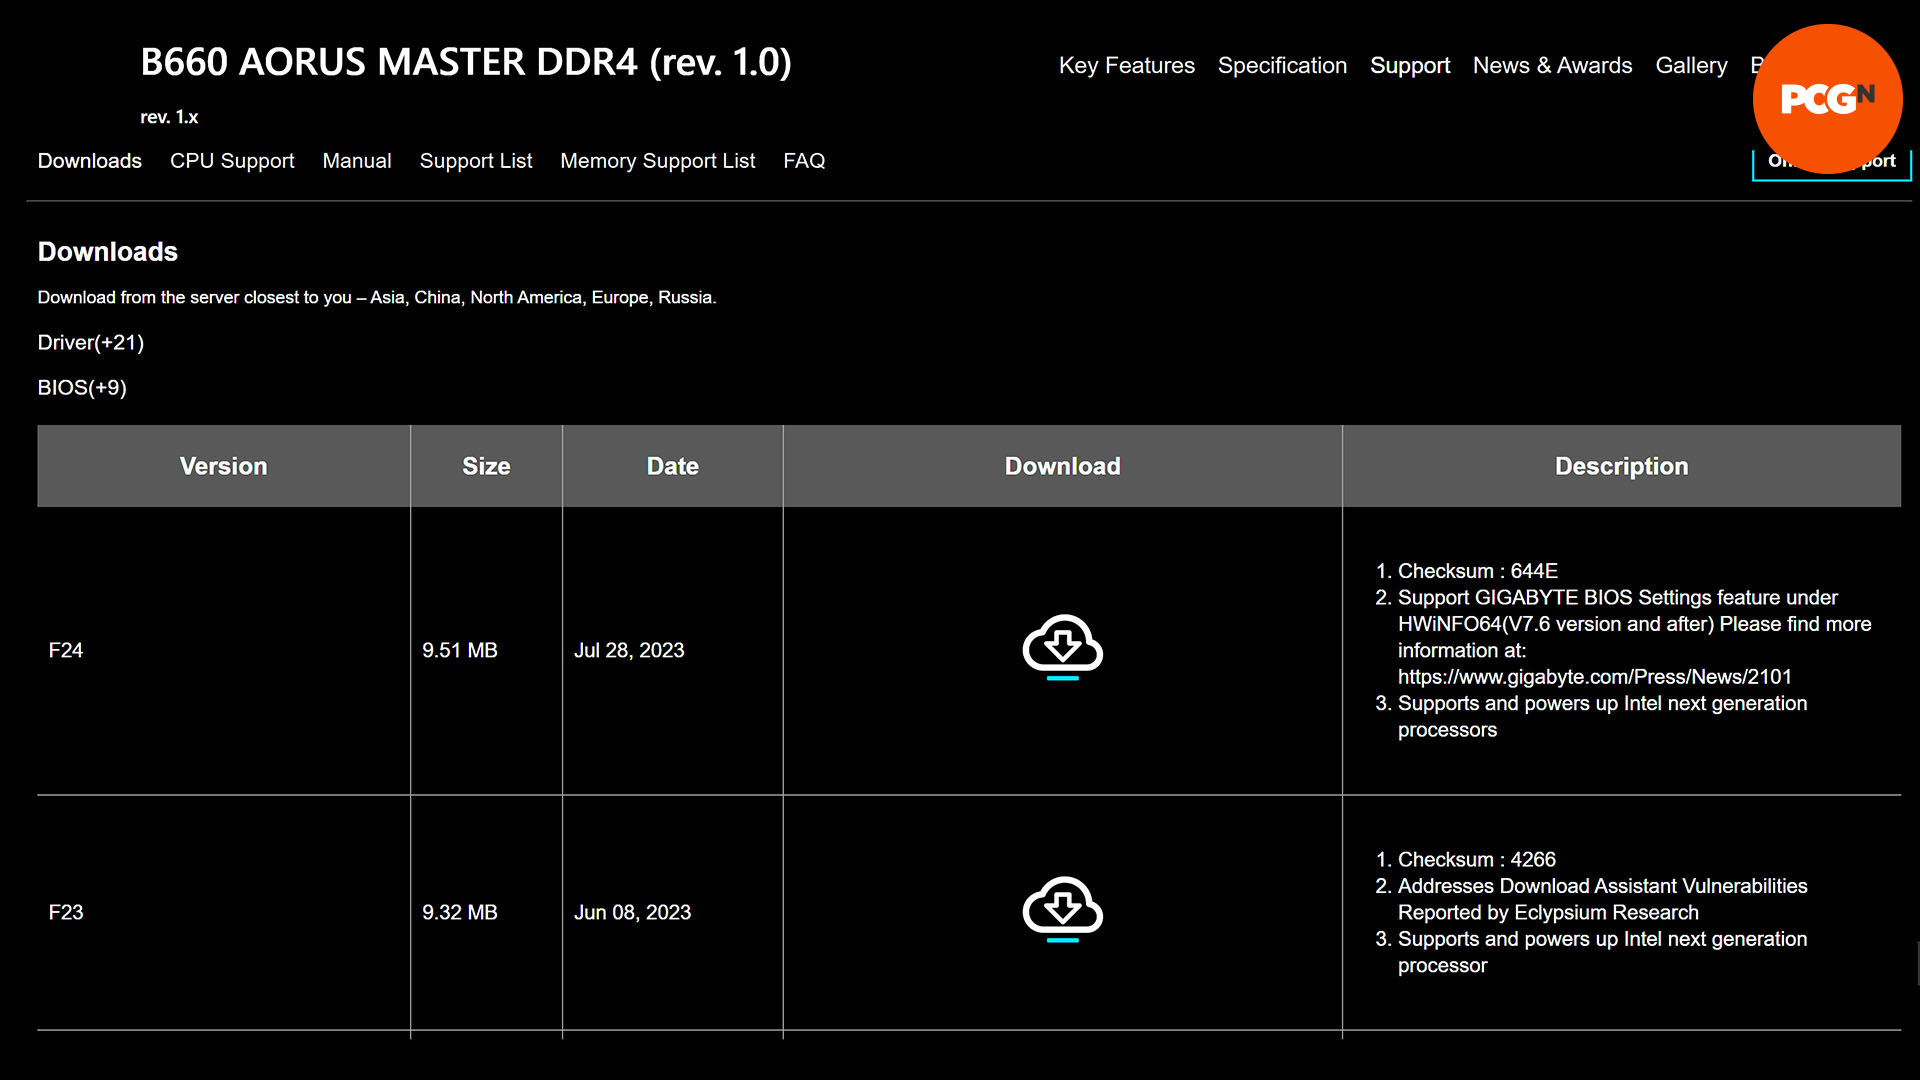
Now head to your motherboard manufacturer’s website, and find the support page for your motherboard – it’s often quicker to just Google your motherboard’s name than go through all the menus on the website. Make sure that you have your motherboard’s name right to the letter – if you try to flash your motherboard with a BIOS for another board then you can render your motherboard unusable. Check, check, and check again, that the support page is for your exact model.
There will be a downloads section in the support section, and somewhere in there you’ll find a list of BIOS updates. Find the latest BIOS for your motherboard, and download it. In our case, we’re installing BIOS update F24 for our motherboard, which the update says ‘supports and power up Intel next generation processors.’ This will enable our old Intel 12th gen motherboard to boot up with future Intel 14th gen processors, such as the Core i9 14900K.
3. Open BIOS download Zip file
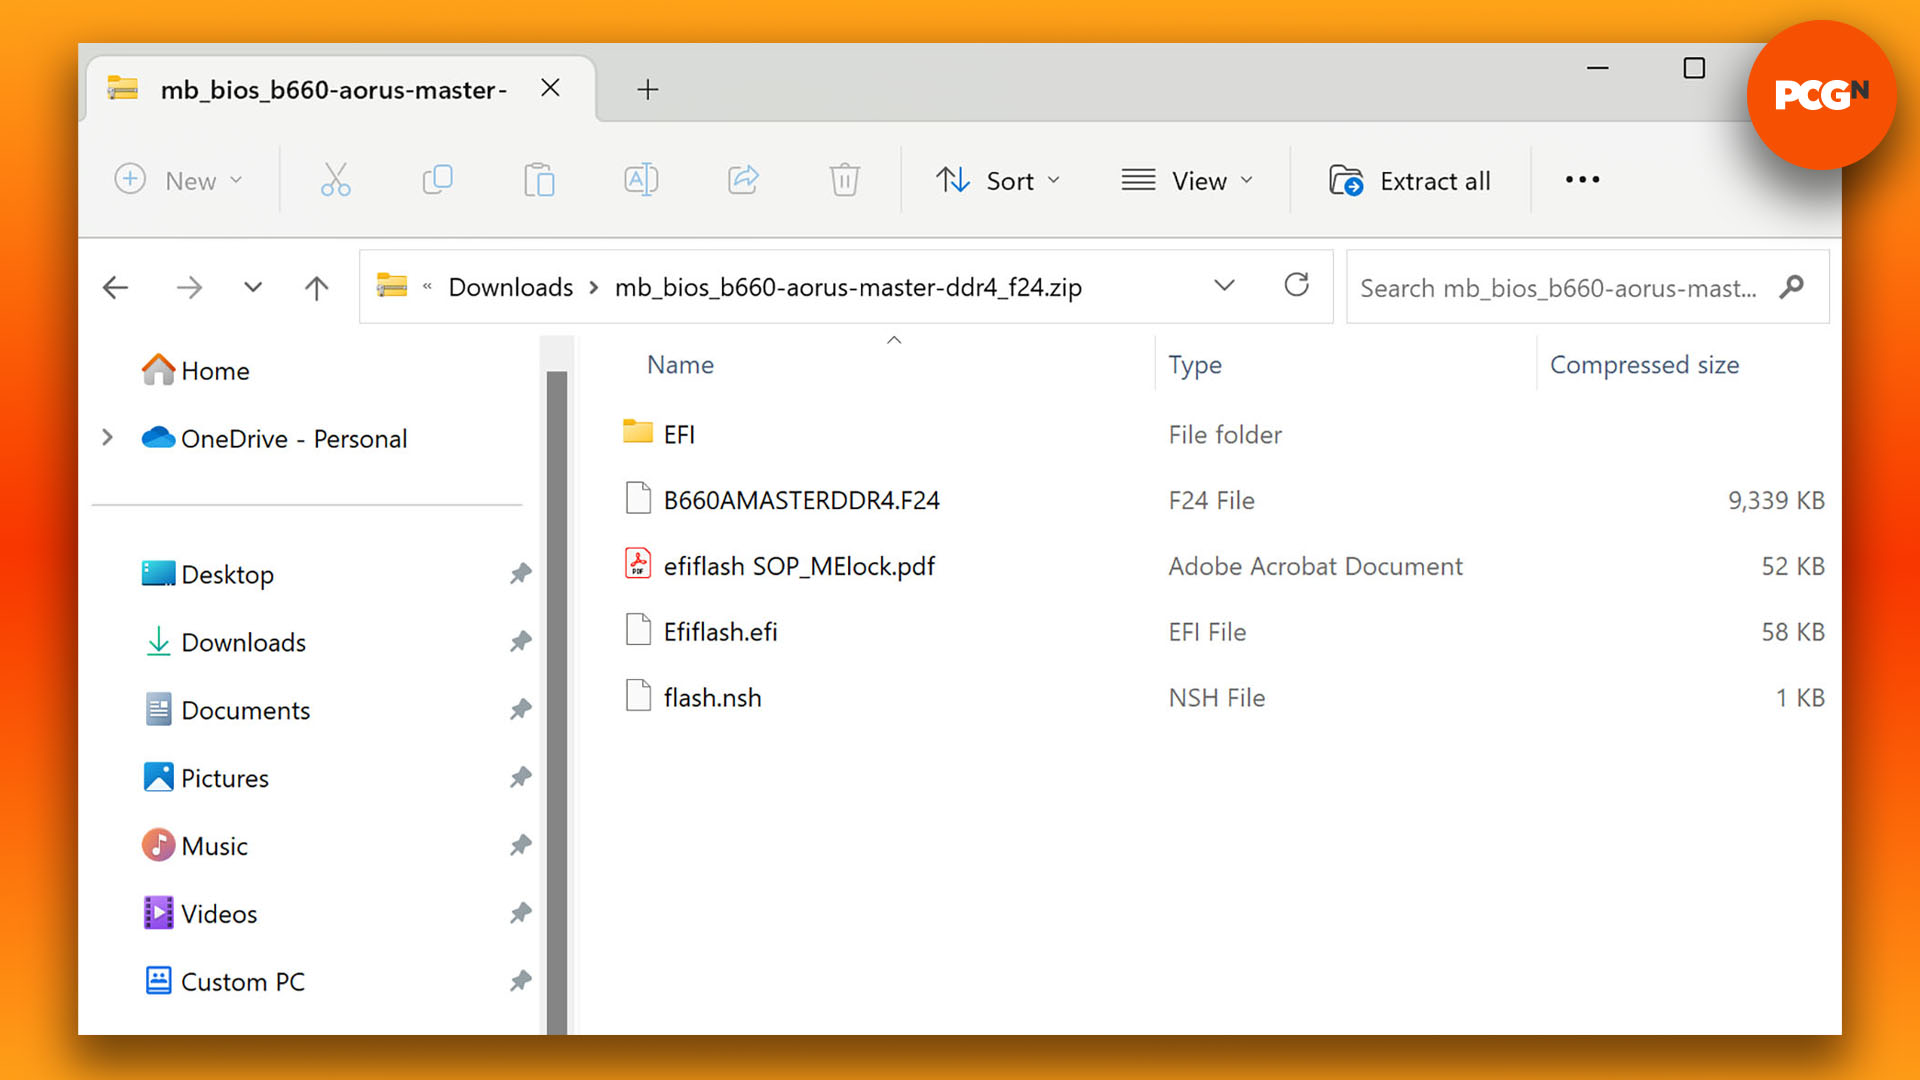
The BIOS download will usually come in the form of a Zip file, which will contain a few other files in addition to the new BIOS file. There’s often a PDF or text file giving you instructions on how to flash your BIOS, as well as a flash utility and sometimes a further utility to change the name of the file. In our example above, and in most cases, the BIOS file will be in all caps, and will also be the largest file in the folder.
In our example, B660AMASTERDDR4.F24 is the BIOS file (F24 is the BIOS version number as well as the file extension), the PDF file contains the instructions, and flash.nsh is the flash utility (we cover how to use the latter at the bottom of this article). Read these instructions before you do anything else – sometimes you have to rename a file before performing a BIOS update, and you really don’t want to end up getting this wrong.
4. Copy files to USB flash drive
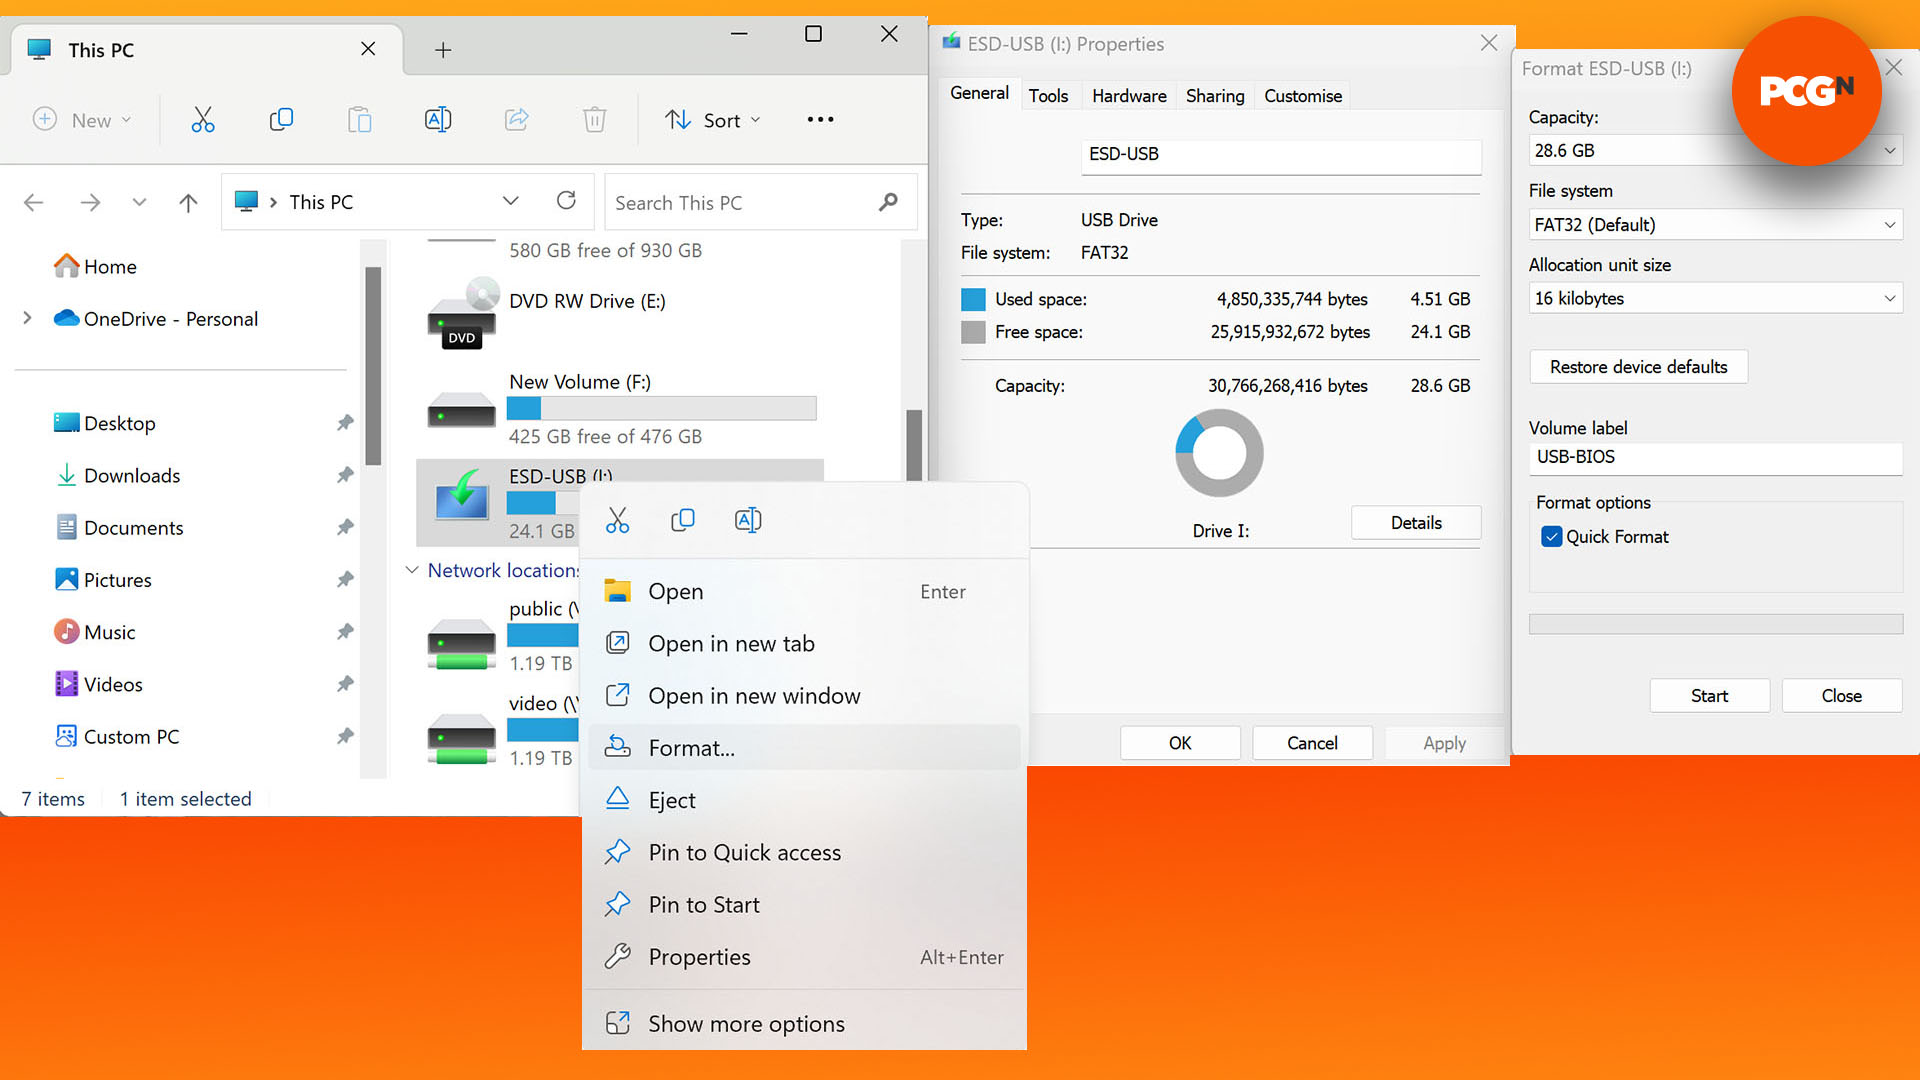
Whichever method you choose to flash your BIOS (the other methods are listed at the bottom of this feature), you will need to copy your files to a USB flash drive. To start, we recommend deleting all the data off the drive first, and formatting it with FAT32 if it isn’t already – some BIOS flashing utilities don’t recognize the NTFS file system used by Windows.
To do this, right-click on the USB drive under This PC in Windows File Explorer, and go to Properties. If it says FAT32 under File System then you’re fine. If it says NTFS, then right-click on the USB drive again and select Format. Select FAT32 under File system, tick the Quick Format box, and hit Start. Once that’s done, copy the new BIOS file over to the root of your formatted USB drive (not in a folder), leave the USB flash drive plugged into your PC, and then restart it.
4. Enter EFI flash utility
We’re going to start with the flashing method that has the best balance of user-friendliness and reliability, which is using your motherboard’s EFI flash utility, rather than the utility supplied in your Zip file. EFI stands for extensible firmware interface, and it’s the system that replaced the legacy BIOS used on old PC motherboards – the terms BIOS and EFI are largely interchangeable these days, but technically you’re updating your EFI here.
When your PC starts up, you’ll see a splash screen from your motherboard that normally says something along the lines of ‘Press Del to enter setup,’ but sometimes also gives you the option to enter a BIOS flashing utility by pressing another key.
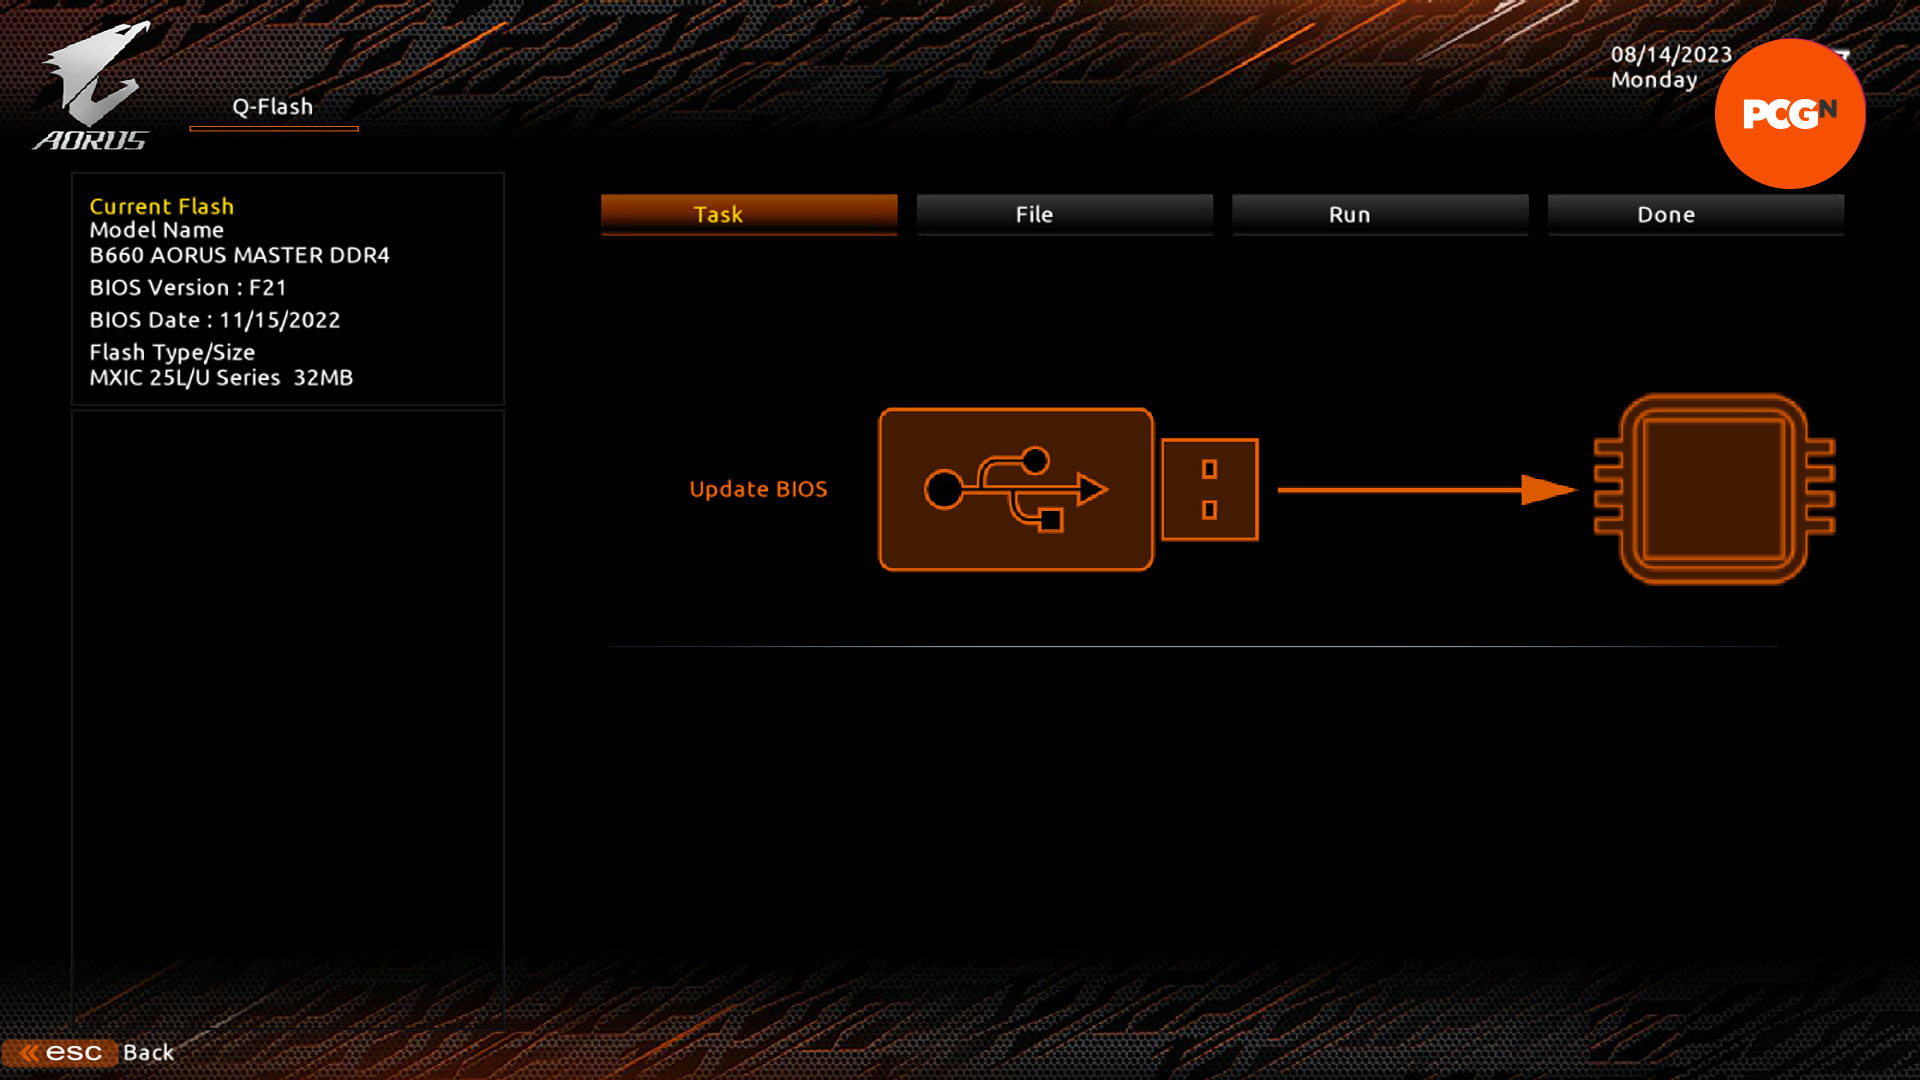
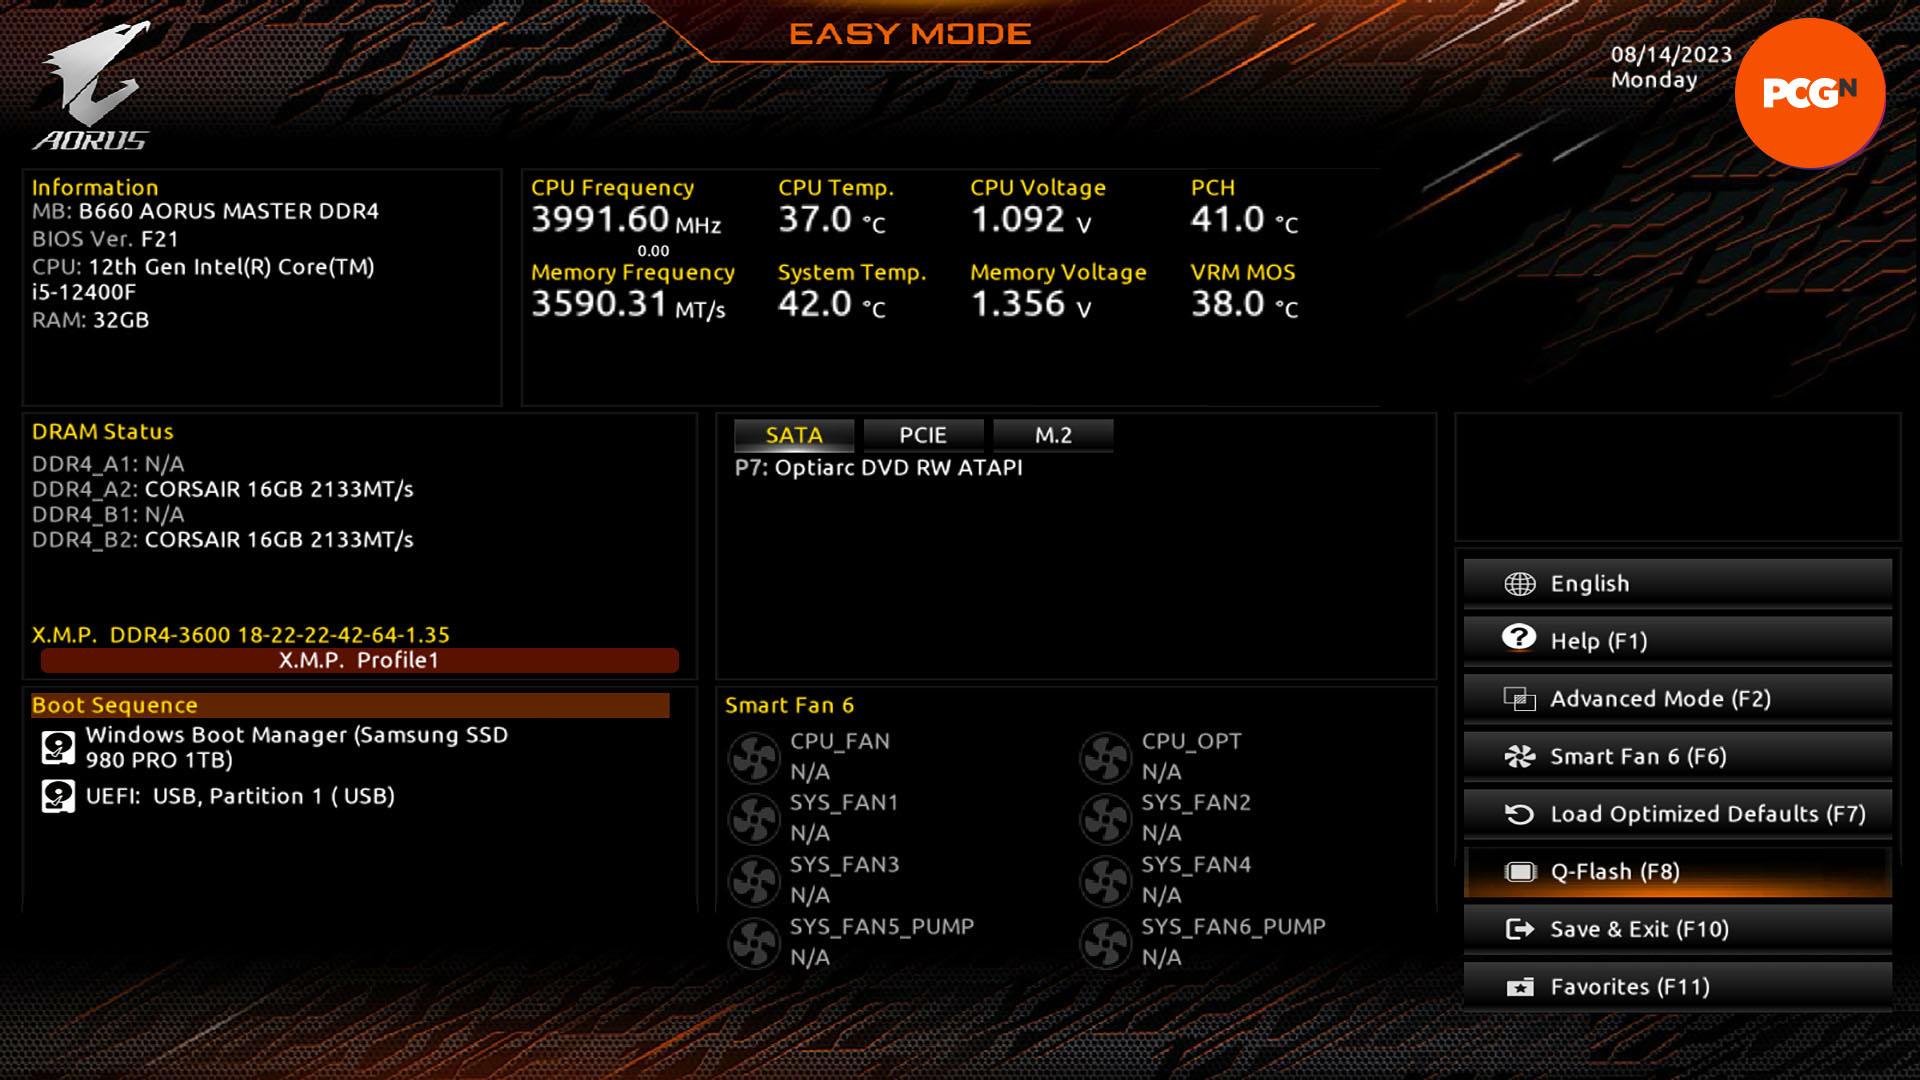
In our case, we can press F8 to enter Gigabyte’s Q-Flash utility. The equivalents from other motherboard makers are Asus EZ Flash, MSI M-FLASH, and ASRock Instant Flash. You can also usually access your motherboard EFI’s flash utility by pressing Del to enter the main EFI. This is the method we’re taking, but the principle is the same.
Once you’re in your EFI, switch your EFI to Advanced mode (there will usually be a button for this flagged up somewhere on the first screen of the EFI), and then find the flash utility. In our case, it’s flagged up on the first screen of the EFI (even in Easy mode), but if not it should be somewhere in the menus in Advanced mode. The Asus EZ Flash utility is normally found in the Tools menu, and MSI M-Flash is found in the Utilities section.
5. Browse to new BIOS file
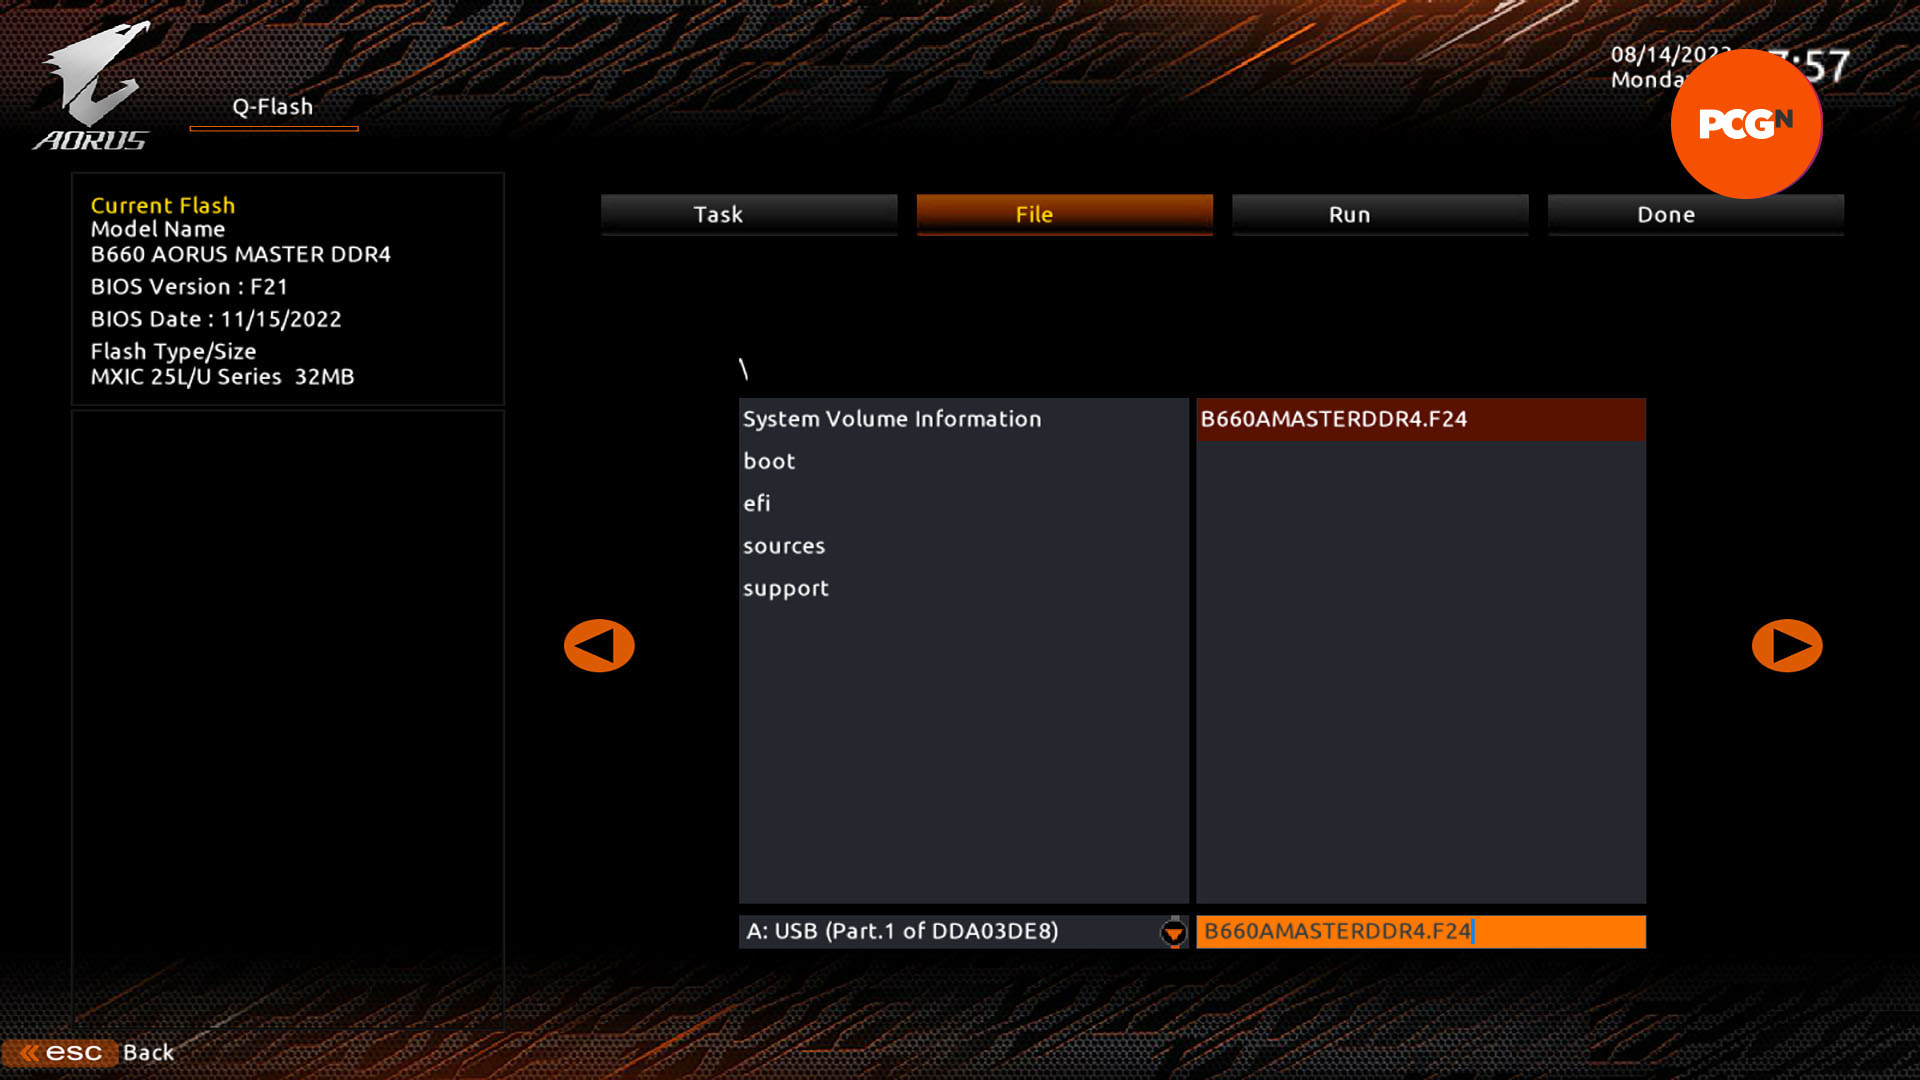
There will be a very basic file browser system somewhere in the flash utility that will enable you to point it to the new BIOS file. In our case, it’s in the File tab, which you access by simply clicking on Update BIOS from the first screen, but this will vary between motherboard manufacturers. Browse to your USB flash drive and select the new BIOS file. The screen may also display the details of the current BIOS running on your board – in our case it’s in the top left.
6. Confirm BIOS update
Once you’ve selected your file, you need to get to the next stage, which is flashing it. In our case, that just means clicking the orange arrow on the right, but this varies between motherboard makers. On Asus EZ Flash, the next stage is simply confirming that you want to read the BIOS file.
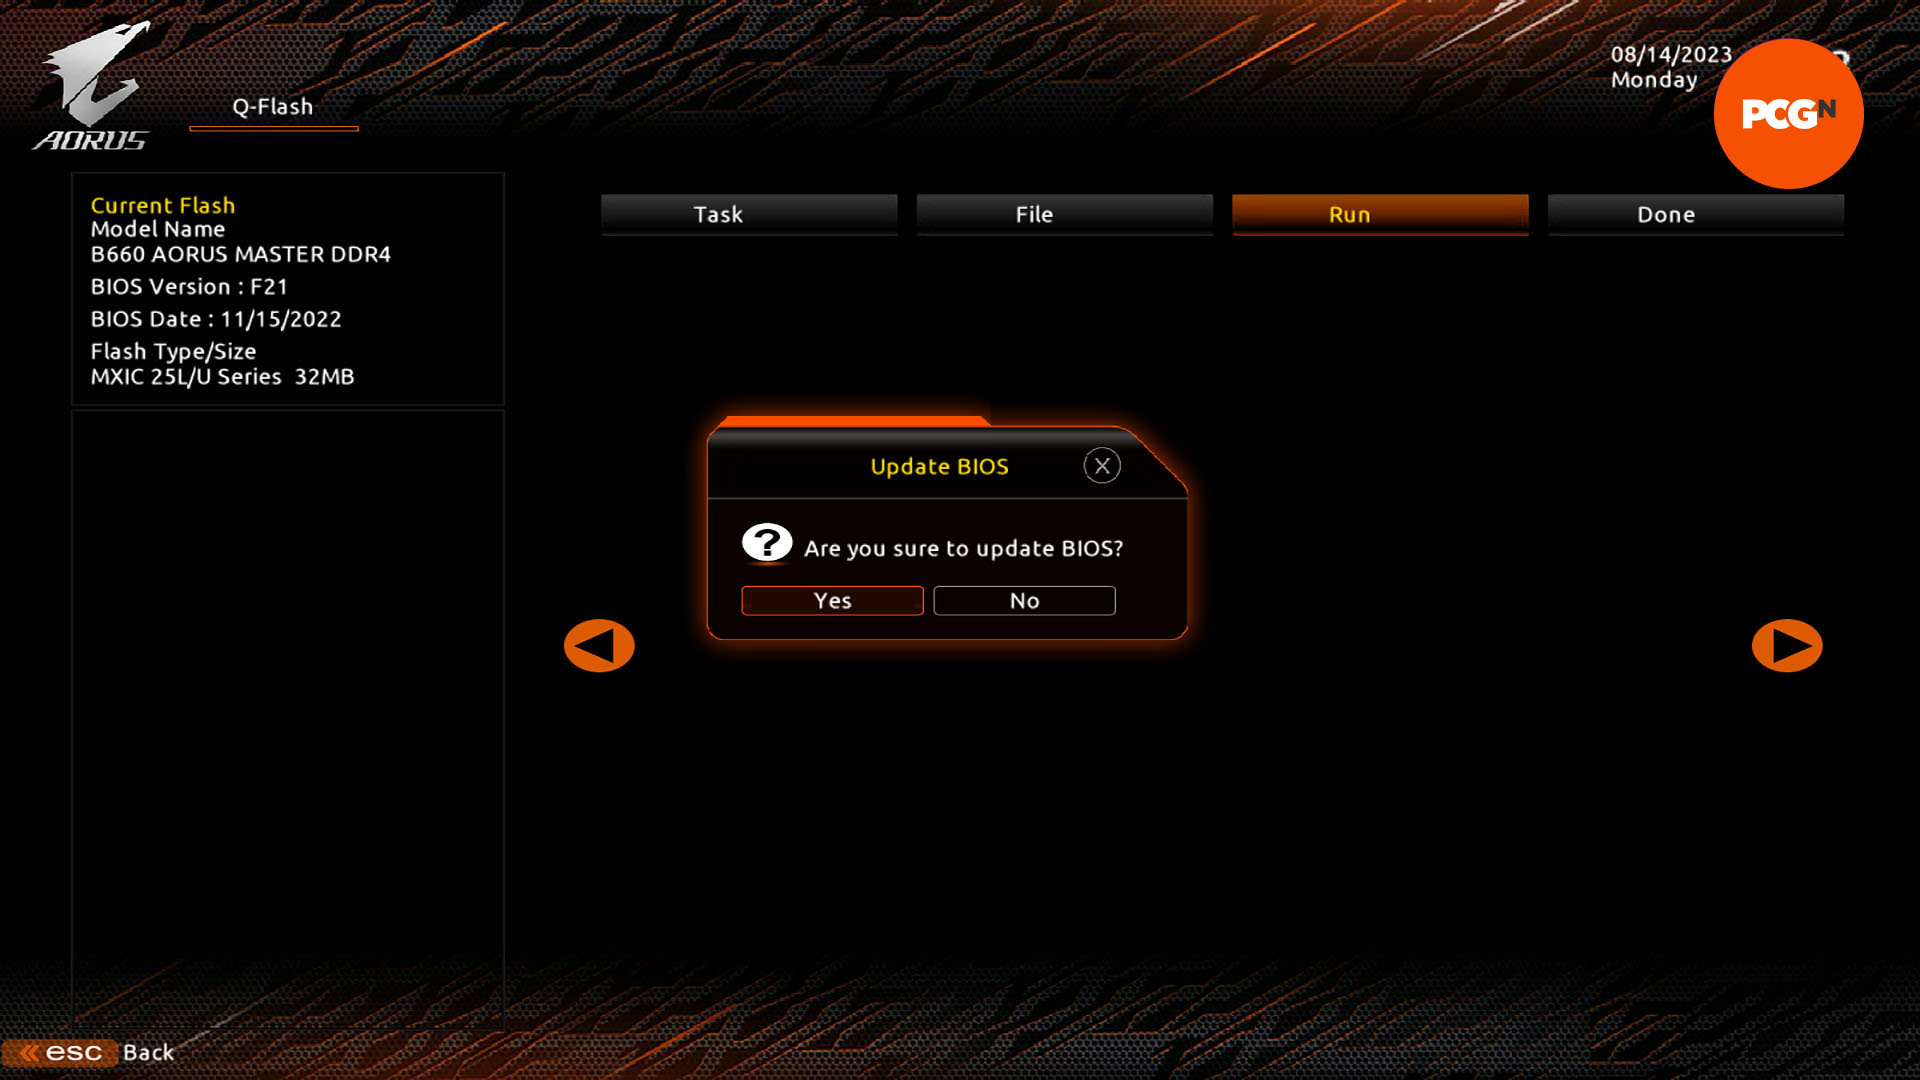
Either way, you’ll usually be greeted by a box asking you if you definitely, really, absolutely want to update your BIOS. If you’re lucky, it might also be written in terrible English. Click Yes to carry on. Click No, if you just want to double-check that you’ve definitely got the right file for your motherboard.
7. Start flashing process
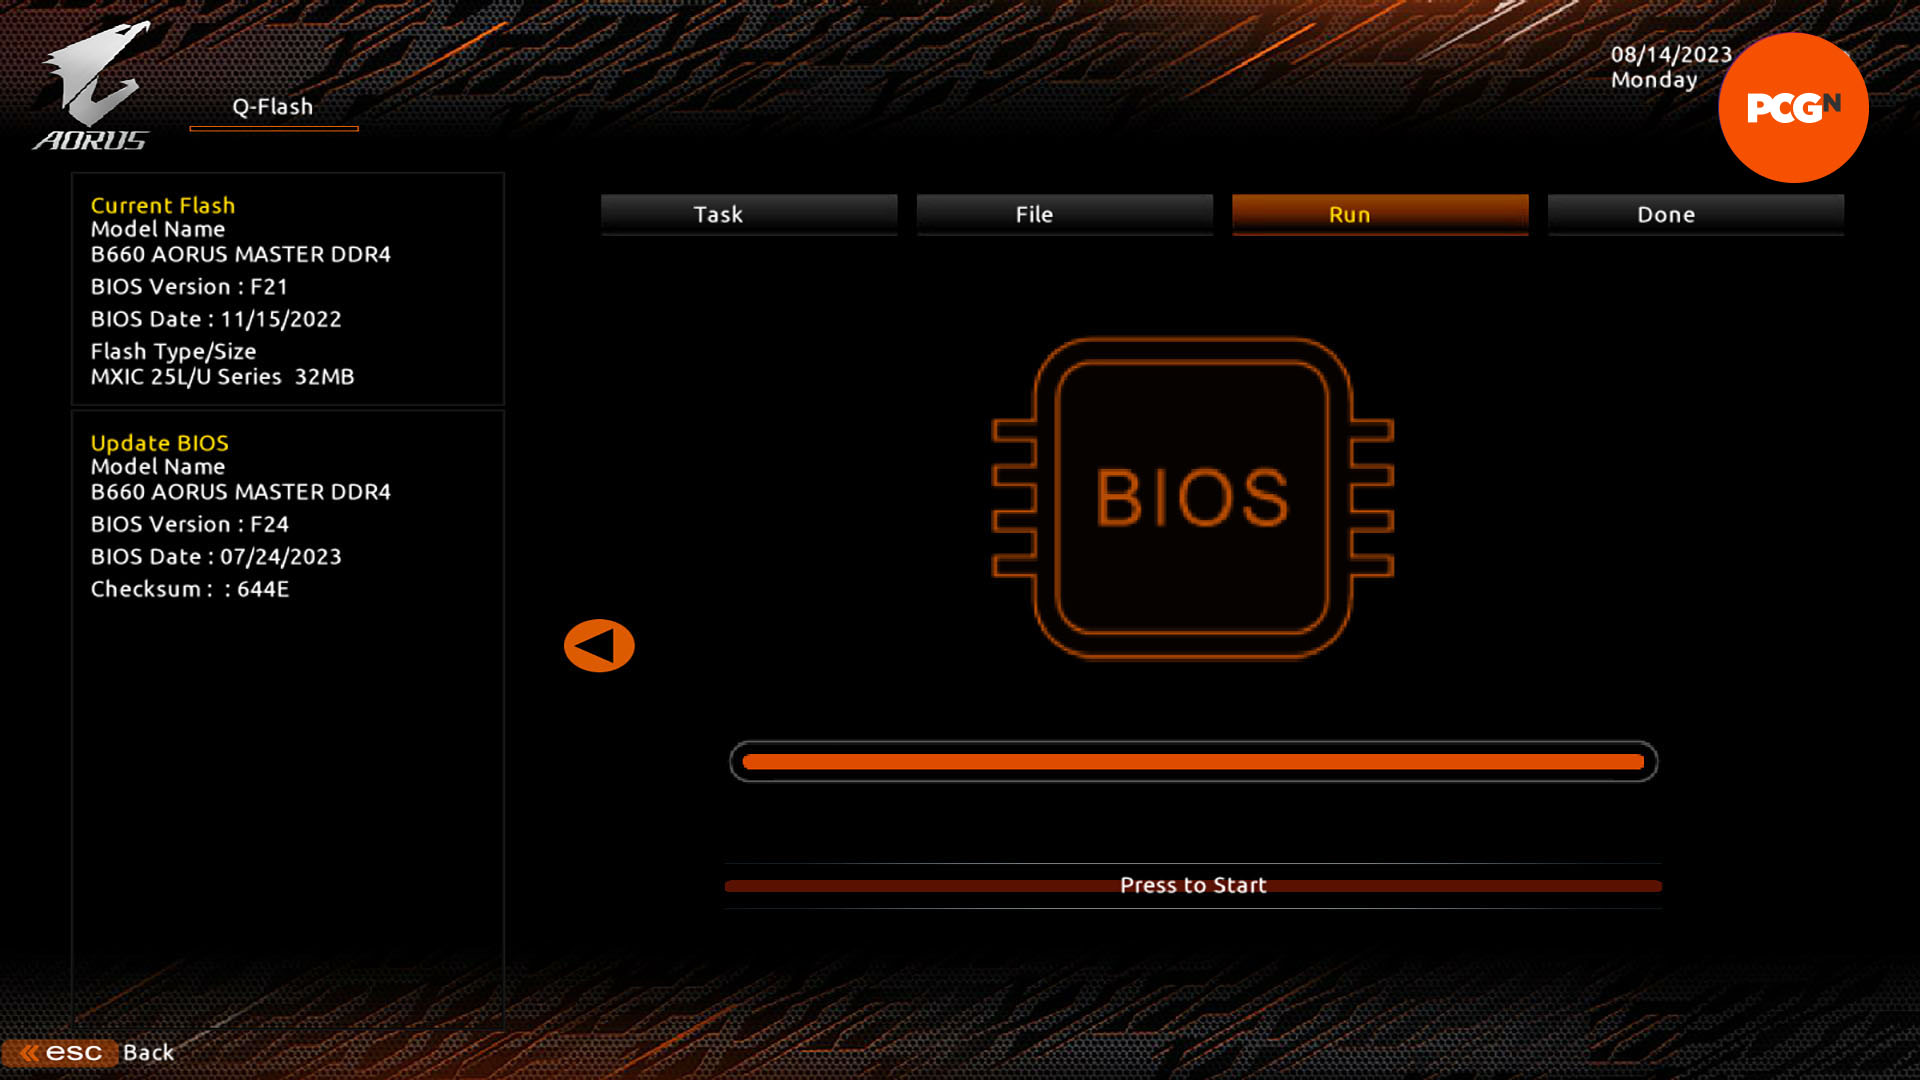
At this point, your EFI will either start flashing your BIOS automatically, or you might have one last screen to double-check everything before you set it going. In our Gigabyte EFI, the old and new BIOS are listed correctly on the left, so we’re going to hit Start to get it going.
8. Reboot system
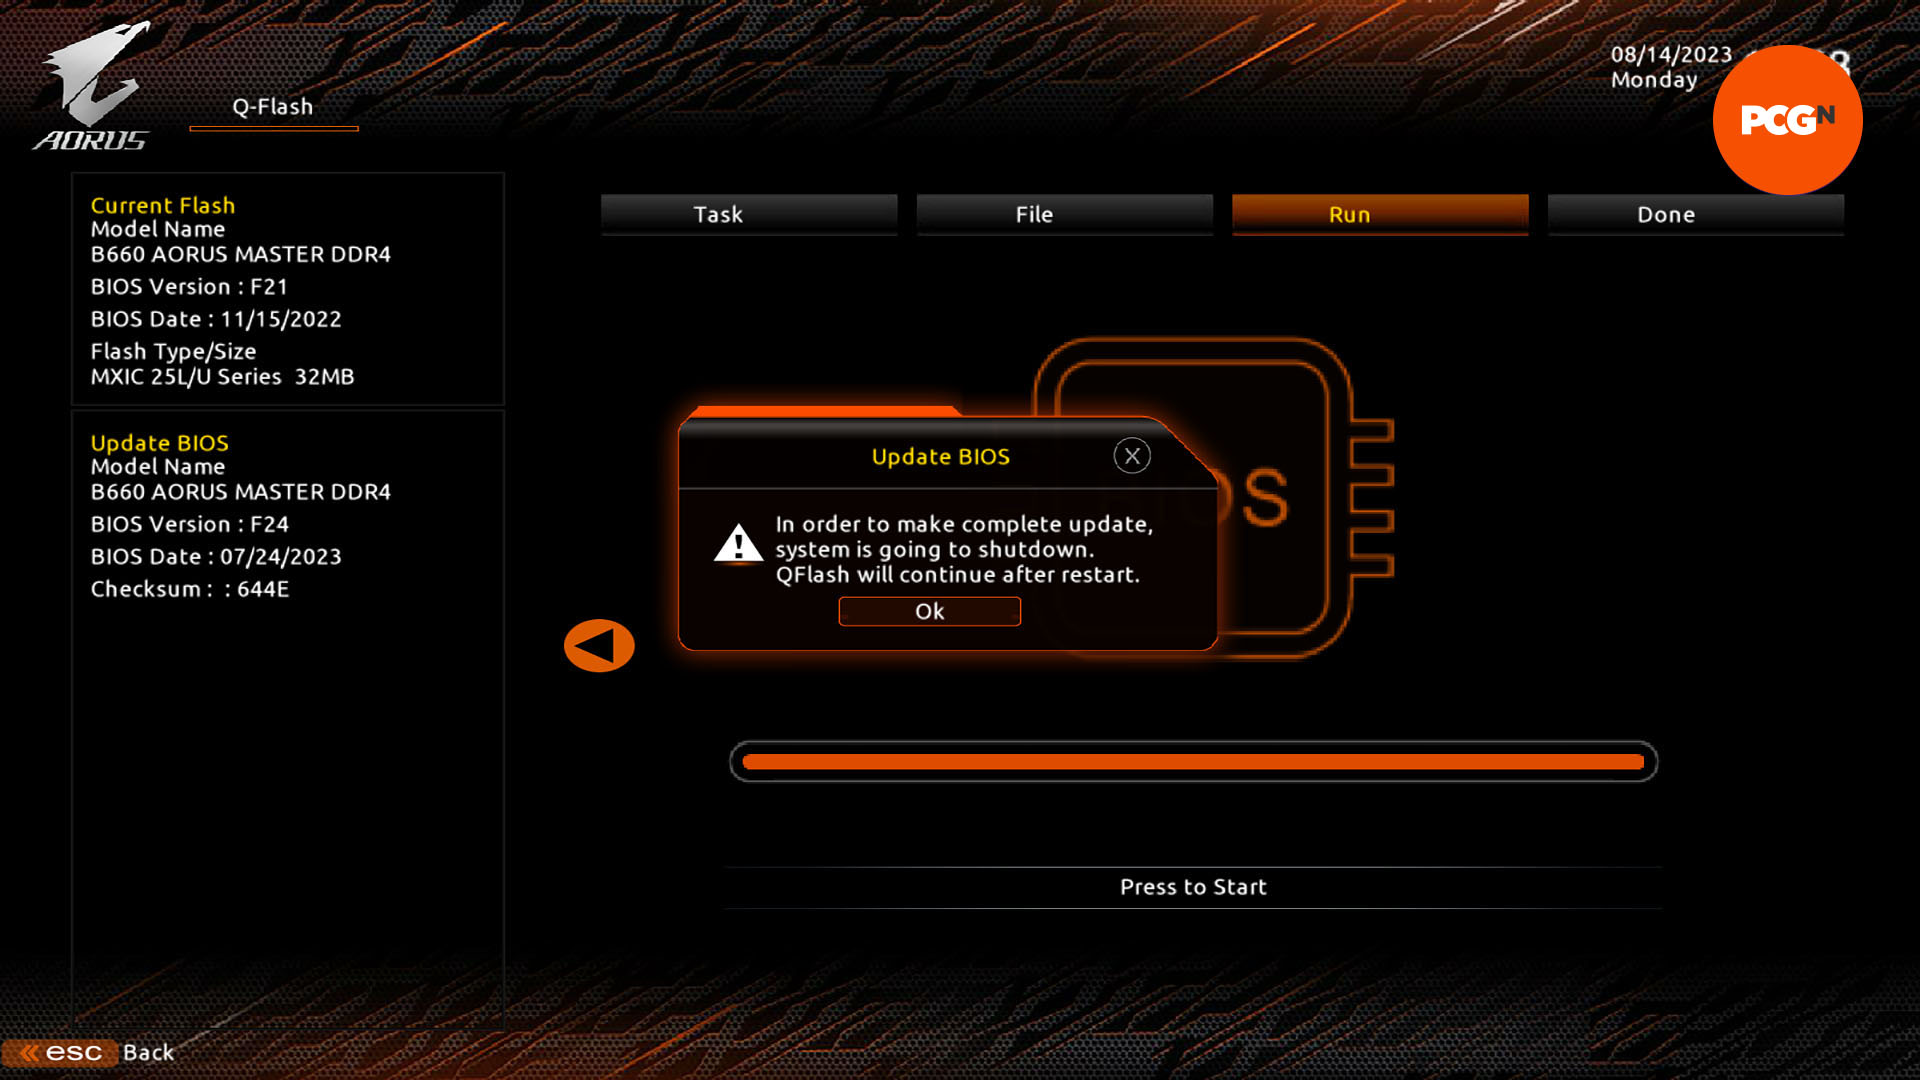
Once your EFI has finished flashing your new BIOS, it will prompt you to restart the system. Confirm this if necessary, and then wait for the system to fully restart. This will take a bit longer than usual, as it finalizes the EFI flash, so leave it alone to do its thing – don’t reset it or turn it off.
When it eventually reboots again after flashing, it will have probably changed most of your EFI settings (such as your memory XMP profile, resizable BAR and so on), so press Del to enter the EFI again and get your settings right.
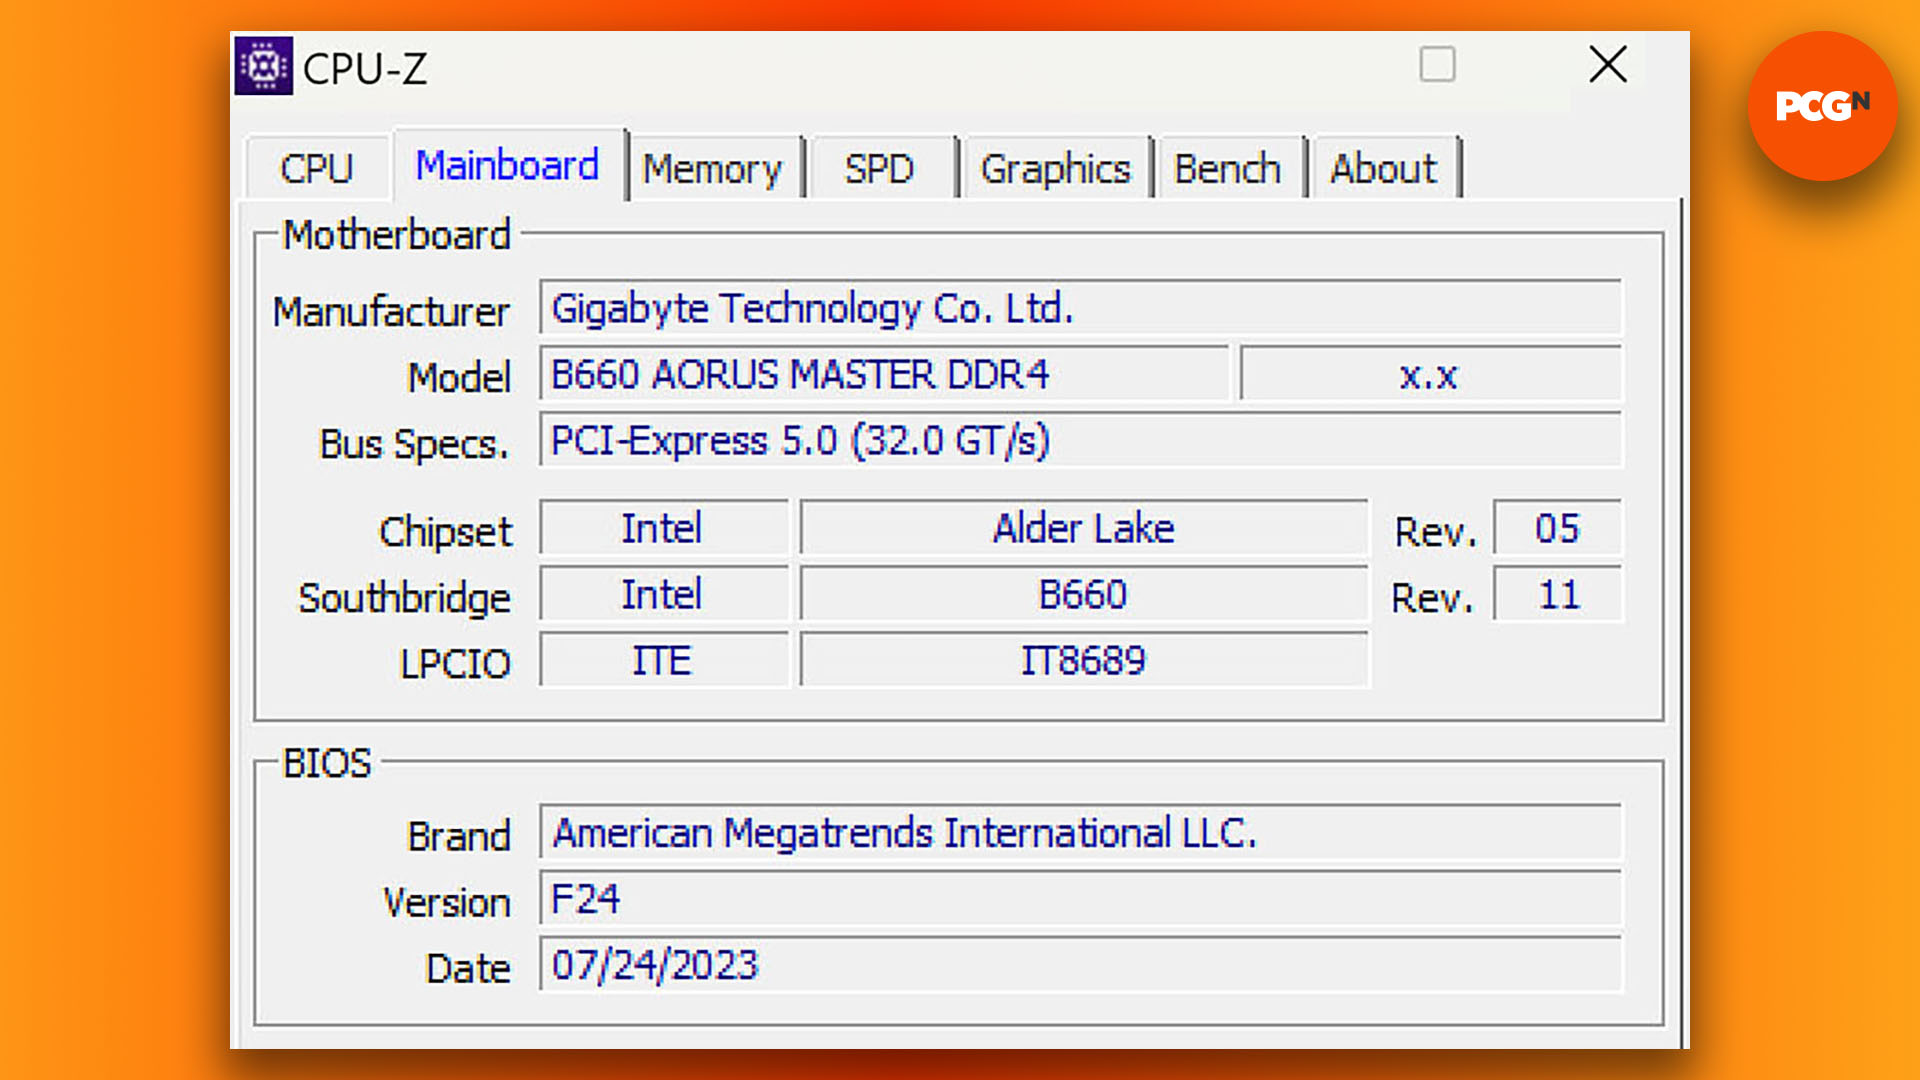
You should be able to check that your motherboard is indeed running the latest version from here too, but if not, run CPU-Z when you get into Windows, and click on the Mainboard tab. Your new BIOS version number (F24 in our case) should be listed in the BIOS section, along with the date of issue.
What if my motherboard doesn’t have a BIOS flash utility?
In the unlikely event that your motherboard doesn’t have a flash utility built into its EFI system, there is another way to flash your BIOS, and this will often be detailed in the instructions in the Zip file for your download. In the old days, this process involved booting into an old-school MS-DOS mode and using a floppy drive, but it’s now more often done with a low-level EFI shell and a USB flash drive.
Once you’ve downloaded your new BIOS update, your first step will be to make your USB flash drive bootable. You can find out how to do this in our full How to make a bootable USB drive guide – format it with FAT32, rather than NTFS, when you get to step 8.
Make doubly sure you fully read the instructions in your Zip file -if there are no instructions in the Zip file, they should be available in the Support section of your motherboard’s page on the manufacturer’s website. Rename any files if necessary, and then copy the necessary files to the root of the USB flash drive (not in a folder). Leave the USB drive plugged into your PC, then reboot it and press Del to enter setup.
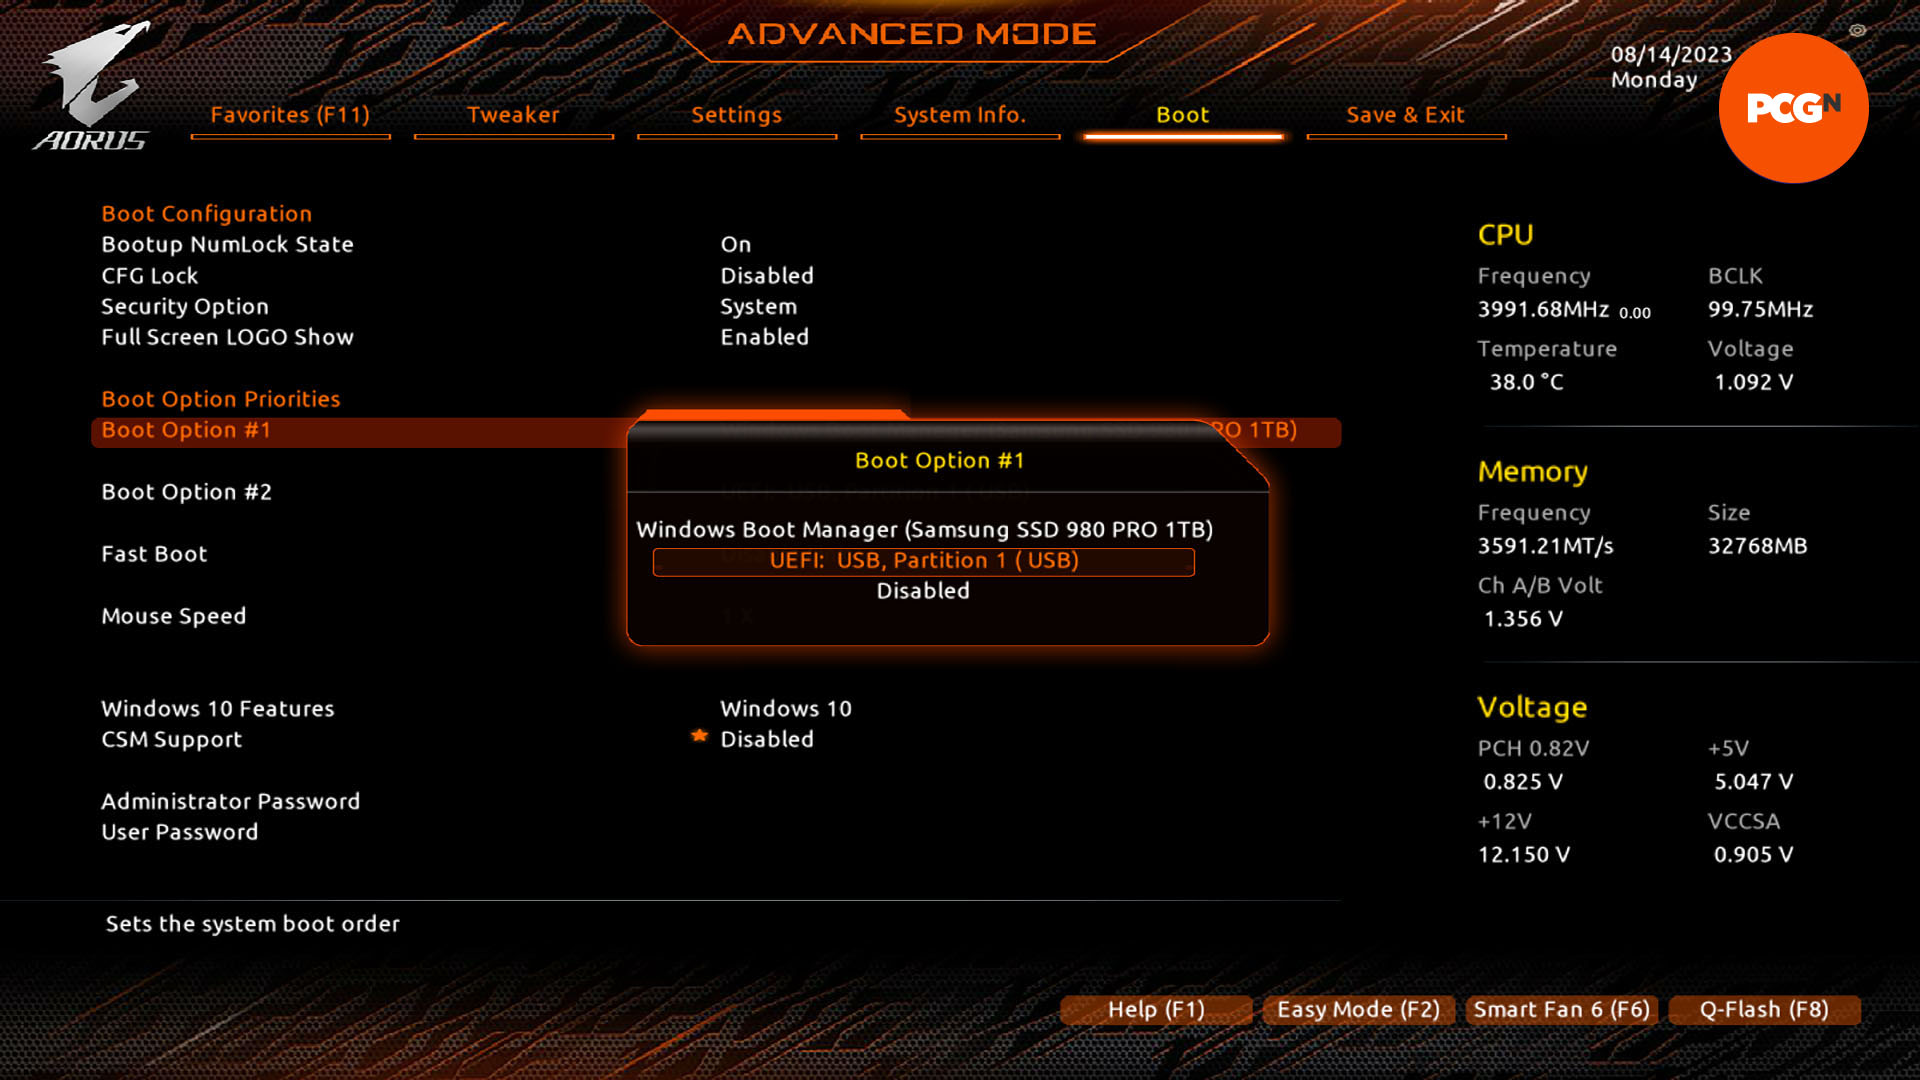
You’ll then need to change the boot order, to make sure your system boots from the USB drive first, rather than your usual SSD or hard drive that contains Windows. This may be instantly accessible from the first screen of the EFI, or you may have to find the Boot section. Either way, make sure the USB drive is set to be the number one boot drive. Save your settings and exit, then wait for your PC to reboot.
Whichever system your motherboard manufacturer chooses for this low-level BIOS flash, you’ll now be greeted with some very unfriendly-looking text, with a prompt at the bottom. From here, you can run the flash utility on your USB drive, following the instructions in the Zip file to flash the BIOS.
Can I update my BIOS without a CPU?
In the old days, there was no chance of being able to run a new CPU in an old motherboard, unless you had an old CPU handy so you could boot into your system to do it, but that’s changed on many (though not all) new desktop PC motherboards now.
A relatively modern feature commonly called BIOS flashback enables you to flash your BIOS to the latest version, even if your existing BIOS doesn’t recognize your new CPU – you don’t even need a display on your monitor. In fact, you don’t even need a CPU installed in your motherboard. If your motherboard supports USB BIOS flashback, this means you could buy an old B660 or Z690 motherboard secondhand without a 12th gen CPU, but still run a 14th gen CPU on it.
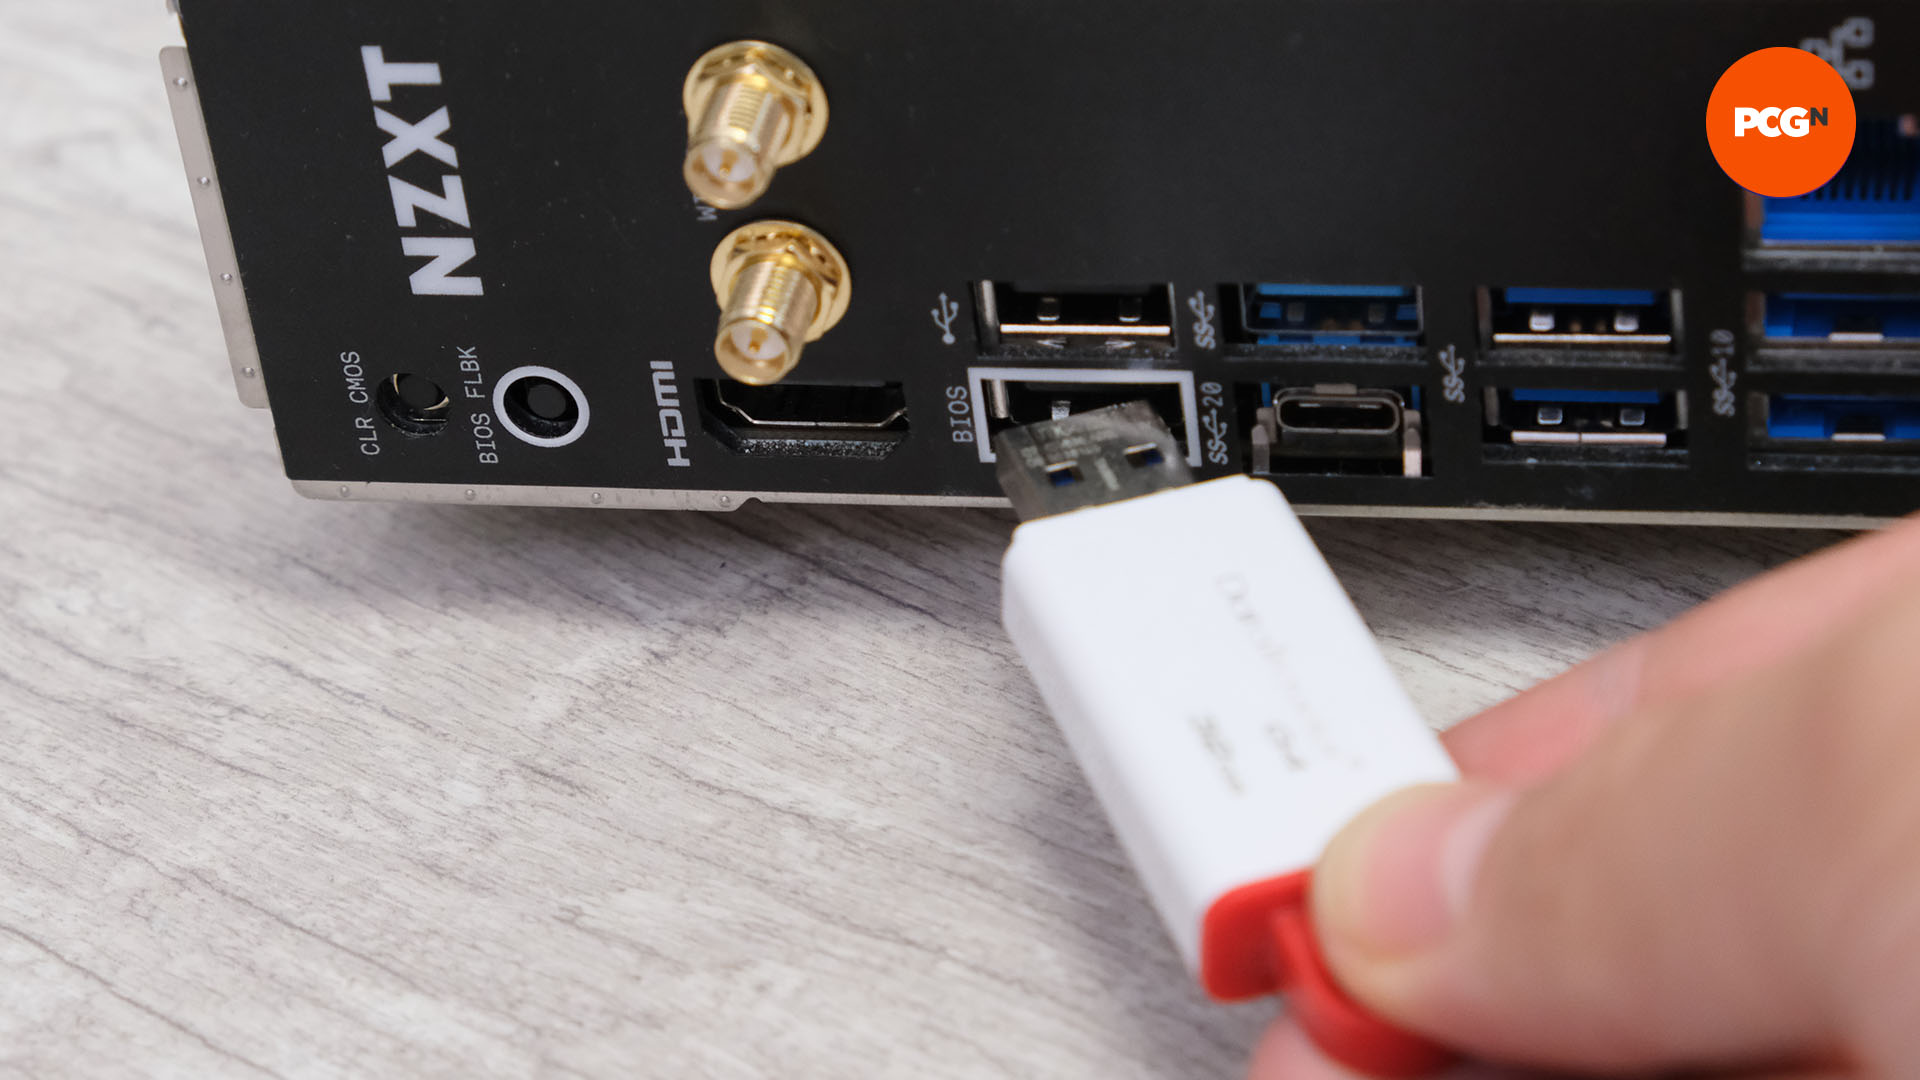
As with the above methods, you’ll need to follow your motherboard manufacturer’s instructions for putting your new BIOS file onto your USB flash drive. Put the file on the root of the drive, not in a folder, and follow the instructions to the letter. Also, as with the other methods, make absolutely doubly sure that you’ve definitely got the BIOS file for your exact model of motherboard.
Your next job is to find the USB BIOS flashback port on the back of your motherboard – it’s often labeled ‘BIOS’, or something similar, but you can always nail down its location in your motherboard manual. You now need to follow the next step in your motherboard manufacturers’ instructions, which usually involves plugging the USB flash drive into the BIOS flashback port, plugging in all the power cables on the motherboard, switching on the PSU, and then pressing the BIOS flashback button.
On many motherboards, you’ll find a light near the BIOS flashback button, which will flash to show you which stage the flashing process is currently undertaking. Don’t reset or switch off your PC, or you’ll risk bricking your motherboard. After a few minutes, the light should indicate that the flashing process is complete.
We’re all done with our BIOS update guide now, and we hope you’ve managed to update your motherboard to either accept a new CPU, or get some new features, such as resizable BAR support. If you want to benefit from the latter, make sure you read through our guide on how to enable resizable BAR, where we run you through it step by step.
If you’re going to construct a new system, make sure you check out our full guide on how to build a gaming PC, where we take you through every step of the process.
