Figuring out the best Call of Duty: Black Ops 4 classes is pretty tricky when starting out, thanks to the game’s myriad create-a-class options. So if you want to start levelling up your weapons to unlock the best attachments and mods then knowing what you want your final build to look like will save you a lot of time.
With this list of the best Black Ops 4 classes you should have no problem dominating the battlefields in multiplayer. This list of Black Ops 4 classes will give you a complete equipment list to follow as well as an explanation for each element and a what kind of play style you should adopt for it. As you cannot guarantee what Specialist you’ll play as in multiplayer, we’ve not built any of these Call of Duty: Black Ops 4 classes around specific Specialists.
You can choose everything from perks and attachments to operator mods, and optics. Black Ops 4 adopts the Pick Ten create-a-class system, allowing you to push the boundaries and create some unconventional Black Ops 4 classes like a revolver-only build or a belt-fed SMG.
Here are the best Black Ops 4 classes:
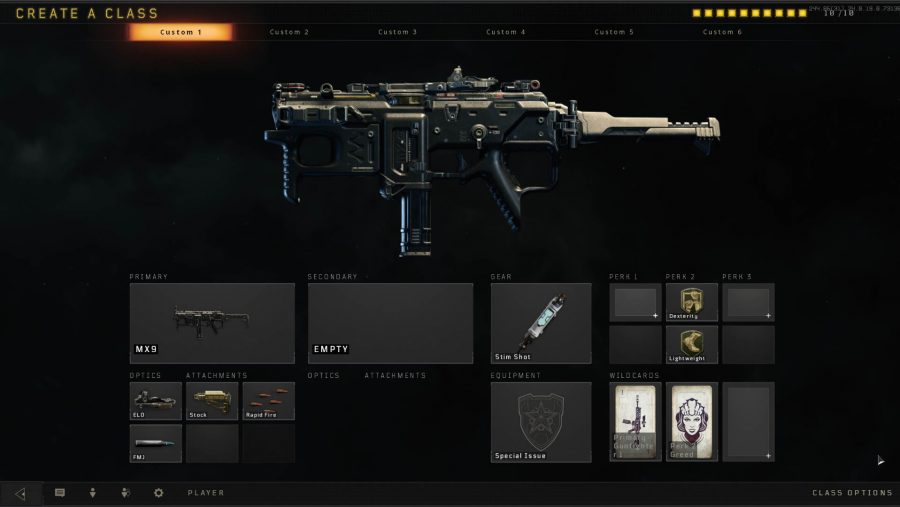
MX9 setup
Primary: MX9
Optic: ELO
Attachments: Stock, FMJ, Rapid Fire
Secondary: none
Gear: Stim Shot
Perks: Lightweight, Gung-Ho
Wildcard: Primary Gunfighter, Perk 2 Greed
Scorestreaks: UAV, Hellstorm, Attack Chopper
This assault Black Ops 4 create-a-class build is all about speed: you can kill quick, move quick, and heal quick. Playing this Black Ops 4 MX9 class is all about charging through corridors and using your powerful SMG and ability to strafe quickly and accurately to outgun enemies in close-quarters.
Widely regarded as the best weapon in the game, the MX9 is the fast and powerful SMG that forms the basis of this assault class. The ELO sight provides a very open optic that’s great for tracking multiple targets. Attached to the MX9 we have a Stock for faster movement while aiming, FMJ for quickly taking down armoured targets, and Rapid Fire to down targets faster.
As we’re constrained by the Pick Ten Create-a-Class, this class will not run a secondary weapon, but that frees up a slot for a Wildcard like Primary Gunfighter which allows us to equip a third attachment to the MX9. Another Wildcard that is important to this Black Ops 4 class build is Perk 2 Greed, which lets us equip a second ‘green’ perk – Lightweight and Gung-Ho make combine to make this an outrageously speedy class. Finally, we have the Stim Shot equipped as our chosen gear item: it heals faster, is available more often, and can be used without lowering your gun.
ICR-7 setup
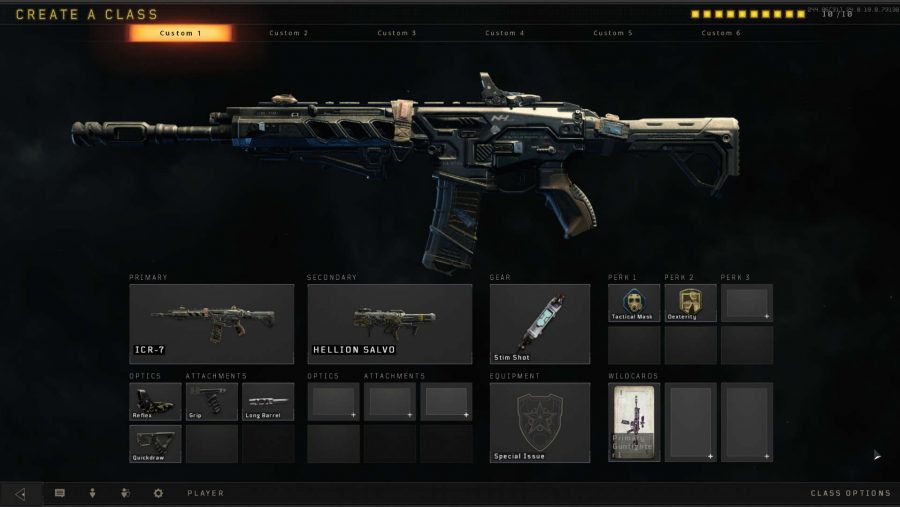
Primary: ICR-7
Optic: none
Attachments: Quickdraw, Grip, Long Barrel
Secondary: Hellion Salvo
Gear: Stim Shot
Perks: Tactical Mask, Dexterity, Team Link
Wildcard: Primary Gunfighter
Scorestreaks: Care Package, Hellstorm, Attack Chopper
If you’re the type of player who likes to anchor themselves to a key map junction or objective and slaughter every enemy who dares to wander into your line of sight then this ICR-7 Black Ops 4 class is tailored for you. The snappy, accurate assault rifle will see you through mid-range scraps while the perks and secondary weapon will provide you with some protection from enemy utilities.
The ICR-7 is the most accurate assault rifle in the game, offering reasonable damage and rate of fire with scarcely any recoil. With a Grip attached it’s even more accurate, while Quickdraw will allow you to snap into ADS rapidly and the Long Barrel will ensure your rounds still deal solid damage even over longer distances.
If you’re anchoring a point this ICR-7 setup will allow you to quickly respond to new threats, land your hits, and drop them with ease. The Dexterity perk compliments this play style even further, speeding up the kind of movements you’re likely to use while cycling between cover. Stim Shot is also helpful in this regard, allowing you to recover from damage faster, which is helpful for holding down busy lanes and objectives.
Tactical Mask and the Hellion Salvo are handy for dealing with enemy utilities and scorestreaks, meaning enemies will have to root you out of cover themselves. Team Link meanwhile is one of those sorely underrated Black Ops 4 perks that allows you to see your teammates through walls, including where they’re aiming – this is really helpful for understanding where enemies are coming from and how much of the map your team controls.
Titan setup
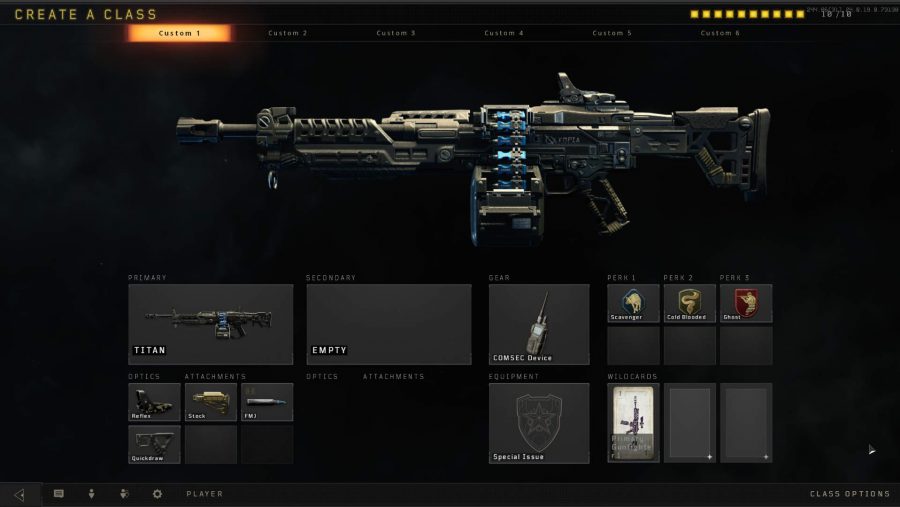
Primary: Titan
Optic: Reflex
Attachments: Quickdraw, Stock, FMJ
Secondary: none
Gear: Comsec Device
Perks: Cold Blooded, Scavenger, Ghost
Wildcard: Primary Gunfighter
Scorestreaks: Hellstorm, Attack Chopper, Gunship
This Titan class works best for players with a conservative playstyle. The high ammo count and devastating stopping power of the starter LMG make it the perfect weapon for locking down vantage points or sitting just behind your team’s frontline and mopping up any enemies who slip through. We have also built this class around achieving high scorestreaks, so you won’t get the best out of it you’re dying too often.
LMGs have been among the worst weapons available in previous Call of Duty Games, but the Titan is a little different: it’s powerful, accurate, and effective at all ranges. With a Stock, Quickdraw, and an open optic like a Reflex sight equipped it becomes a lot more mobile, allowing you to use it more like an assault rifle. The FMJ rounds will melt enemy armour, but also give you a way of countering enemy gadgets.
The combination of Cold Blooded, Scavenger, and Ghost perks will enable you to stay in the fight for longer, whether that’s ammo refills or invisibility to enemy recon. This is the only class setup you should consider the Comsec Device for – this piece of gear makes scorestreaks cheaper, making it easier to achieve high-end scorestreaks like the Gunship. Bide your time, let your teammates soak up enemy pressure, and gradually work your way toward the Hellstorm. Use that to grab an extra couple of kills, which should be enough to call in an Attack Chopper. By the time the helicopter has been destroyed or expired you should be very close to summoning in the Gunship.
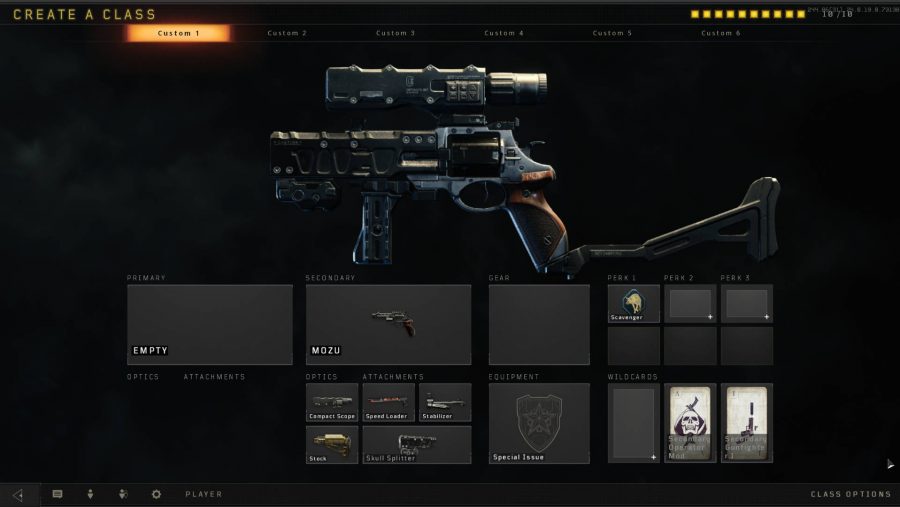
Mozu setup
Primary: none
Secondary: Mozu
Optic: Combat Scope
Attachments: Skull Splitter, Stock, Speed Reloader, Stabilizer
Gear: none
Perks: Scavenger
Wildcard: Secondary Operator Mod, Secondary Gunfighter
Scorestreaks: Care Package, Hellstorm, Attack Chopper
Entering battle with nothing but a handgun might not sound appealing, but this Mozu build turns the Black Ops 4 revolver into a powerful sniper rifle that’s capable of one-hit-kill headshots. That’s thanks to the Skull Splitter Operator Mod, which guarantees lethal headshots at any range, so aim high for instant kills.
By strapping nearly every attachment available to the Mozu you can make it a much more viable primary weapon. The Speed Reloader will put your reload time on par with that of a magazine-fed weapon, while the Stock and Stabilizer will make boost your movement speed and accuracy while aiming through your Combat Scope.
The Mozu is already a very powerful pistol, so three or four shots should take anyone down, but with Skull Splitter and a fortuitous recoil pattern you will regularly score one-hit-kills. As you’ll be spamming shots at enemies, ammo can be an issue after your first couple of kills, so having the Scavenger perk is essential for going on those longer killing sprees.
Belt Feed Cordite setup
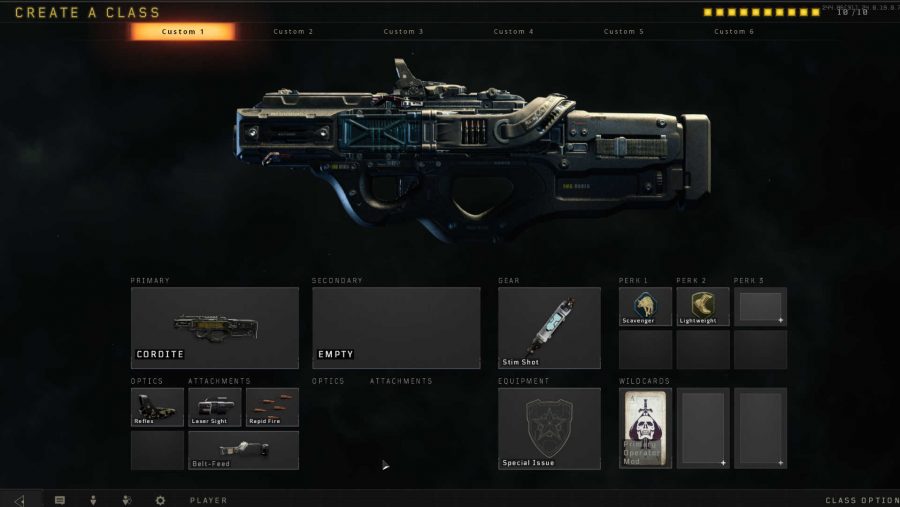
Primary: Cordite
Optic: Reflex
Attachments: Belt Feed, Laser Sight, Rapid Fire
Secondary: none
Gear: Stim Shot
Perks: Scavenger, Lightweight
Wildcard: Primary Operator Mod
Scorestreaks: Care Package, Hellstorm, Attack Chopper
Spray-and-pray is the term that best defines this Cordite Black Ops 4 class setup, which makes the most out of the frankly bonkers Belt Feed Operator Mod for the Cordite SMG. Belt Feed eliminated the need to reload – though you’ll have to watch out for overheating – allowing you to fire with reckless abandon and clear out corridors with ease.
With this setup, we’ve doubled down on the Belt Feed Operator Mod with attachments like Laser Sight and Rapid Fire, so you can hammer enemies with even more bullets per second and switch between ADS and hip-fire without sacrificing too much accuracy. If you manage to burn through the 500 rounds you spawn with then the Scavenger perk will keep you topped up.
Stim Shot and Tactical Mask can both be replaced if you’re not a fan of them, but both compliment the aggressive playstyle of this Black Ops 4 class setup.
Auger DMR Double Tap setup
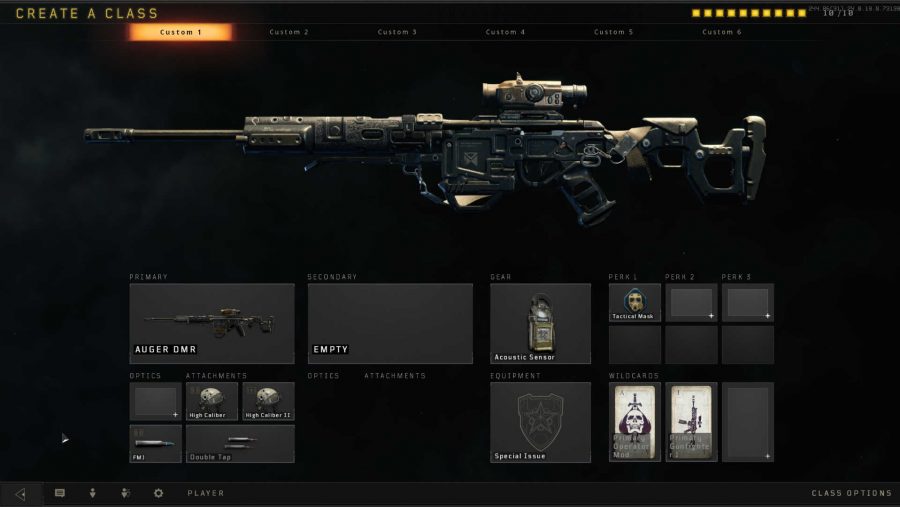
Primary: Auger DMR
Optic: none/default
Attachments: Double Tap, High Calibre I, High Calibre II, FMJ
Secondary: none
Gear: Acoustic Sensor
Perks: Tactical Mask
Wildcard: Primary Operator Mod, Primary Gunfighter
Scorestreaks: UAV, Hellstorm, Attack Chopper
Unless you’re a skilled quickscoper, you probably won’t have the best time with sniper rifles in Call of Duty: Black Ops 4 multiplayer. The high pace of gameplay and rarity of long lines of sight make landing multiple hits on an enemy before they’re able to reach cover very difficult, so a semi-automatic rifle like the Auger DMR is often more effective.
Already a powerful, accurate, and dynamic long-range option, the Auger DMR is transformed into a death-dealer at all ranges when equipped with the Double Tap Operator Mod. As the title suggests, this attachment grants the Auger DMR burst-fire, which effectively doubles the rifle’s damage output. It only takes two bursts to kill with this attachment, but our build makes it even more powerful with additions like High Calibre I and High Calibre II, which buff damage to the head and torso.
Fortunately, the Auger DMR comes already equipped with a solid optic, which frees up a slot for an additional perk or attachment. We’ve gone with FMJ rounds to ensure that high damage output isn’t doesn’t disappoint against armoured enemies, but really it’s up to you. Tactical Mask offers solid protection against a variety of enemy gadgets, making it a good pick when there’s only space for one perk in your build. We’ve gone with the Acoustic Sensor for our gear choice as it will give you a slight edge in detecting enemies, but Team Link would be a solid replacement.
Mog 12 Dragon’s Breath setup
Primary: none
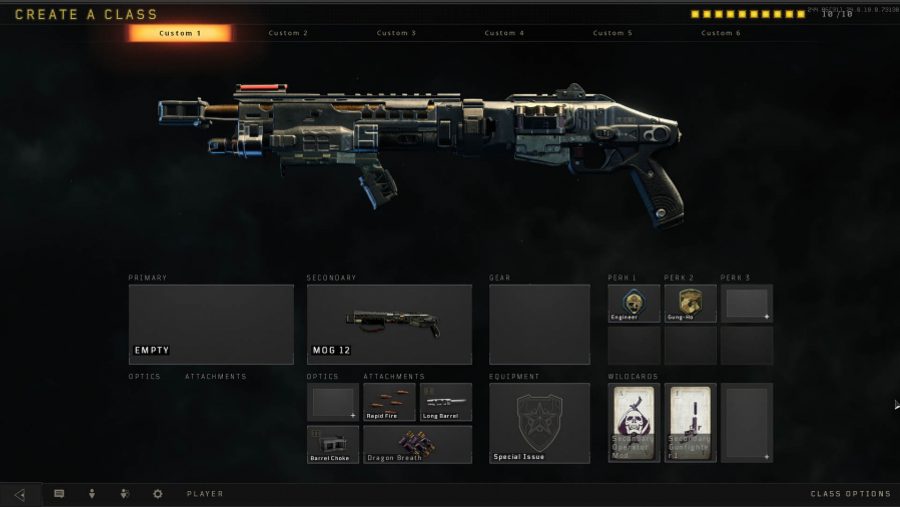
Secondary: Mog 12
Optic: none
Attachments: Dragon’s Breath, Rapid Fire, Long Barrel, Choked Barrel
Gear: none
Perks: Engineer, Gung-Ho
Wildcard: Secondary Operator Mod, Secondary Gunfighter
Scorestreaks: UAV, Care Package, Attack Chopper
Unfortunately, shotguns have been consigned to the role of secondary weapons in Black Ops 4, so they’re generally pretty weak. However, with the right attachments and dedication to the cause, you can mod the Mog 12 into a lethal weapon capable of close-quarters carnage.
For starters, you’ll want Dragon’s Breath, the operator mod for the Mog 12 that sets enemies on fire with each shot. Unlike in previous Call of Duty games, this fire doesn’t actually deal any damage, but it does slap enemies with a trauma status effect that slows them down and stops them from healing for a considerable duration. This Operator Mod makes it extremely hard for enemies to get away from you or recover once you’ve connected the first shot, and even if you can’t kill them, someone one your team probably will. The Rapid Fire attachment dramatically shortens the waiting time between shots, while the combination of Long Barrel and Choked Barrel increase the effective range of this class, especially when aiming down sights.
As you’ll be sprinting around and looking to close enemies down, you’ll benefit from Engineer, which highlights enemy traps through walls, and Gung-Ho as it lets you fire your weapon while sprinting. Playing this class is all about speed and aggression, so being able to avoid traps and fire while sprinting is godsend.
