
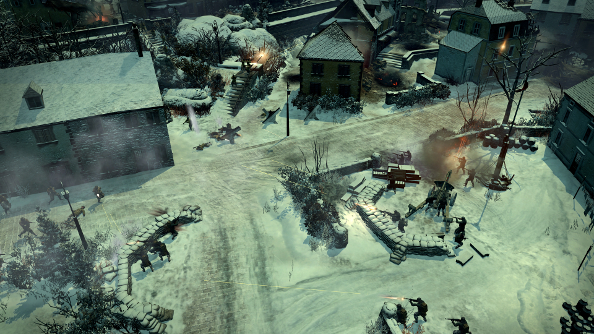
A relentless barrage of mortar strikes rain down on our position. Charging through the pitted, smoke-filled town square means running right into a fierce German tank. My allies in the north shout down the radio – they need help, they need artillery support, but all our artillery has been destroyed by the Germans. We have to charge now. Even if it’s suicidal, we have to push forward.
This is my third attempt at Company of Heroes 2: Ardennes Assault’s Houffalize mission. It is nothing like the other two. My primary goal and the environment is the same, but everything else is different. This is Relic’s World War 2 strategy game at its most dynamic and most surprising, and even as my men die in collapsing buildings and behind blown up cover, I’m hooked.
Where Relic’s last Company of Heroes 2 standalone, Western Front Armies, revitalised the series’ multiplayer, Ardennes Assault is poised to do the same for the single-player. It’s a new campaign inspired by the Battle of the Bulge, and pits the US forces against the German war machine.

The original campaign on the Eastern Front was a series of missions linked by a single linear narrative, but this time around choice is pushed to the forefront with as much of a focus on big picture strategy as real-time tactics. It feels like a war, rather than just a chain of battles, where failure doesn’t mean the end of the game, and victories can be devastating.
“It’s sort of more sandboxy, I guess,” Relic’s Mitch Lagran tells me. “But there are narrative elements that arch through it. Obviously the Battle of the Bulge had its own narrative, and the result of what you do in those missions, that has a different impact. There’s a narrative that happens with that, but we wanted a lot of that to be emergent, so the player’s own choices are drawing that out.”
It starts on a “meta map” revealing the entire war, and immediately choices need to be made. Three companies make up the playable US forces: Dog Company, Able Company and Baker Company. Each company specialises in support, airborne and mechanical warfare respectively. They are all led by different officers, too, each with their own personalities and stories. All three are present on the meta map, and each can be controlled there.
“We actually tried to keep it quite close to how [Western Front Armies] played,” Lagran explains. “We want players to have a continuous experience between multiplayer and single-player. Obviously each company has its own special bits. So a lot of the core tuning and balance is based on the multiplayer, and then each company brings in their own special, unique abilities.”

The goal of these companies is to defend and liberate territory on the meta map and push the Germans back. Within this map are 18 scenarios with different battle types, random objectives and scripted missions. While I only played the Houffalize scenario, each time I played it, the mission transformed into something new.
I eased myself in by selecting a save point set early in a campaign on normal difficulty. This meant that my troops weren’t experienced, and I was unable to spend many points on customising them. They were fresh, though, and were ready to leap into battle. I opted to bring in Able Company, the airborne fellas.
The scrap went very well. The goal of Houffalize is link up with another unit north of the town. The only problem is that the Germans are right in the middle, whittling down the other unit while stopping the two forces from combining. They were not match for many company, though. Capturing German artillery, I was able to send barrage after barrage at their troops attacking my ally, as well as any large groups of them within the town itself, and this made it pretty simply for the rest of my men to move from building to building until we hit the battle in the north.

Throughout, I used the company’s unique abilities to wipe the floor with the Germans. Paratroopers dropped from the sky, into unsuspecting groups of foes; planes took out progress-halting tanks; and then more planes filled the enemy with bullets.
My confidence bolstered by this early victory, I went on to see similar success in my second attempt, where my mechanised company, complete with upgraded abilities, clashed with a much more advanced German force. They were more aggressive, harder to kill and fielded tanks and half-tracks, unlike the last group. But they were defeated anyway.
“Difficulty affects enemy composition to some degree,” Lagran tells me after the battle. “But the bigger part is basically the enemy strength. So you have little iron crosses that show on each mission. That depicts the amount of enemy forces in that area. For each mission, they’ll actually reinforce in different ways, so on the briefing screen it will give you a list of exactly what that node strength is adding. Maybe if you’re on node strength 5 there’s going to be a King Tiger present on the map, well that’s going to change up what’s happening. It’s actually quite deliberate changes, and it will dynamically change as the Germans reinforce the missions on the map.”
It was during the third attempt that everything started to fall apart. Using the support company, things started normal enough. I quickly attempted to gain control of the enemy artillery, and when I snatched the first one I got into the rhythm that had held me in good stead before. That wouldn’t last.

The attack on the second German gun was a clusterfuck. Two vehicles accompanying my men were destroyed quickly by hidden enemies in buildings with anti-tank weapons, and then a stream of Germans poured out of a side street, flanking my troops and mowing them down. In the chaos, the gun itself was destroyed as well.
I obviously spent too much time contemplating that failure, because I hadn’t spotted the one gun I had managed to capture being assaulted by the enemy. When the tank appeared, though, it got my attention. It rolled in, taking out one of the buildings I’d stationed men in, and then proceeded to lay into the artillery. By the time I put together a counter attack, the tank had done its job and the gun was no more.
The fight wasn’t over, though. Even without the artillery, I still had to save my ally. If I’d been playing as the airborne or mechanised companies, this would have been a hairy situation, but Dog Company has a lot of tricks up its sleeve. Being the support company, they don’t sound very aggressive, but they do tremendous amounts of damage to an enemy force. They come with special artillery abilities, you see.

“Sometimes I love looking back at the map after going through it with support and thinking ‘Oh my god, look at the destruction I’ve wrought’,” Lagran says after I enthused about my support playthrough. It’s essentially very violent terraforming.
With these powers waiting to be unleashed, bombardment could recommence. Less effective than if I still had the guns, certainly, but it cleared some of the way for me. It was still a slow, agonising push, though, and the Germans were throwing everything they had, especially tanks, against me.
Lamentably, I was unable to finish that conflict, as my time with the game was up. Had I continued, though, it would not have been much of a victory. Since each fight is part of a larger war being played out on the meta-map, pyrrhic victories are meaningful. Winning, but only just, has an impact on the company, weakening it to the point where it won’t be effective at all unless the damage to the health of the company is repaired.
What defeat means has changed, as well. Even if an entire company is wiped out – which can happen if you lose a battle and have no troops left – the war continues regardless. It’s possible to end up fighting off the Germans with a solitary company. And it’s possible to end up doing this and winning. It’s changed for the enemy, too. A defeated German force will retreat after a battle, and they can even join up with another group, reinforcing it.
“You’re consolidating their forces if you’re letting them retreat,” Lagran explains. “If you’re not blocking them or cutting them off – you can cut off German territories with allied territories if you’re being clever about which missions you’re taking – they’ll just go and reform.”
So it’s just as imperative to keep an eye on the meta map, controlling it and predicting enemy movement, as it is within one of the scenarios. Risks and opportunities other than missions pop up on the map from time to time, making navigating it, trying to find the most efficient ways to reach a foe, tense. An opportunity for an ambush might present itself, like a Choose Your Own Adventure, or convoy of enemy tanks might be discovered, but failure is a possibility and will lead to a weakened company.
Ardennes Assault is an ambitious shift in perspective. For the first time, a Company of Heroes game feels like its taking place in an evolving war, and it’s a war where players can choose how to proceed, making big, sweeping changes to the direction of the campaign. In and out of battle, I found myself making tough decisions, second guessing myself, constantly wondering if risks were too great and where that would leave my company when it came to the next battle. And that’s even without there being a next battle, because I only had access to one mission. Yet the game encourages that mindset.
Though it’s a standalone expansion, the huge changes to the formula and the inclusion of big picture strategy makes Ardennes Assault feel more like a sequel.
The Company of Heroes 2: Adrennes Assault release date is November 18th. Check it on Steam here.