
Minecraft has a sort of fuzzy, low-fi charm to it that makes taking static screenshots of a build a bit troublesome: you’ll never get amazing lighting, sharp lines, or anything approaching gritty realism. For that you’ll need a renderer.
Now there are two ways of doing it: the complicated way that involves multiple programs, one to generate a 3d model of a map that’s useable in something like Blender; but I’m going the easy route and using Chunky.
Chunky is basically My First Renderer. With some work and patience you can get lovely results and using it, but it’s never going to be as effective as Blender. But that’s okay if you just want to try it out. Rendering takes up a lot of resources, so this is only really worth the effort if you have a decent CPU powering your PC.
It only works with maps saved to your PC. If you have something worth rendering in the world place your character in the vicinity and save the level. It’ll help when finding it in Chunky.
Download the program and leave it somewhere you can find it and unzip it to a folder. Inside there’s chunk.jar – run it. The UI is rather simple compared to major rendering programs: first thing you need to do is Select World and choose the one with the area you want to render.
You’ll get a top down view of the map. Left click anywhere on the map: rendering is a delicate process and you can mess it up easily if you over reach. The red box that appeared when you clicked? That’s what the program will try to render, so only select your build and a tiny bit of the surrounding area. You should see a small icon showing where you left your player, which will help you navigate the world.
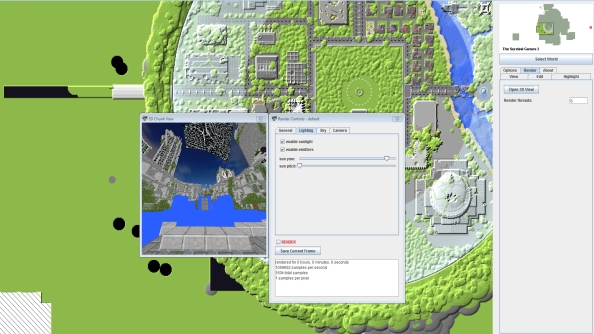
With that chosen you can add your current texture pack if you like, telling the program where to find it in the “Options” menu. Ignore the other options and press the Render tab and select “3D view”. Now you’re where the magic happens. A box will appear showing a view of the world. Click the “Camera” tab and select “Move camera to player” and it’ll show you the PoV of the player you left in the game. You an move the view around with WASD and the mouse keys, dragging the camera around the scene to get the best view, even up into the air. toy can adjust the FoV in the camera TAB as well, to enable a wider or narrower focus.
Now click on “Skymap”: if you want a background to your image, you’ll need to load an image. It can be anything, but the program suggests a few here.
You can also adjust the angle of the sun in the lighting tab, so you can give the scene any time of day you want. This is particularly nice if you want to render torches: set the angle of the sun low and it’ll be night in the render.
With that all set hit the “General” tab. This is the final, major tweak. The “canvas” settings impact the performance of the program a lot: it’s originally set to 400 by 400, a tiny size because it knows how demanding the process is. You can change it to whatever you want, but high, desktop sized numbers will require overnight rendering.
In all these tabs there’s a “Render” checkbox: select it when you’re done and the process will begin. The rough image in the 3D view will begin to smooth out. The longer you leave the program, the sharper and cleaner the image will be. There’s no automation from now on: you have to decide for your self when you’re happy with it. Ten minutes? An hour? Overnight? More complex images will certainly need lengthier processing. When you’re happy, click “Save current frame” and the program will dump a .png file to your desktop.
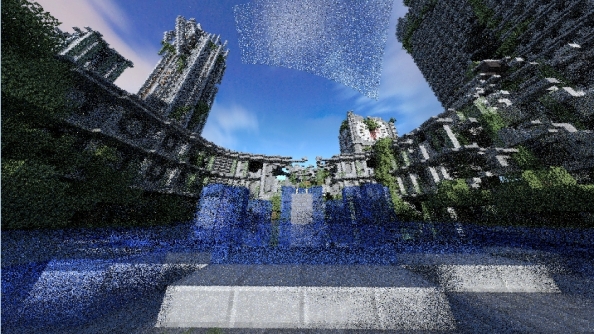
Is that it? Well, yes. But there are variables you can play with in the program: you can place the camera far away from the rendered chunk and use the FoV to zoom: you’ll get an interesting effect. Play around with different angles, lighting options, render times, and backdrops. It’s up to you to decide what’s pleasant and what you hope to achieve, but aim for something that Minecraft can’t produce and feel free to share it below. You can check out the best Minecraft builds for some crazy Minecraft mega builds.