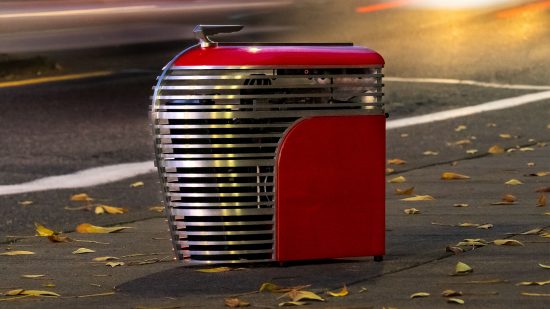
With its shiny candy apple red panels, and aluminum front grille, this classic car PC build takes inspiration from the 1930s hot-rod era. Built by PC modder Josiah Fast, this art deco PC is based on the design of the 1938 Graham Spirit of Motion, which incidentally is the name of this PC build.
Thanks to our rapidly growing PC building Facebook page, we’ve seen some truly inspired custom gaming PCs. You can even submit yours for consideration right here. Here and now though, Josiah tells us how he built this classic car PC build.
PCGamesN: What inspired you to build this PC?
Josiah: This project came about because my dad started gaming in recent years. He had an older laptop he had been both gaming and working on, and it was in need of an upgrade. So, I wanted to build him a desktop computer that would let him play games at above low graphic settings. The extra fun part of this build was that I wanted the specs and design to be a complete surprise for him.
How did you plan and design this build?
Solidifying the concept and design of the Spirit of Motion was a multi-month process. I created lists of his favorite things, asked him some leading questions, and landed with a rough plan for an art deco era car’s front grille with Candy Apple Red paint.
He has always loved early automotive design and hot-rod-era candy red paints. Combining these two was a welcome challenge. I started with numerous hand drawings in my notebook, and once satisfied with the shape, I moved to 3D modeling.
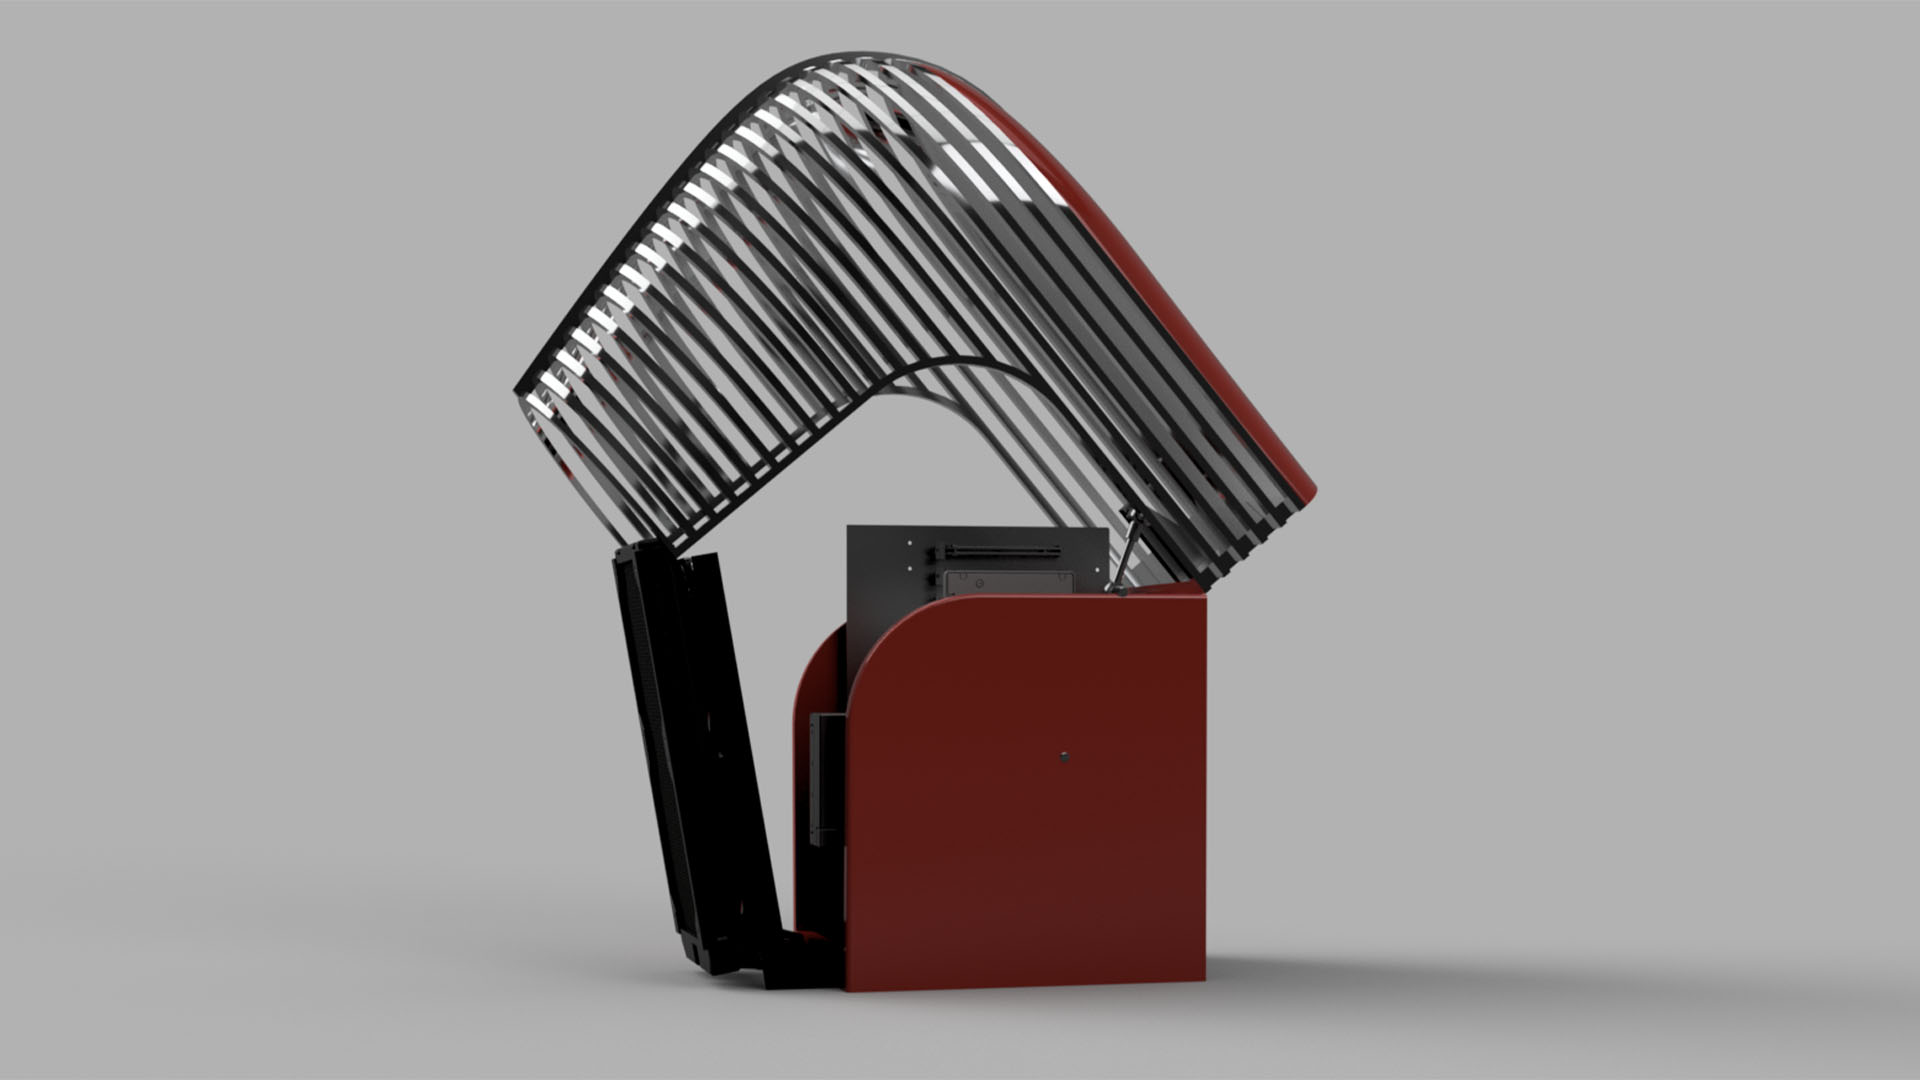
The design inspiration came most specifically from a 1938 Graham Spirit of Motion, an icon of 1930s automotive styling. For instance, despite significantly increasing the difficulty of manufacturing the case, I wanted to make the case wider at the top than the bottom to match that car’s hood (bonnet) shape. This also lends the overall design a sense of motion, from the forward-leaning and rising shape.
I also thought it would be great if you could access the hardware like you would in a car as well, so the grille needed to lift like a car’s hood. This led to the need to run the motherboard upside down to keep all the rear I/O as low as possible, as the hinge and mounts for the hood took a good deal of space on the rear of the case.
What tools, machinery, and materials did you use?
I don’t currently own a 3D printer, CNC mill, TIG welder, laser cutter, water jet cutter or metal brake, yet I needed them all to make this build a reality, and I couldn’t afford to pay someone else to make all the parts for me. But where there’s a will, there’s a way.
I hired out the laser cutting, sheet metal work and water jet cutting to two local businesses. Along the back and bottom of the PC is a single sheet metal piece that I paid a metal works shop to laser cut, bend and powder coat in black with a light texture.
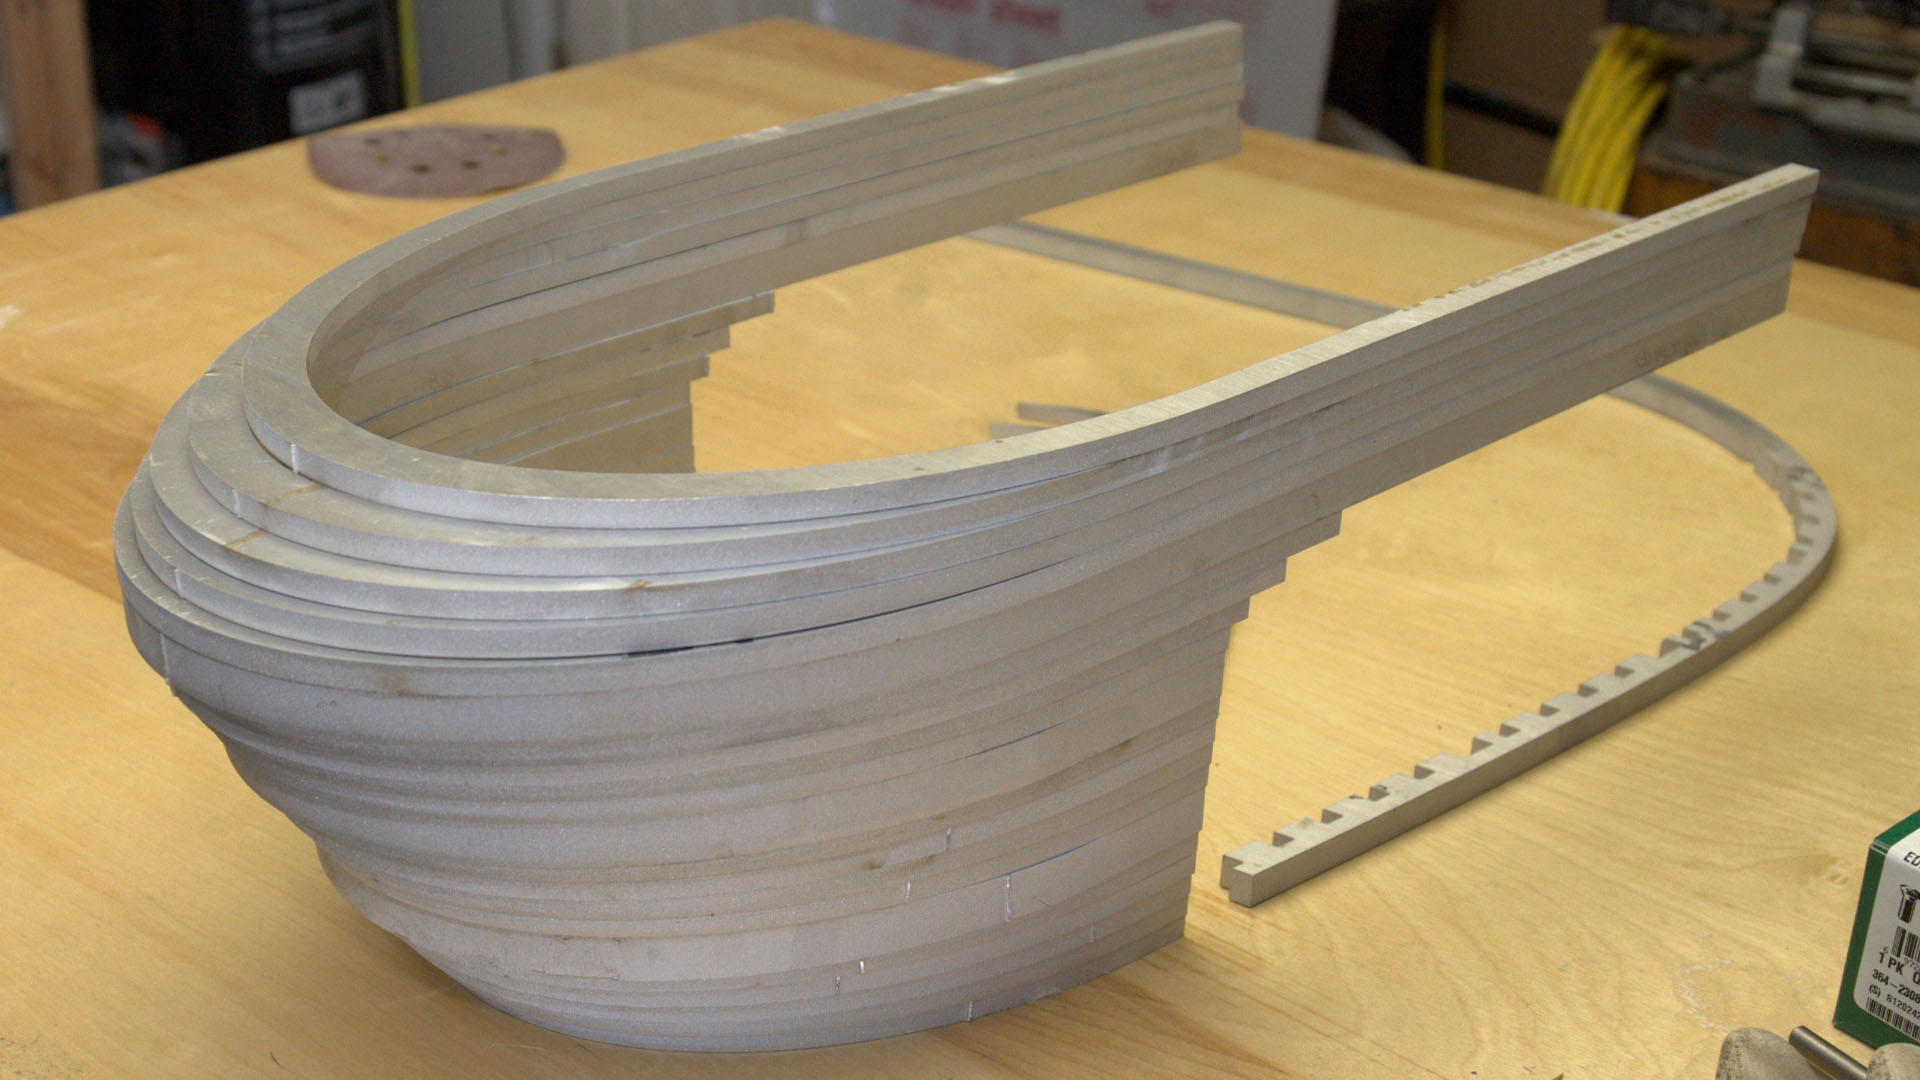
The grille is created with 25 unique pieces of aluminum, so I had to create that many unique 2D drawings for the water jet cutter. Pieces were cut from 1/4-inch, 3/8-inch and 1/2-inch aluminum plate. While those pieces were being made for me, I took off on building everything else.
There’s a machine shop roughly 30 minutes away from where I live, so I visited the owner and struck a deal. I worked for him at his machine shop after work each day, and he would give me access to his CNC mill and TIG welder. I learned a tremendous amount from him and was able to use tools I’m unable to own myself.
The frame was one of the most critical components to this being a successful build. A large radiator would hang from the front of the frame creating a twisting force, the heavy grille would also hinge from the back of this frame creating a much greater twisting force, and all the computer hardware needed to be mounted and fit perfectly between those. So two side panels and two cross bars make up the frame that was CNC machined from 0.5-inch-thick 6061 aluminum plates.
Because these side panels would show and be painted red, I couldn’t use screws to join these pieces. The solution was fully TIG welding the frame. Using the same material, and while I had access to the CNC, I also did all the cutting, drilling and tapping I needed for several other mounts and brackets within the frame.
I picked up the water jet-cut pieces from the local business, and this is when it first began sinking in that I may have underestimated the amount of time it was going to take to create this solid aluminum grille. This was easily the most labor-intensive and difficult part of the build. Naturally, it’s also the feature that really sets it apart.
My grille design has each individual piece curving with the shape of the spine yet the water jet cuts material at a 90-degree angle. So I hand-shaped, with a saw and files, the front angle of every grille piece to fit perfectly into the grille’s spine. I had to be extremely careful because there were no extra pieces, and the final finish for the grille is raw polished aluminum. There wasn’t an opportunity to hide mistakes with fillers or paint.
Before I could weld, I spent days polishing the top and bottom side of each piece to an almost mirror finish. I did, however, finish the backs of each with a brushed finish, which saved me a ton of time and didn’t compromise the aesthetic.
Welding was an adventure and after only a couple of small fires, I had the lower section of my grille taking shape. Before welding the upper section of the grille I needed to attach the hinge and back plate. There was no way I was going to chance a misalignment of the grille.
The hinge is a beefy piano hinge that I cut down to the exact width needed. I proceeded by drilling and countersinking holes in the hinge, drilling and tapping threads into the frame and backplate, and lastly mounting the hinge assembly. With that complete, I centered the grille to the frame and welded the remaining upper grille pieces to the backplate.
This next step was the only part of the build I didn’t enjoy, as it was hours upon hours of sanding, grinding, hand filing, buffing and polishing. I needed to shape the entire outside surface to match the contour of the spine. This is a complex compound curved surface that’s extremely difficult to maintain without introducing flat spots or mistakes. Any error in the finish would be immediately noticed due to the light reflections off the eventual polished aluminum grille.
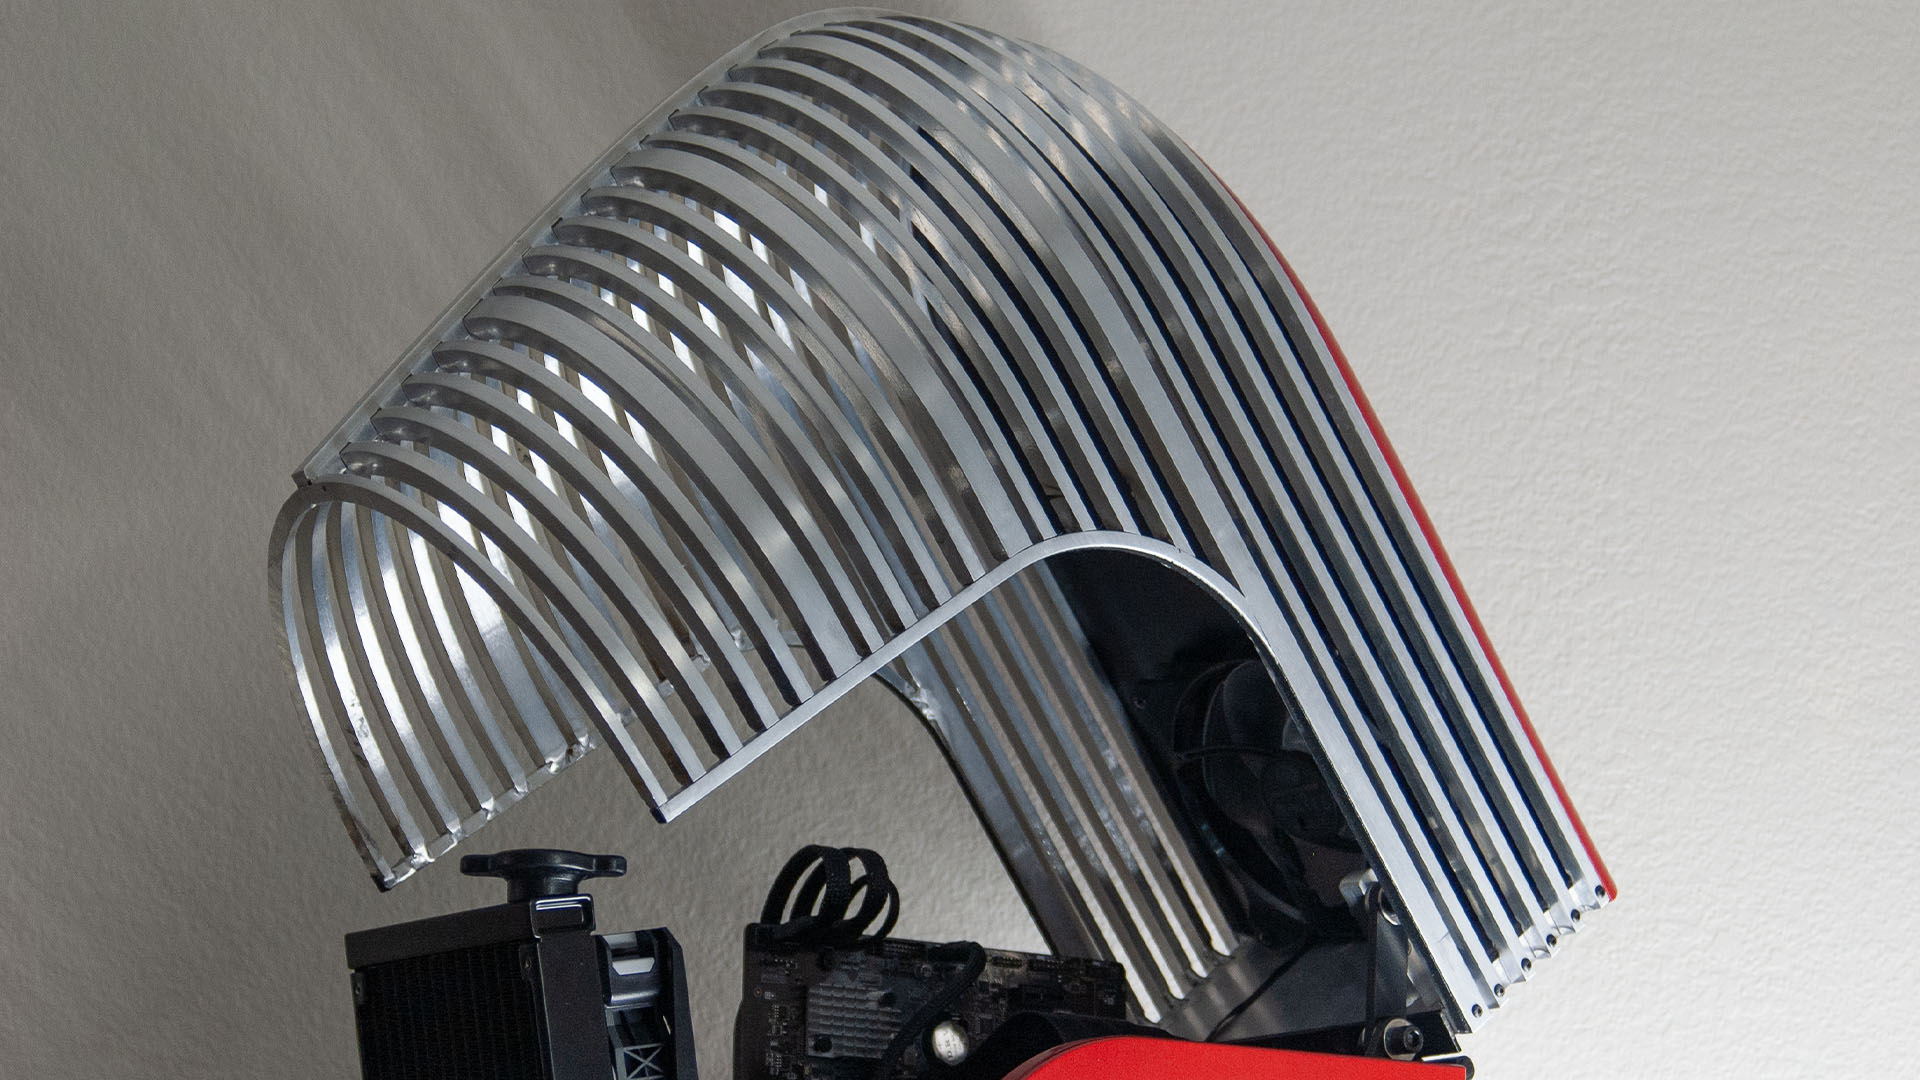
I primarily used an angle grinder and belt sander with very heavy grit sandpapers to tackle the initial heavy removal and rough shaping. As the form approached the correct shape, I used finer and finer sandpaper grits. To finish up the outside polish, I used a die grinder with a fine-fiber disk.
The sheet metal showed up from the local shop right on cue, as I needed it for mounting the hardware and some internal brackets. The pieces looked flawless. The finish was incredible. My excitement in getting ready to install this gorgeous piece of metalwork, though, was short-lived when I noticed I’d made a massive design flaw.
I had forgotten to add the hole for my power supply fan. I was able to measure and mark where I needed the hole before carefully cutting it out with a jigsaw. It was painful sawing away at the part I had just paid a bunch of money to have made, but I’m glad it was something I could easily fix.
Because the case widens as it goes up, I designed and 3D-printed a bracket that would orientate the motherboard to be truly vertical. There’s another similarly made bracket that supports the optical drive and SSD that alters the hardware to make it vertical. I utilized an ultra-slim drive from a laptop and mounted it to be accessed at the case’s rear.
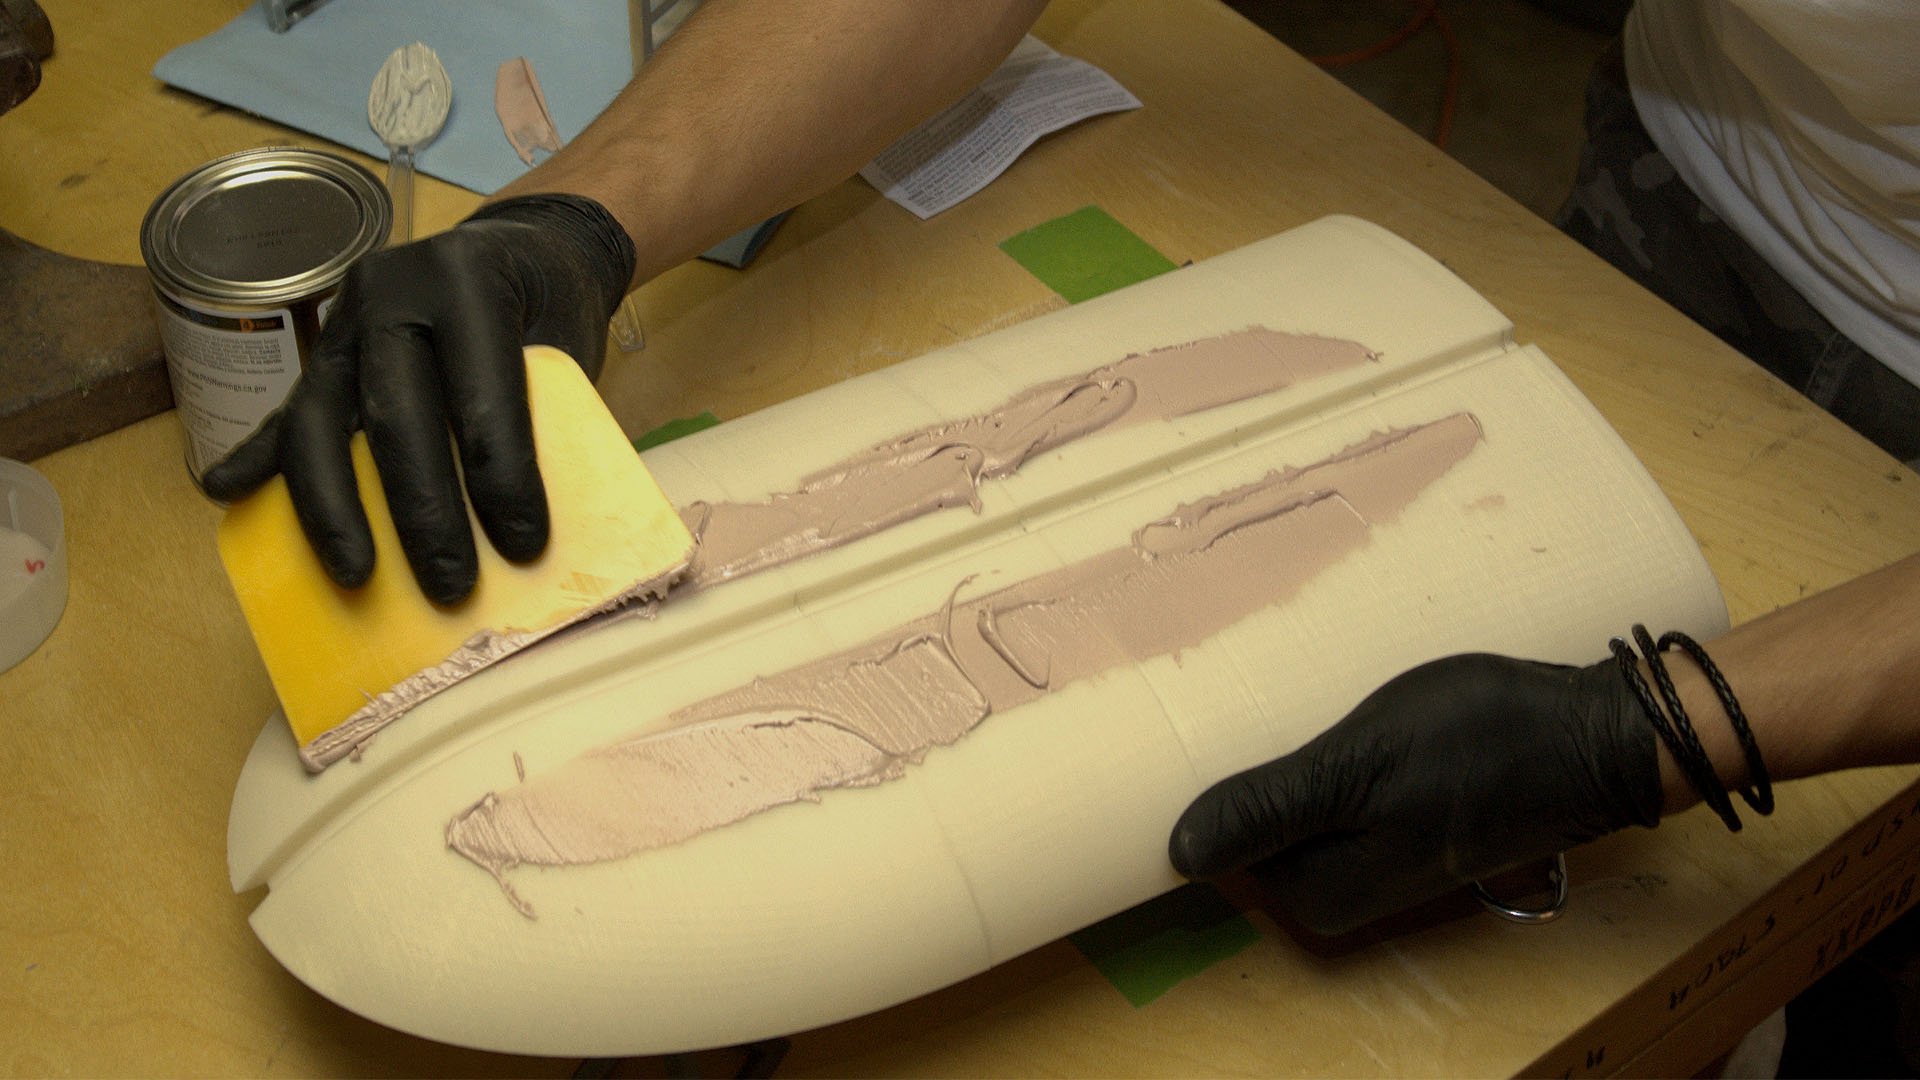
The top portion that sits on the grille was 3D-printed in three separate pieces. The rear section is hollow to accommodate a fan and exhaust grille at the back of the system. The three printed pieces were prepped and glued together before I applied Bondo over the entire surface and sanded it smooth.
What was your favourite part of the build?
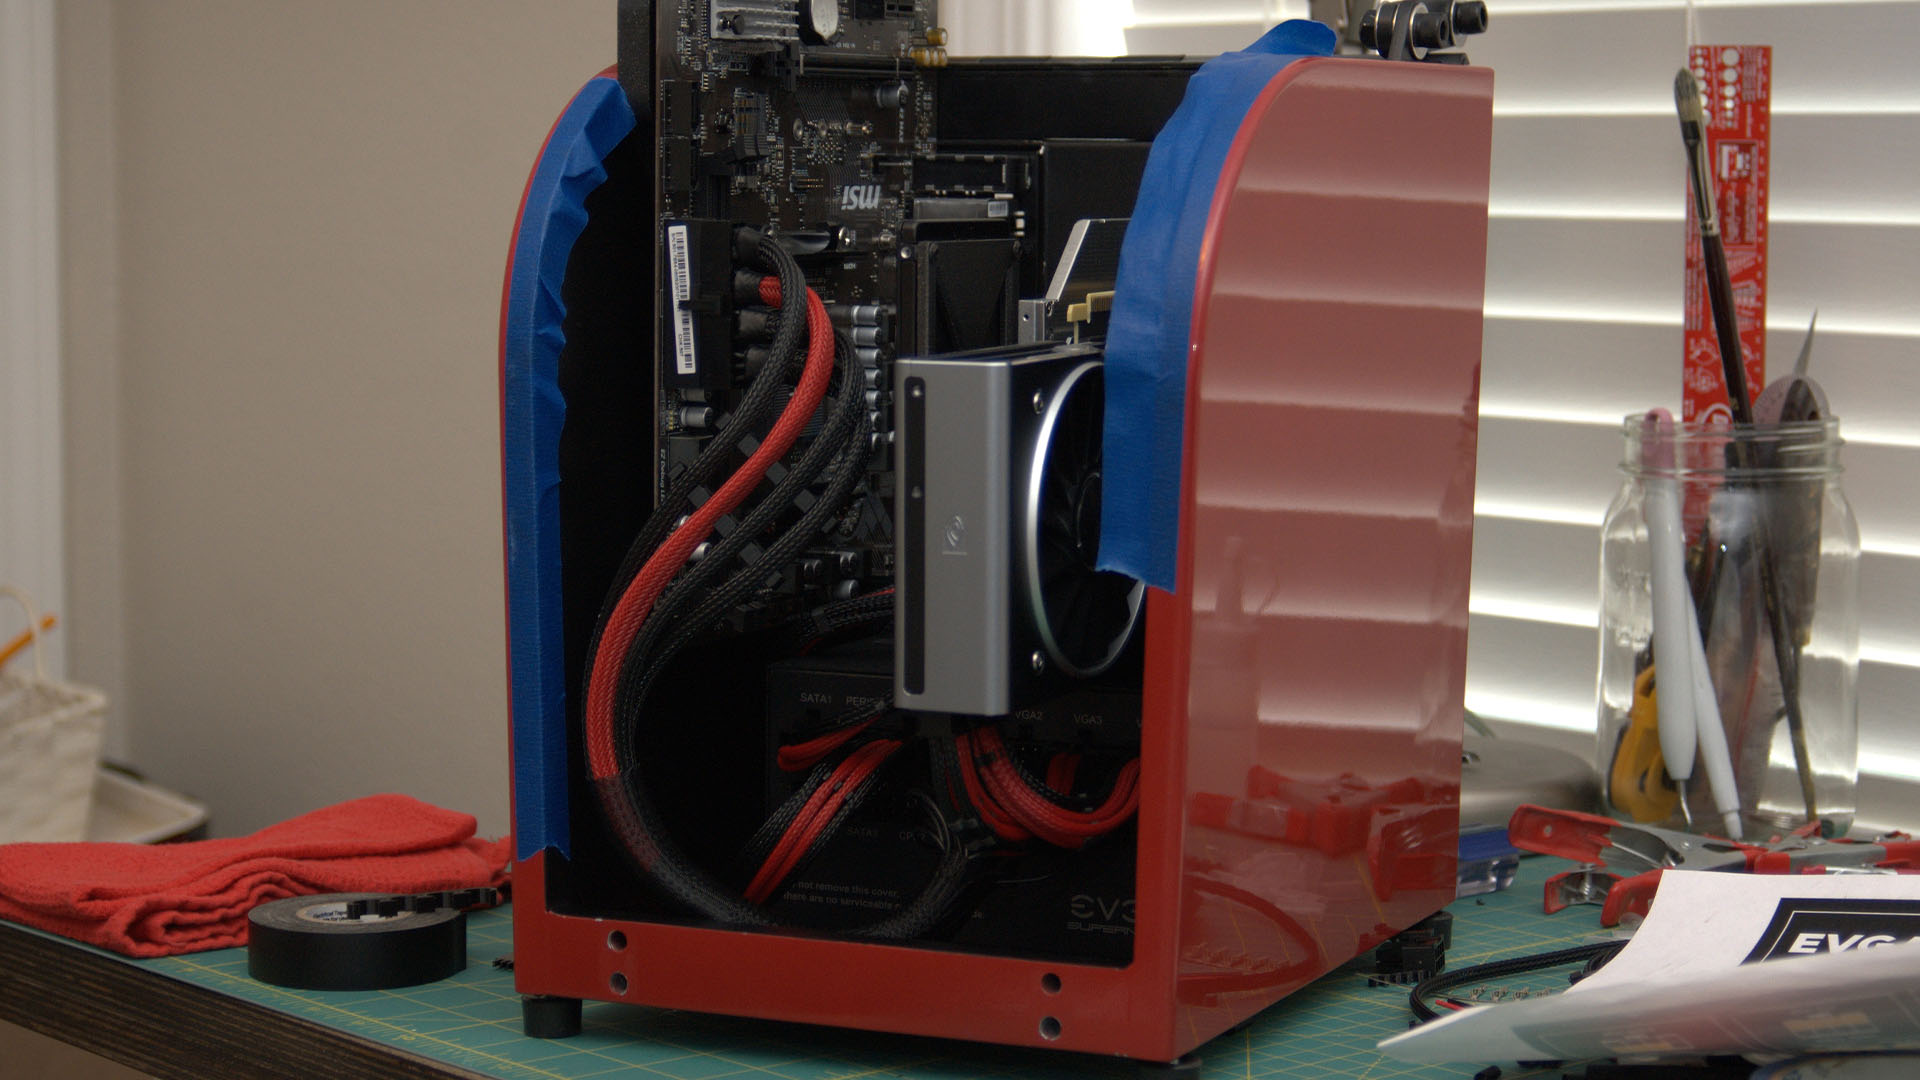
I could write pages on the finer details of the build, so I’ll just touch on some of my favorite features and why. I wanted this to have a show car-quality cherry red paint job but the budget afforded me three cans of spray paint from the local hardware store. The goal was then instead to imitate a show-quality automotive paint job with my three cans. Challenge accepted.
I started by priming everything with two to three coats. Once dry, this was wet-sanded before the metallic cherry red paint was applied. I wanted to simulate the visual depth you get with an expensive paint job, so I followed the red paint with around five coats of gloss clear coat. This would also give me enough thickness in my clear coat so that I could cut and buff the clear to be perfectly smooth.
After drying many days to give the paint a chance to fully harden, I took to wet-sanding with 1,000-grit sandpaper followed by 1,500. Rubbing compound, polishing compound and a good wax coat finished it up.
I designed and 3D-printed the hood ornament in PLA plastic, sanded, primed, sanded more and painted the ornament to look almost exactly like the aluminum spine it is mounted to. Multiple people have thought (even in person) that the ornament is actually metal.
Custom wiring and sleeving came next, and was some of the most fun I’ve ever had. Some of the cables were mere inches long because of the way the hardware was oriented. After not liking individual-sleeved wires for my 24-pin cable, I tried grouping the wires into four bundles. The aesthetics were much less busy and I love how it turned out.
The radiator as a whole was another of my favorite features. The custom multi-piece aluminum mount is angled to perfectly match the grille contour. This also made it easy to see the radiator sitting behind the grille exactly like a real car. I finished the radiator off by designing and 3D printing a scaled-down radiator cap that included a vinyl cut caution sticker.
The last fun feature is the power button itself. I’m a big fan of repurposing and reducing unnecessary waste when possible. While taking out some trash at work I noticed a piece of equipment sitting in the dumpster. An old air pillow machine with a shiny aluminum button right on the front that I knew would be the perfect power button for the Spirit of Motion.
I’m pleased with the end result of Spirit of Motion. Limitations dictated a few unexpected design changes but ultimately, I wouldn’t change anything. It was a labor of love from the beginning and I feel like the finished PC satisfies my goal of creating a one-of-a-kind build specifically for my dad.
Surprising him with the computer when it was complete and his reaction to seeing it is a memory I’ll cherish for a very long time.
Spirit of Motion classic car PC specs
- Sponsors: Nvidia and EVGA
- Motherboard: MSI B450M PRO-M2 Max
- CPU: AMD Ryzen 5 3600
- RAM: 16GB (2 x 8GB) G.Skill Trident Z 3600MHz
- Storage: 500GB Samsung 970 Evo, 1TB Samsung 860 Evo, LG Ultra Slim Blu-ray drive
- Graphics card: Nvidia GeForce RTX 2080 FE
- Power supply: EVGA SuperNOVA 750 G5
- Reservoir: EK-Quantum Kinetic TBE 160 DDC Body D-RGB – Acetal
- Radiator: EK-CoolStream PE 240
- Fans: Cooler Master MasterFan Pro 140 RGB
We love Josiah’s work here – he’s really captured the styling of the era with a PC that’s based on just the front of a car – the shiny red paint and aluminum grille are really striking.
This post originally appeared on Custom PC, which has been covering amazing setups for over 20 years and is now part of PCGamesN. Join our 500k member Facebook group to discuss this build.
If you consider yourself to be an expert PC builder, you can also submit your own custom PC build to us today for a chance of being featured on PCGamesN in the future.
