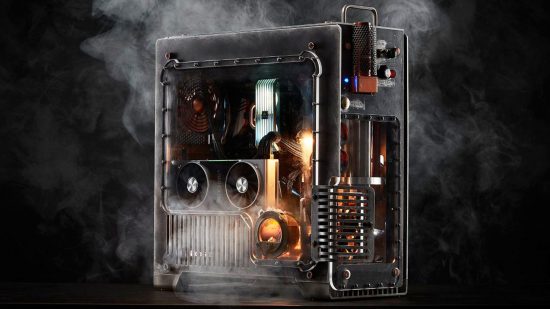
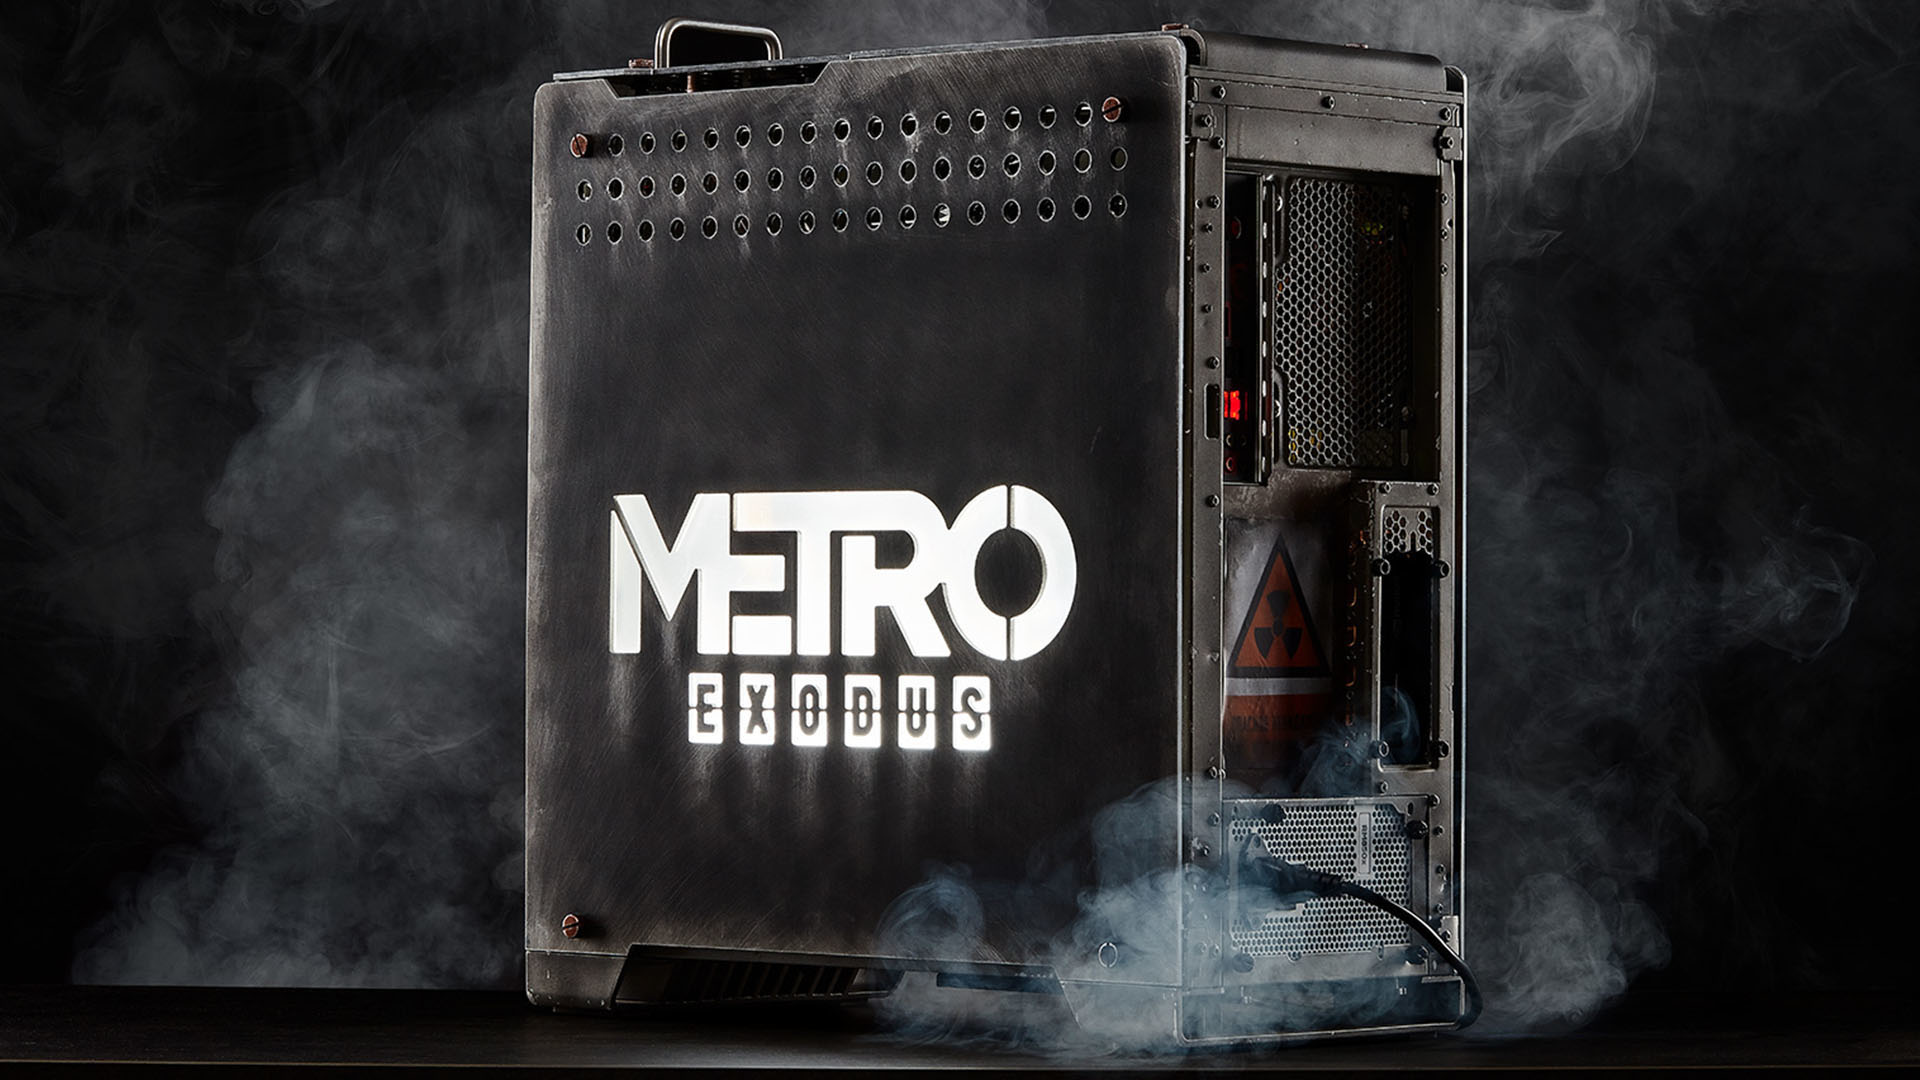
This rugged Metro Exodus gaming PC looks like it could survive a nuclear apocalypse, and it has loads of mechanical touches that echo the look of the game, with pistons, gears, analog dials and smoke puffing out of it. Created by one of the godfathers of PC modding, Bill Owen, we were keen to find out how this Corsair 570X Crystal build was made.
Thanks to our rapidly growing PC building Facebook page, we’ve seen many custom gaming PCs, from mods based on existing case designs to scratch PC builds. You can even submit yours for consideration right here. For now though, let’s find out how Bill from MNPCTech created this stunning build.

PCGamesN: How did this PC build come about?
Bill: Creating dystopian-themed PC mods has long been a passion of mine, so receiving an invitation from Deep Silver to create a PC based on Metro Exodus was a dream come true. The Metro game (and book) series is set in a post-apocalyptic Russia, where the fallout from nuclear war has left the world ruined and humanity has to survive on the scraps left over from its previously peaceful age.
The main character, Artyom, must eke out a living, scavenging what he can find, while taking on hazards both human and mutant with his cobbled-together arsenal of handmade weapons. Rendered in gorgeous detail by the 4A Game development team in Ukraine and Malta, there could hardly be a more inspiring world on which to base a PC mod. You can see a video the machine when it’s all fired up below.
What inspired the design of this build?
A steam-powered locomotive plays a large role in the game and, since there are no electrical power sources in this world, I imagined the PC as being independently powered by a small single-piston steam engine.
One month to develop a working engine from scratch wasn’t realistic, but creating a contraption that looked like one might be doable. However, such a task would require some extra engineering expertise and there was only one person I knew who could do it: the modding genius known in the bit-tech online mod community as ‘Cheapskate’. My thanks go out to him for his help.
Did you come across any difficulties during the build process?
We already knew we’d be using an Nvidia GeForce RTX 2080 and Corsair 570X Crystal mid-tower chassis as the foundation for our build. As such, space was limited to the front of the chassis for creating the faux single-piston engine. While it restricted our options, this location did ultimately make sense, as it best presented the piston rod and gears.
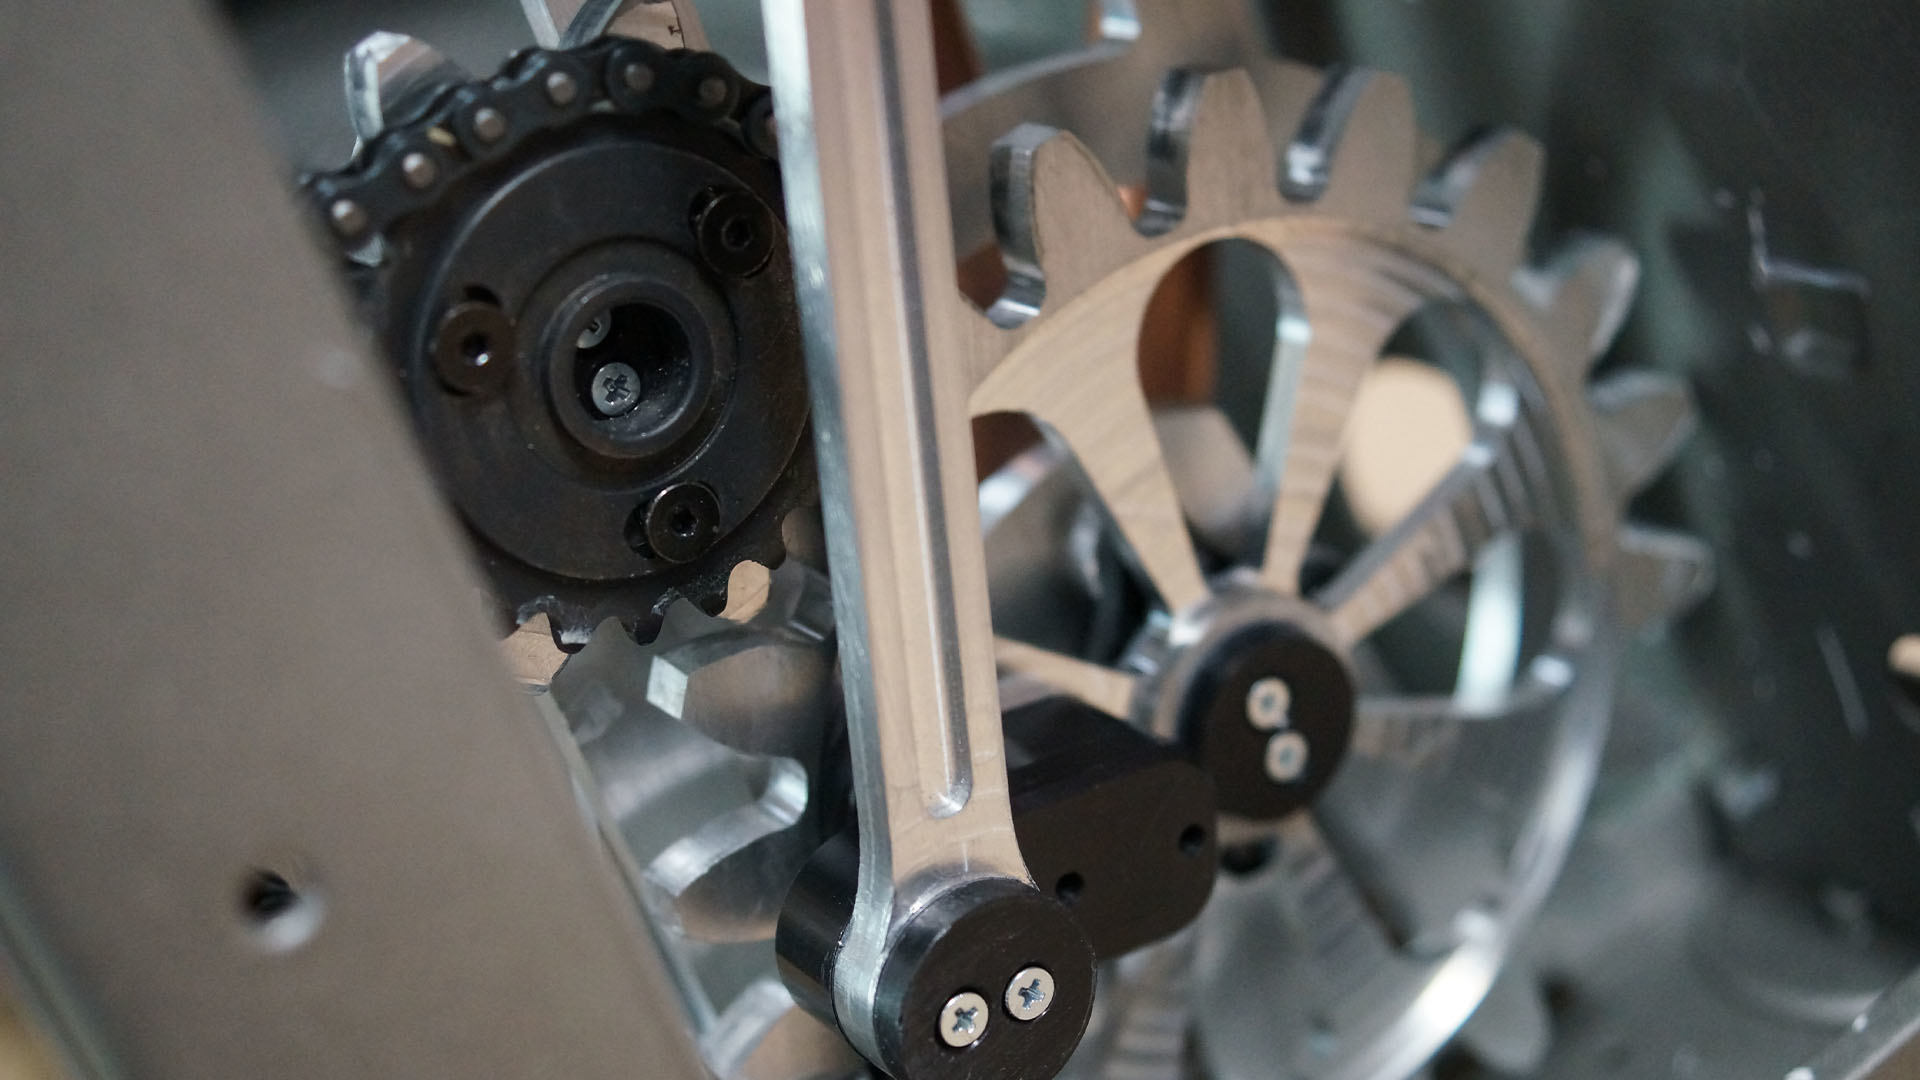
Not surprisingly, it was this piston/gear assembly that was the most time-consuming feature of the PC. It consists of a large stainless-steel tube with a working piston inside it, along with a gear and chain assembly for keeping the machine moving. Everything other than the chain had to be created from scratch.
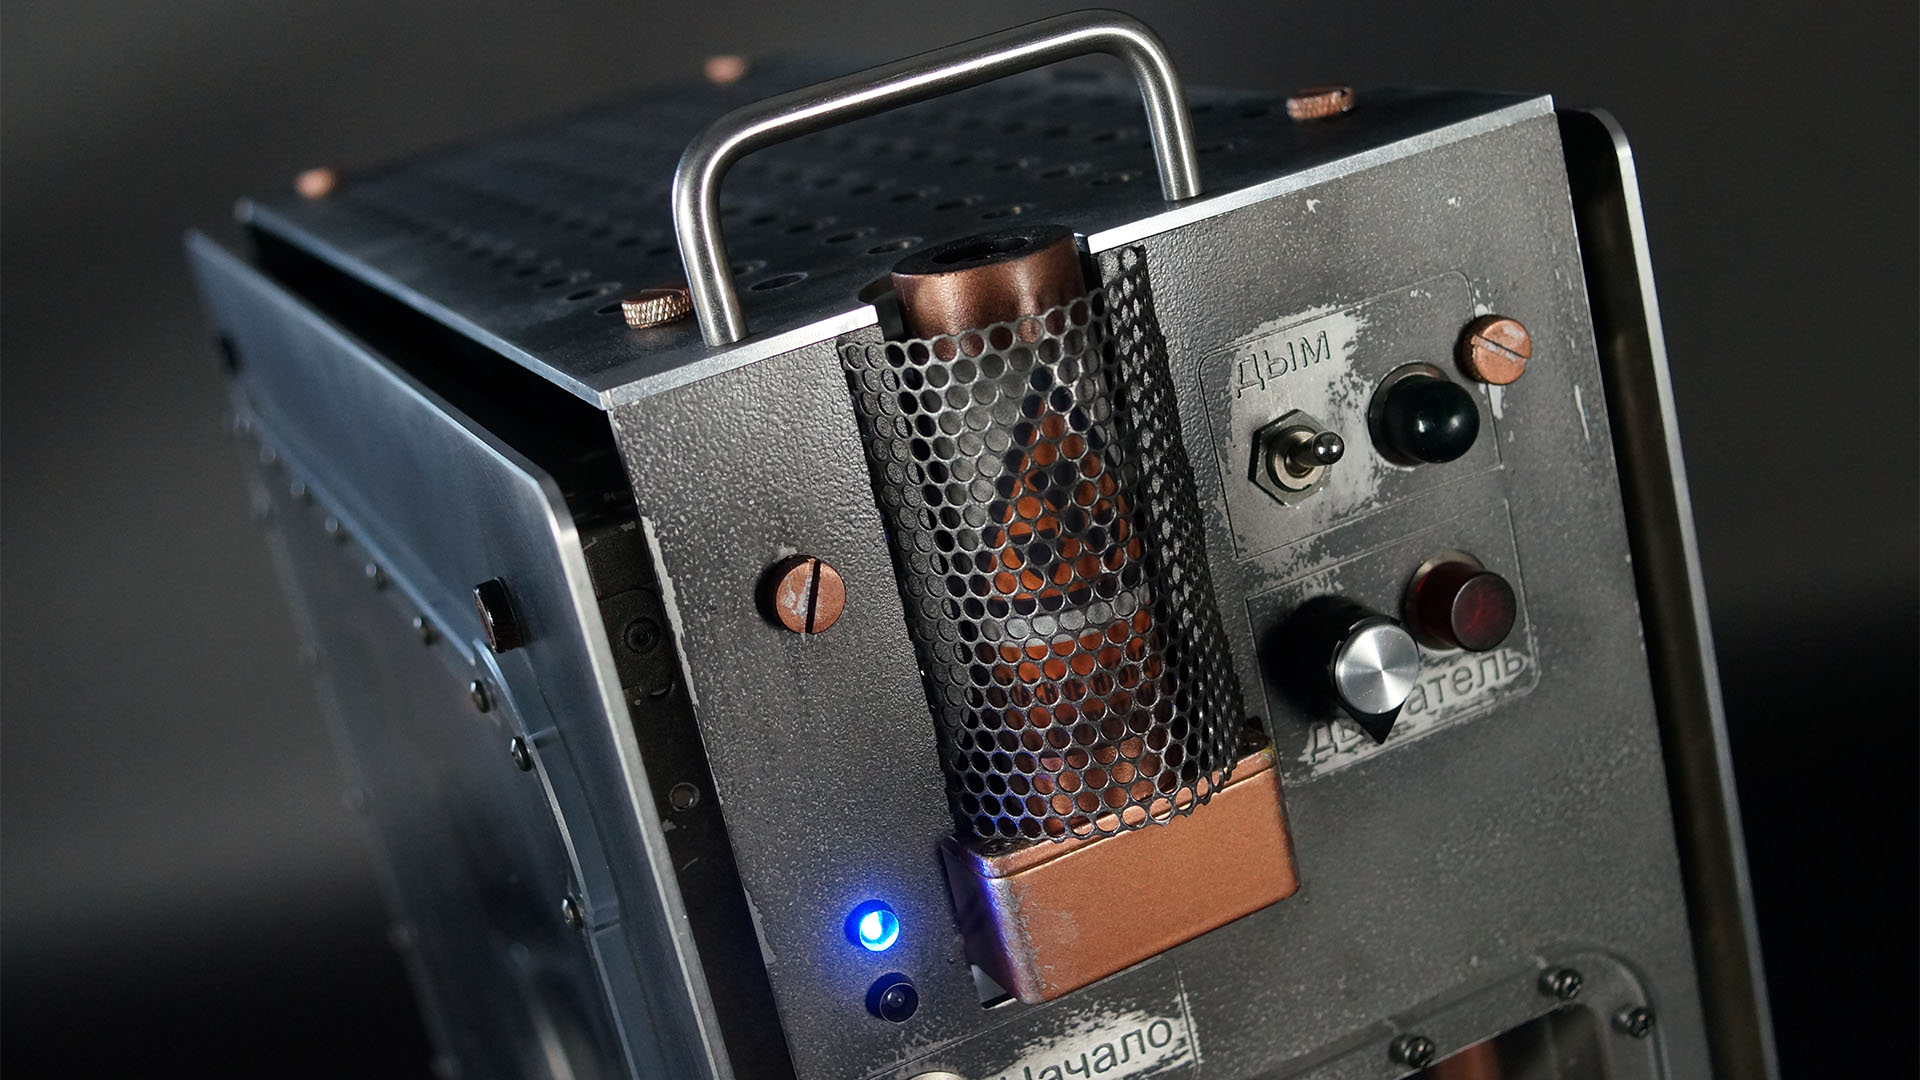
The piston engine was made from a variety of machined and laser-cut parts. Materials included black acetal, and 6061 aluminum for the framework and gears. The piston and crankshaft were made from grey Delrin and they actually pump inside the cylinder. Meanwhile, the smoke stack is one designed for scale-model steamboats made by ‘RC Smokers’ in Australia.
The smoker is based on similar technology to vape pens and can be refilled with the same liquid. So not only does the PC provide a fun visual effect, but you can even use it as an air freshener of sorts.
Before the smoke generator arrived, we had designed the piston cylinder to be connected to the smoker box with a tube, so the piston would produce a realistic steam train chugging effect. However, the piston didn’t produce enough air pressure, so we had to abandon this idea. Luckily, the RC Smoker produced its own effect, so we could rely on that. I also added a keychain remote control for the smoker, just to mess with people.
To drive the piston assembly, we used a gear and chain system, with the chain coming from Cheapskate’s bicycle. Power comes from an IG32 12V DC 197rpm motor, which is controlled by a wireless RF remote control switch transmitter and receiver (single channel, relay, 12V DC, 10A). The speed of the piston gear assembly is controlled by a vintage rheostat dial on the front panel.
Tuning the gears to turn and operate effortlessly took a great deal of development time. I believe it went through three design revisions until we nailed it. Incidentally, if you’ve ever wondered where to find parts for future PC mods, recycle bins are a good place to start.
Putting myself in the role of the game’s protagonist, I climbed over a fence to scavenge parts from my local bins and returned triumphant with a nice steel handle and some vintage incandescent table lights to illuminate the PC’s interior. Score!
The light fixtures were a particularly lucky find, as they look like the sort of thing you might encounter near an abandoned Russian factory. Well, to my mind, at least. If you fancy a bit of dumpster diving, though, do proceed with caution. There’s loads of inspiration to be found in those bins but plenty of nasty stuff too. Bring gloves and a filtered mask.
Can you tell us more about the case mods?
The world of the Metro games has always been a harsh place, so it was important that the exterior of the Metro Exodus PC reflected this hardship. You can’t be lugging around a PC with tempered glass panels in this wasteland. As such, I outfitted the Corsair 570X case with a battle-hardened exterior.
The tempered glass panels were replaced by 5mm thick machined aluminum plates. All of the exterior panels were also given suitably steamy circular ventilation holes.
The left side also has a large cast acrylic window fastened to it with countersunk machine screws. Below the window are air vents for the vertically mounted RTX 2080 graphics card.
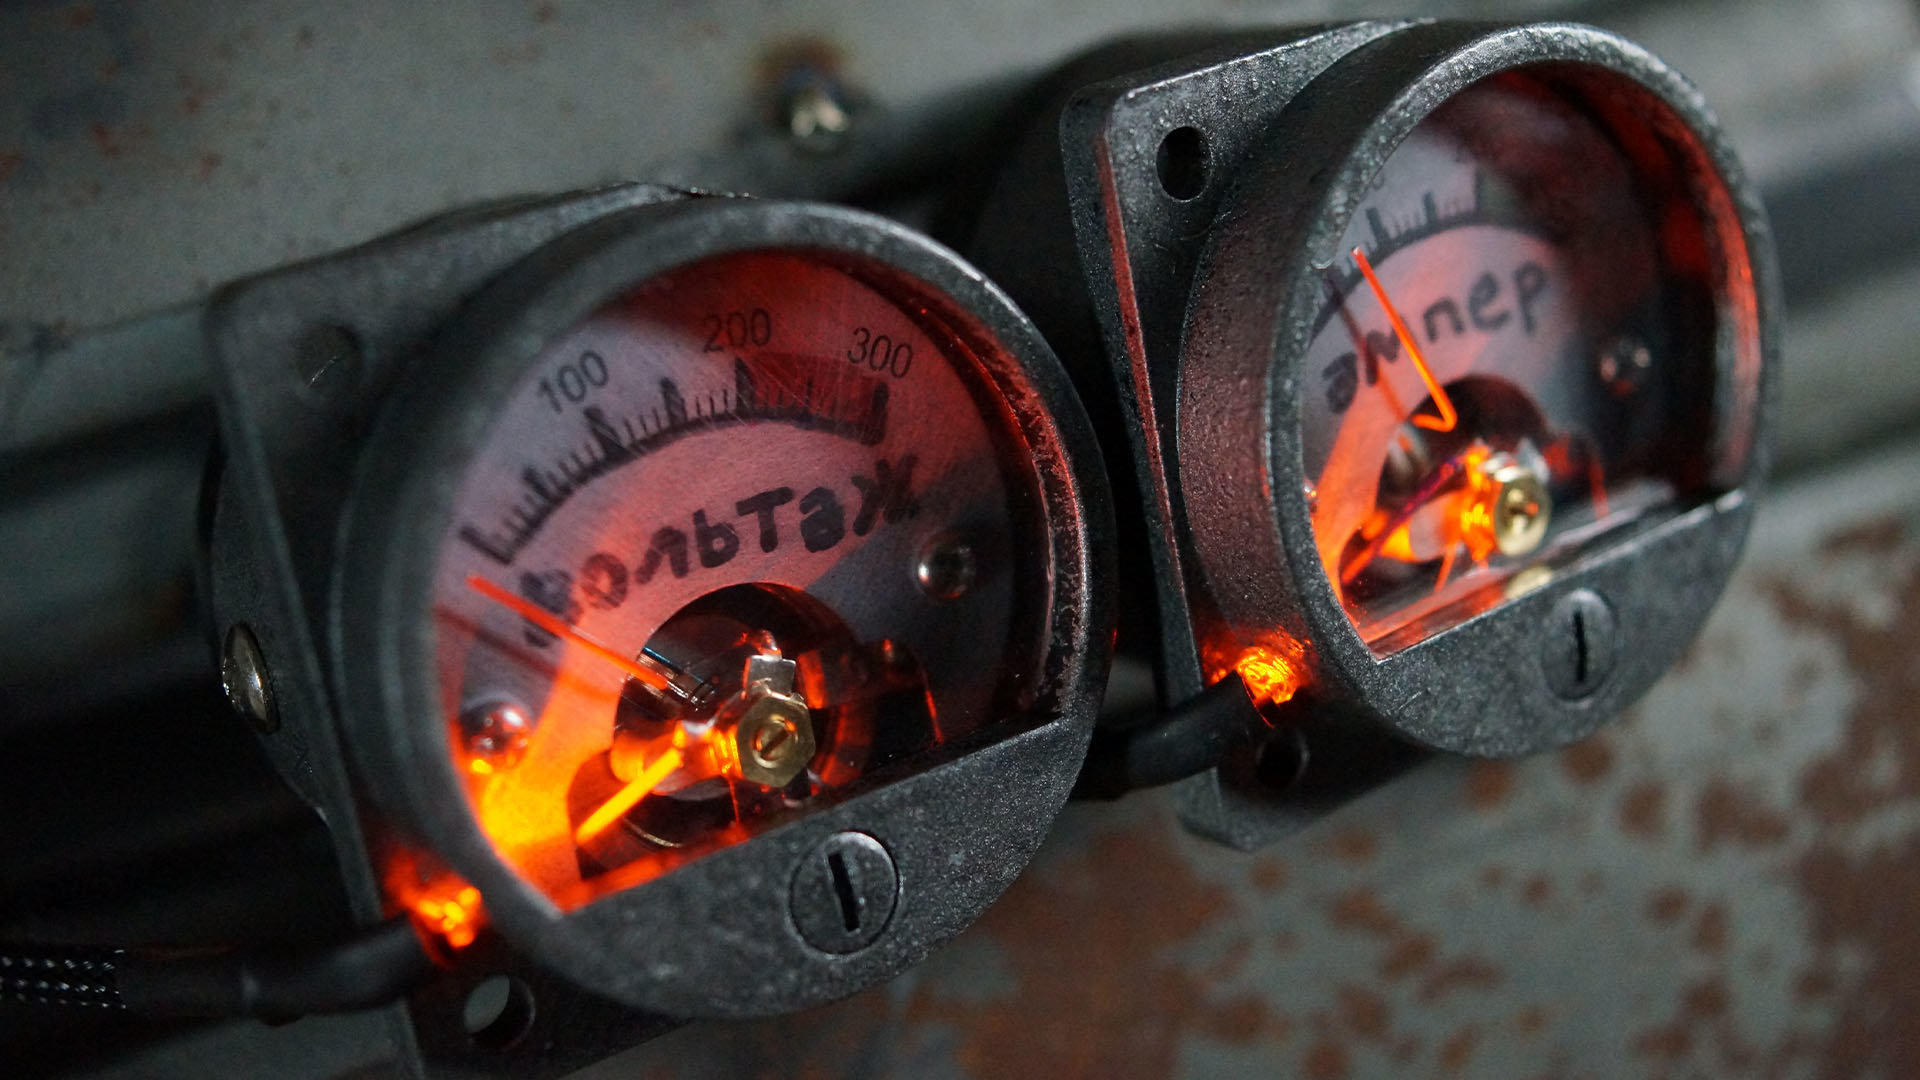
The corner of the window also has a voltmeter that mirrors the Geiger counter gauge on the ‘Bracer’ wristband of main character, Artyom. To create it, I modified an Uxcell AC 0-300V analog-dial voltmeter with a new face and Russian text that reads ‘индикдтор’ (indikdtor, or indicator).
The gauge is backlit with a 12V incandescent light bulb from a Triumph motorcycle taillight. I distressed its bezel with a barrel sander attachment on my Dremel and bent the edge with a heat gun. Its surface was given a faux rust effect with the Triangle Coatings Sophisticated Finishes Rust Antiquing Set.
Meanwhile, the right side panel was milled with the game’s logo. Behind the cutout we fitted a 3D version of the Metro Exodus logo made from 12.7mm thick clear acrylic. The panel was backlit with white LEDs sourced from Darkside Mods, and the acrylic was scuffed with 500-grit sandpaper to disperse the lighting.
The front panel was machined from 5mm-thick aluminum with a clear acrylic window at the bottom. We engraved the Russian words двигатель (motor) and Hачните (start) underneath the dials. Only belatedly did I realize that Hачните doesn’t quite mean ‘start’ but rather ‘beginning’. It still sort of works but clearly trusting in Google Translate alone wasn’t the best approach.
The bezel was finished with Rust-Oleum Hammered hammer-effect paint and primer. This provided the sort of beaten, industrial look that would be at home in the world of Metro Exodus. To further the rugged look, I scuffed the paint around the switches and dials with medium-grit sandpaper.
The front panel provided space for the basic controls of the PC. I reached out to three individuals in Russia who collect and sell these parts on eBay. They helped me to get an authentic Russian military transmitter dial switch and control panel lights. I also salvaged some vintage gumdrop-style red and green incandescent light bulbs from the control panel of a diesel locomotive. The lights indicate when the piston and smoker are turned on by the remote control.
The top and side panels were aged and weathered to give the impression that this machine had survived many years of abuse. This process began with airbrushing on a flat black base coat, which was then scuffed with a medium (red) Scotch-Brite pad around high-usage areas, such as access screws, switches and buttons. The final touch was the lower front grille, which was laser-cut from acrylic and bent with a heat gun.
What has the reaction been like to the smoke?
Upon completing the build, I invited some friends into my workshop to gauge their reactions, and what amazed me was how few people were bothered by the smoke billowing from the PC.
Clearly, the lack of an unpleasant odor accompanying the smoke – if you’re ever had any electronics go up in smoke, you’ll know what I mean – was enough to reassure them it wouldn’t do any harm. It was fun to set off the smoker by remote when they had their faces up close though!
Are you completely happy with the end result, or do you wish you’d done some of it differently in retrospect?
After posting images of this build on Instagram, someone asked, ‘What’s with the RGB lights on the CPU and memory, they don’t fit the theme’. It’s a reasonable question and one that’s worth addressing when it comes to PC modding in general.
For a start, giveaway builds such as this one are sponsored, so hardware partners provide the components to build the systems and, accordingly, they often want their wares to be displayed in all their glory. As a result, you do sometimes need to compromise the aesthetics, but that’s the balance you need to strike when building these sorts of systems.
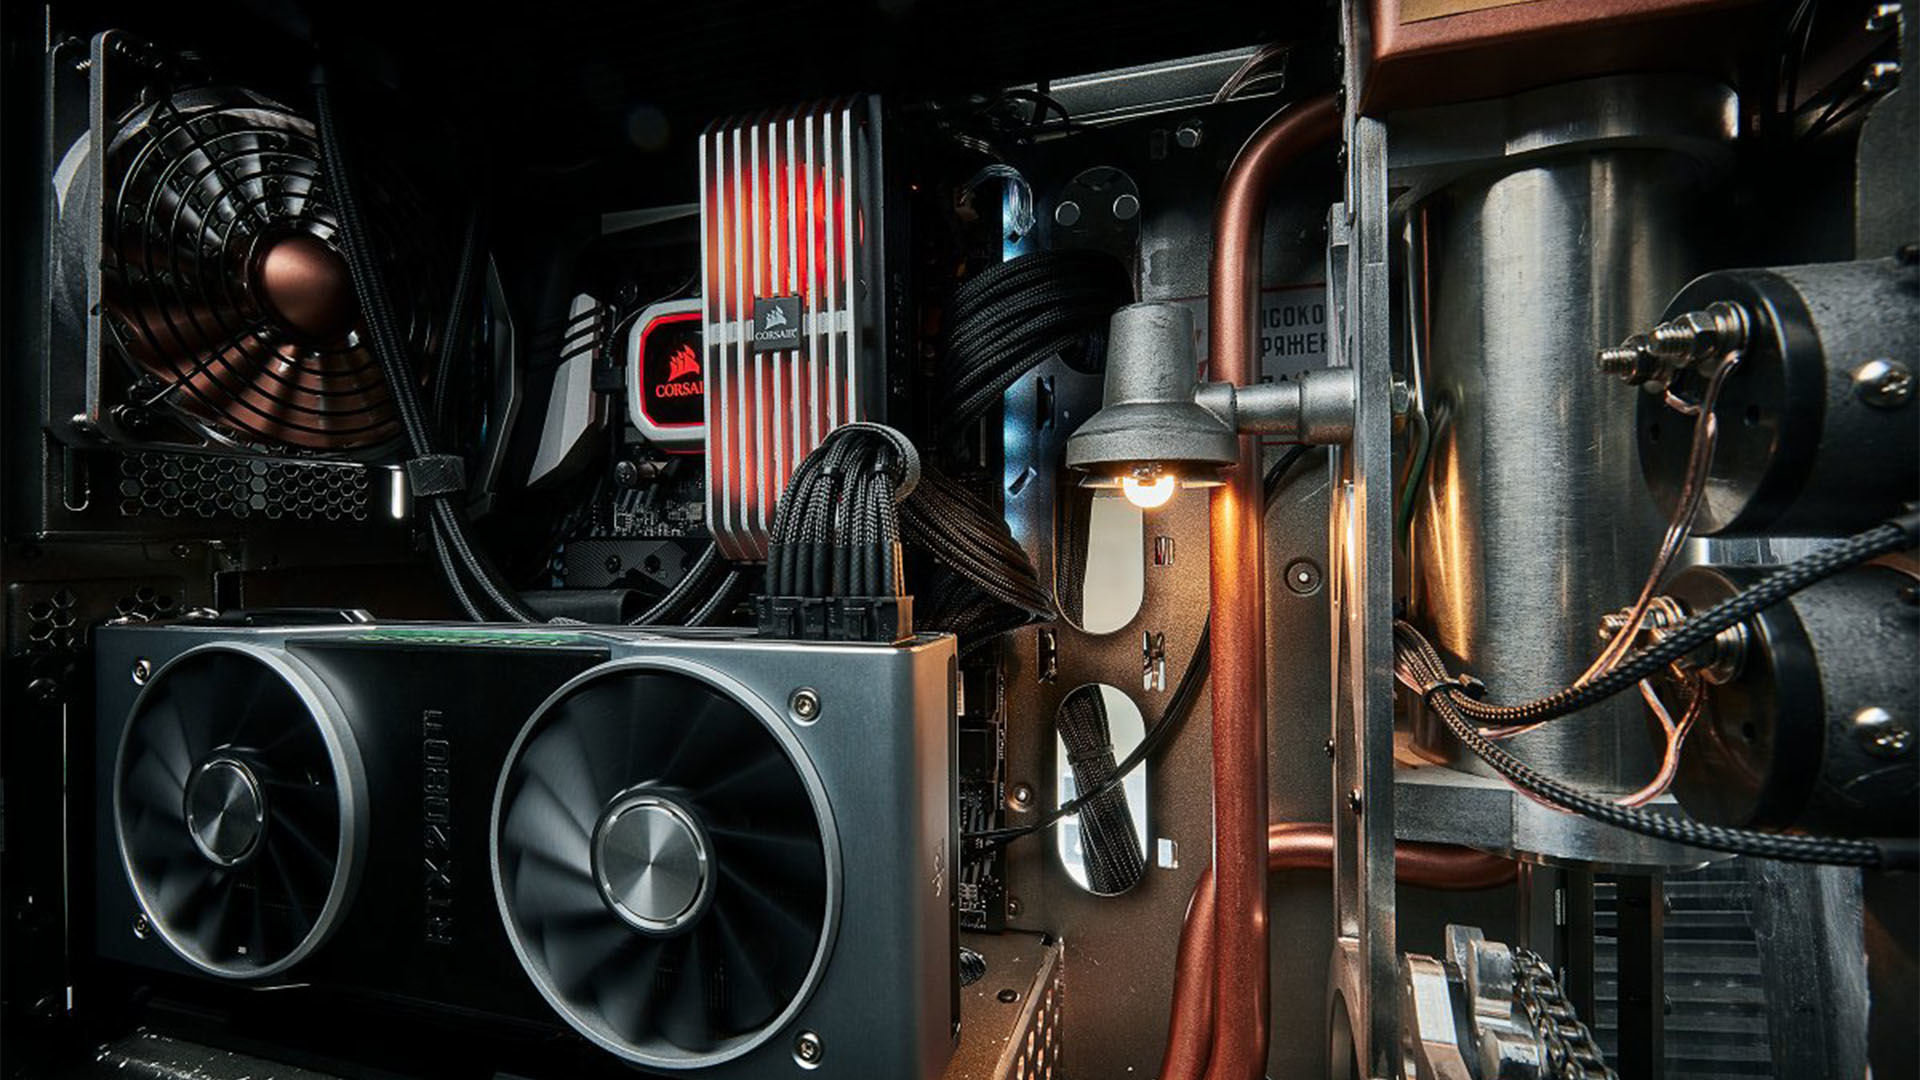
The second reason also answers another question that I’m often asked, which is why I don’t implement custom liquid cooling for these builds. The answer is that I believe in keeping these types of builds simple. The machine’s new owner may never be inclined to do proper maintenance and clean the liquid loop, or they may want an easy path to upgrading hardware at a later date.
Also, shipping anything with a water-cooling loop is a major hazard. If you send it filled, there’s a very high chance of the competition winner receiving a rather damp and unusable PC. And even if you send it empty, you’re relying on the winner to properly fill it themselves, and there’s still the high chance of a leak having developed en route.
All told, I was very pleased with the final results. As with any mod, I hated to see it leave after putting in all that work, but I’m glad to hear that the individual who won is very satisfied with it. I also couldn’t be happier to see that Corsair’s competition for the case received 130,000 entries.
You should absolutely be pleased with this build, Bill, it’s amazing work. Not only does it have cool details, such as gears and dials, but the fact that they mechanically work, and you get smoke coming out of it too, really brings this machine to life.
This post originally appeared on Custom PC, which has been covering amazing setups for over 20 years and is now part of PCGamesN. Join our nearly 500k member Facebook group to discuss this build.
And if you consider yourself to be an expert PC modder, you can submit your own custom PC build to us today for a chance of being featured on PCGamesN in the future.
