How do you fix the Astronomical Clock in Alone in the Dark? One of your earliest objectives in Alone in the Dark is to find the Astronomical clock. It’s not hard, the large clock is at the top of the manor stairs – but how to interact with it is slightly more complex.
In a classic survival game puzzle, you must find two missing pieces of a puzzle, place them in the clock, and rearrange them. This isn’t the only time you’ll do this in Alone in the Dark, as we mention in our Alone in the Dark review, but it is the first – and the first time you’ll experience the power of your mysterious Talisman. So, to get your on your way, here’s where to find the Alone in the Dark plate pieces, and solve the Astronomical Clock puzzle.
Where to find Alone in the Dark clock plate pieces
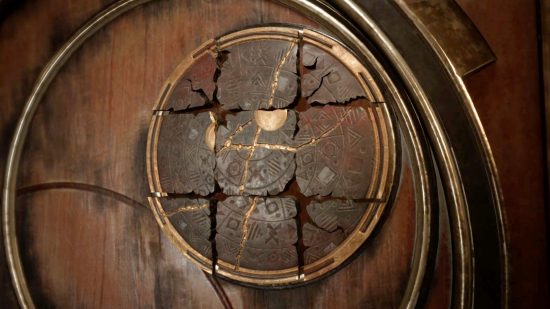
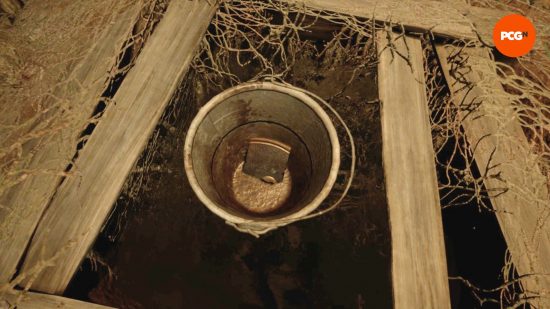
Two pieces are missing from the plate in the Alone in the Dark clock: one is found in a drawer in Elisabetta Pelosi’s room, and the other must be retrieved from a well in the kitchen garden.
To open the drawer in Pelosi’s room, you must find the combination lock solution, for which we have a separate guide. Don’t worry, everything you need for this one is in the room with you. After unlocking the drawer and obtaining the piece of broken plate, head out into the garden – that’s not as easy as we’re making it sound, but we’ll leave you to discover the rest.
Once in the garden, having retrieved a pair of bolt cutters on the way, you can now unlock the chain on the shed. Pick up the hose inside, and attach it to the end of the hose already on the garden floor. Follow the hose back to the tap on the back wall, and turn the tap on. This fills the well, bringing the final clock plate piece up to meet you. Take the two pieces you’ve found back to the clock and place them with the others.
Alone in the Dark clock puzzle solution
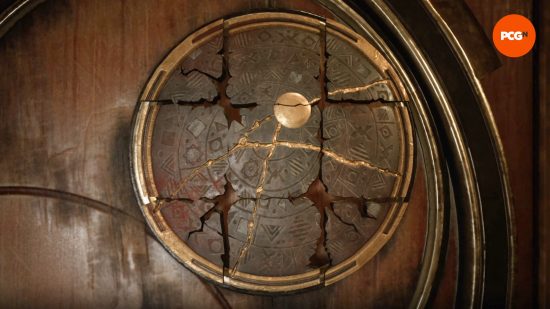
Rearranging the plate pieces in the Alone in the Dark clock puzzle may look fairly easy as a golden pattern weaves through it. However, the corner pieces are a little more difficult to get right, so if you’re struggling, one of those may be out of place.
Without using the image below, or the image in the Commonplace Book item in your inventory, our tip is to look closely at the circle of icons around the outermost edge of the plate. Ensuring these line up on the cracks is the easiest way to check that your corner pieces are in the right place. However, if you’d rather just use an image to help you place your pieces, we’ve got it right here:
Once the plate pieces are in the right place, you can now use the plate for your talisman, and to reveal the next location in Jeremy’s memories.
Alone in the Dark clock talisman numbers
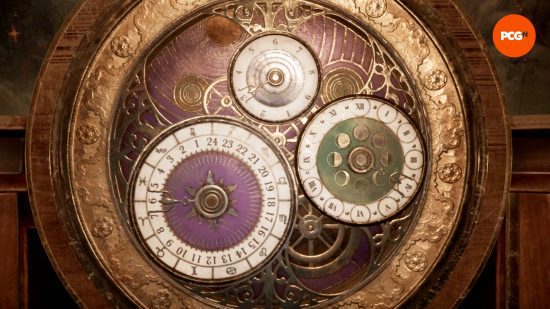
The talisman coordinates for the clock are on the face of the clock itself, and the order in which they should be entered can be deciphered by the size of each of the three clock faces: largest first, middle second, and the smallest third.
Once you have put the plate pieces in the correct order, interact with the clock face above it to see the image below. The numbers – from largest clock face to smallest – read six, four, three, which are your numbers to use on the talisman.
Back out and interact with the plate again, entering the three numbers above into the talisman. The image on the talisman then shows the hall outside Jeremy’s room, which is through the door to your left as you look at the clock. At this point, you must enter Jeremy’s room and leave again, prompting the game to change as you exit.
Now you’ve fixed the plate in the clock and solved this Alone in the Dark puzzle, we’ll leave you to explore the latest of Jeremy’s memories in the horror game. From here, though, there are many more head-scratchers to solve, but we’re here to help if you need it. For example, make sure you collect all of the Alone in the Dark Lagniappes, as some of them unlock special secrets.


