Looking for every Wee Pincer location in Granblue Fantasy Relink? While you can elongate your first run through the relatively short campaign by searching for the dozens of little crabs, it does make more sense to save them for your second run. By waiting until you unlock Chapter Select, you can track your progress. That makes following along with the location list below a breeze.
Can’t quite tear yourself away from Granblue Fantasy Relink? Learn how to get more Griffin Feathers to speed up the early upgrade experience, or double up on the collect-a-thon with the Wee Pincer locations. Just want the loot from the main hub areas? Here’s how to get the Silver, Gold, and Whitewing keys to open the chests in Folca and Seedhollow.

Wee Pincer locations in Granblue Fantasy Relink
Spread across each chapter and often nestled away in obscure corners, platforms, or on cliff edges, finding every Wee Pincer location yourself is a big ask. Just follow along with the list below to quickly find them all:
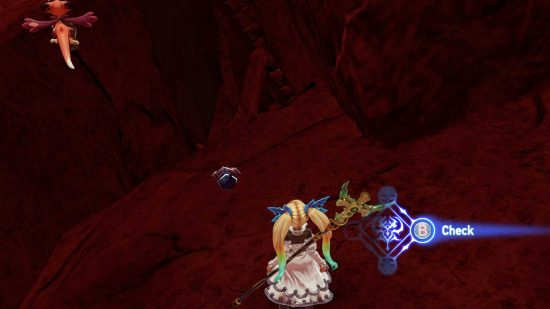
After landing in the volcanic area, head to the end of the left path. Jump down onto the platform in the lava pool.
| Chapter |
# of Wee Pincers |
Location |
| Prologue |
0 |
N/A |
| 1 – The Western Frontier |
1 |
- On a cliff in the first area.
|
| 2 – Tempest on the Horizon |
7 |
- Right before you enter the cave.
- Sitting on a wooden ledge on your left shortly after the cave.
- On a ledge shortly after rescuing the first bunch of villagers.
- On the dirt by a destroyed house in the first village.
- On a large level cliff between the first two rescue objectives by some crates, barrels, and rope.
- Around the broken cart near Siero’s save point before the first boss.
- On the wood ramparts to your left right before the boss fight triggers.
|
| 3 – Creations of the Stars |
3 |
- On the left-most ledge before you cross the first bridge after the cave.
- Drop the first drawbridge, cross it, and head right to find another on the ledge.
- Straight ahead after you enter the bat cave, by the right wall.
|
| 4 – Skies Forever Blue |
1 |
- Keep running straight as you cross over the bridge of the first ship to find this one tucked behind the central machinery.
|
| 5 – Shadows in the Snowscape |
6 |
- When you enter the area with the first breakable ice spikes, head to the cliff on the right.
- After the first, keep to the mission path and take the right path up the cliff, hop up again on the right. Take the left fork and hug the wall briefly.
- Head up the stairs and through the cavern. Hop onto the ledge on the left. It’s down on the next ledge.
- Climb the stairs with the save point and keep right as you leave. Carefully hop onto the top of the broken wall.
- Walk through the tall archway with the braziers on either side and continue straight. It’s on a cliff just to your left.
- As you enter Tredame Sanctum, go straight into the treasure room beneath the grand staircase. It’s in an open chest on your left.
|
| 6 – In Search of Hope |
9 |
- By the tree on your right as you spawn in.
- Head straight up the left path after the first slope. It’s on top of the stone archway.
- After heading into the ruins following the first slope, take the left staircase and climb the broken wall onto a ledge to the right.
- On the west side of the central ruins zone on a tall rock just behind two fallen arc-shaped ruins.
- A major seal is connected to another rocky outcrop via a natural stone bridge. On the other side of the bridge is a small ledge with the Wee Pincer.
- From the location of the last, head toward the airship. You’ll find it on the protruding broken ring right after the staircase.
- From the location of the last, hop off the left side and continue straight into the nearby ruins. Keep straight after the three sunken pillars to find it behind the low sunken wall.
- With the tallest corner section of a ruined stone wall in view in the top-right of your screen, look for a small ruined pillar sticking straight out. Use the nearby walls to jump onto it.
- From the central ruins, head straight toward the tall stone ring visible in the distant sky. Pass through the complex pillar-based structure and gently head left as you leave. Just before the ruins end, turn right into a chamber and left out. You should spot it in a corner on your right by a wall.
|
| 7 – Warning Signs |
3 |
- After landing in the first volcanic area, head up to the end of the left path. Jump off the cliff into the lava pool – the first platform has the Wee Pincer.
- After the cutscene with Id, turn around right as you drop down the ledge.
- Just before the lava chase ends, hop onto a small ledge on your left.
|
| 8 – Relink |
5 |
- On your left just before you leave the weapons hall of Seedhollow Castle.
- Right after leaving Seedhollow castle from the weapons hall, look to your right.
- After entering the next indoor area, take the left path instead of the right. It’s on the left by the rubble.
- By the Omen Stone in the far-right corner of the mech battle area.
- In the right part of the fountain used to reveal the staircase to the Seedhollow Castle Depths.
|
| 9 – Opposing Wills |
6 |
- As you spawn, head back up the cliff on your left and drop down the end.
- On your left just before the staircase.
- As you head up the incline after the open area with the large rune floor, you should spot a short collapsed structure on the right following the bend. It’s here.
- Continue on the path into the purple area where Eugen questions the sound. It’s on your left path after the first jump.
- On the ground of one of the lower arena quadrants close to the central pool.
- Right as you start your ascent up the rocky pathway, you should be able to hop onto a floating stone platform.
|
| Final Chapter |
0 |
N/A |
| Chapter 0 |
1 |
Coming soon. |
You can get away with finding just 20 Wee Pincers for the Crabs Are Neat in-game trophy, but you’ll earn bonus rewards if you find the lot.

All Granblue Fantasy Relink Wee Pincer rewards
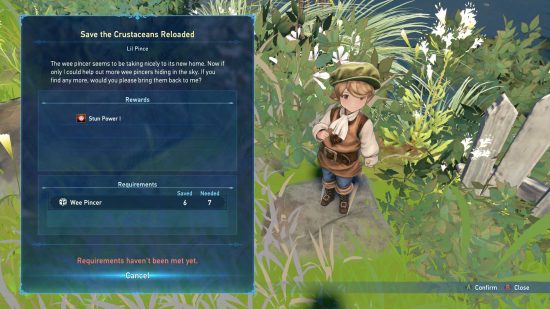
As you save more Wee Pincers in Granblue Fantasy Relink, you’ll be able to report back to Lil Pince by the pond in Folca for more and more rewards. Here’s what you can get:
| Total Wee Pincers rescued |
Reward |
| 1 |
Crabby Resonance Sigil |
| 3 |
10x Rafale Coins |
| 5 |
10x Fortitude Shards |
| 7 |
Stun Power I Sigil |
| More coming soon. |
More coming soon. |
In total, you’ll need to rescue all 45 Wee Pincers to earn the Nothing Is Impossible in-game trophy and corresponding Steam/PlayStation unlock.
Done finding all the Wee Pincer locations in Granblue Fantasy Relink? Take a break with our list of the best open-world games on PC. They’re always packed with things to hunt and collect. Still deep in Hoyoverse’s anime epic? Check out the latest Genshin Impact codes for some freebies. To add to that, did you know that The Elder Scrolls online beats Genshin Impact in the loot box department? We’re serious.


