
How do you unlock the Reveil prop chest combination lock? Clowns, ghost trains, sawing people in half…. the circus is a pretty terrifying place and the ideal location for a horror game, but Reveil takes the trope one step further by putting us behind the scenes, starting in our circus designer’s house.
Much of Reveil is a puzzle game, and most chapters feature at least one multi-step conundrum. In chapter two, you enter Walter’s garage, with neon symbols painted on the walls and ceiling. Three of these are the solution to a combination lock, but there are a few things you have to do to find out which three. If you just want the solution to the combination lock and don’t want to know how we got there, head straight to the bottom of the guide.

How to unlock the prop chest in the Reveil garage
There are three different steps to unlocking the prop chest in the garage in Reveil:
- Rebuild the mannequin.
- Decode the cypher in the notebook.
- Use the code and the mannequin together to find the combination lock solution.
We’ve got a walkthrough for all three steps below.

Locate Reveil mannequin parts
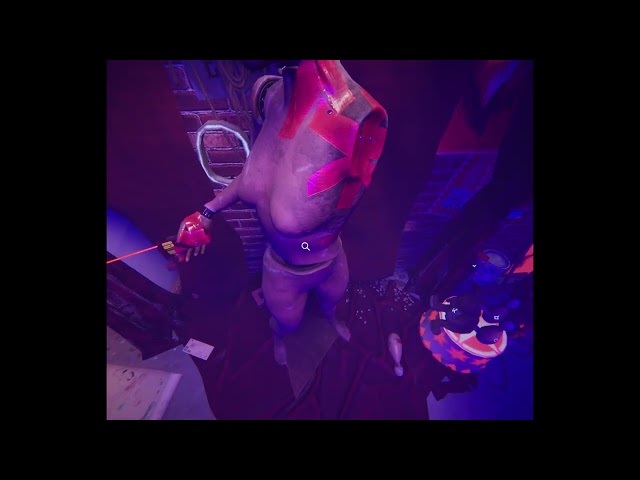
First, you need to locate the missing pieces from the mannequin in the middle of the room, which is missing an arm, its torso, and a hand. As Walter says when he picks up the torso, you don’t need to find the head or the other arm. You need to interact with the mannequin before you can interact with, and pick up, the missing parts.
The missing mannequin parts can be found in the following locations:
- Arm – on the workbench behind you as you look at the mannequin.
- Torso – inside the magic trick box on the table at the back of the garage.
- Hand – on a shelf at the back right of the garage, to the right of the torso.
Simply head back to the mannequin and place the parts. The mannequin then moves on its own, the laser pointer in its hand pointing towards a notebook on Walter’s workbench, taking us to the next step.
Decode the Reveil cypher
Decoding the cypher in Reveil results in three three-digit numbers. Each of the symbols on the bottom of the page relate to three of the numbered symbols above, layered atop one another, resulting in one three-digit number for each symbol. Don’t read on yet if you want to decode them for yourself, but make sure you jot them down.

Looking at the image above, the only three numbers that make up the first symbol at the bottom are 2, 4, and 1, meaning the solution for the first symbol is 241. The second is 414, and the third is 235.
You can decode the cypher before you fix up the mannequin, it doesn’t make a difference to the game. However, this is the order the puzzle was intended to be played, given that the laser pointer directs us here after putting the mannequin together.
Solve the prop chest combination
Finally, head back to the mannequin to complete the puzzle. Looking at each of the mannequin parts, you can see that they each have a roman numeral attached: the torso is I, the arm II, and the hand III, relating to the numbers we just decoded. Each part also has a dial on it, and you must input the three-digit numbers, in order, into the dials.
For example, the first three-digit number you is 241, so move the torso dial to 2, the arm dial to 4, and the hand dial to 1. The laser pointer should now be pointing to a stuffed rabbit. Interact with the toy to see an icon that looks like a sideways mushroom. This is the first icon for the combination lock.
By entering the other two numbers into the dials, the laser pointer will point to the ceiling, and a kind of diamond-on-a-stick shape. The third directs you to a skull at the back of the room, which has a a steering wheel shape on its underside. Now you have all three icons for the combination lock.

So, whether you’ve done the work for yourself or simply used the image above, you can now find out what is hidden inside the prop chest in Reveil and continue on your haunting adventure through the horror game. Before you leave the garage, though, make sure you have all of the Reveil collectibles located in the garage.