
Cyberpunk 2077’s photo mode is probably the only way you’ll be able to see your custom V avatar in action. You could just have them performing the action they’re currently using, but where’s the fun in that? Why not have your avatar imitate Keanu Reeves, pointing out that someone off-camera is breathtaking!
It’s not just poses that you can change. You can make your avatar hold any type of weapon, either firing it or just using it as a cool prop. There’s also a huge number of stickers you can slap onto the image, decorate with frames, and tinker with a massive number of filters. You also don’t need to be too precise at the moment you activate photo mode as you can manually position your avatar and the camera to wherever you want.
With such a huge number of options available, it can be confusing to know exactly what each action does. This Cyberpunk 2077 photo guide aims to decipher all of the available options to enable you to create some fantastic art.
How to activate Cyberpunk 2077 Photo mode
To enable photo mode, press the N key at any time. The action will pause the game and you’ll be able to take a snapshot of your avatar.
Cyberpunk 2077 Photo mode controls
| Control | Keyboard & Mouse | Gamepad |
| Move Camera | Hold left mouse button and move mouse | Left analogue stick |
| Rotate Camera | Hold right mouse button and move mouse | Right analogue stick |
| Camera Distance | Scroll mouse wheel | LT (L2) and RT (R2) |
| Select Option | ↑ and ↓ arrow keys | ↑ and ↓ d-pad buttons |
| Change Value | ← and → arrow keys | ← and → d-pad buttons |
How to customise Cyberpunk 2077 photos
In addition to the basic controls, Cyberpunk 2077’s photo mode has a whole bunch of options available to perfect your screenshot. Each one is separated into tabs, ranging from the type of camera available, the depth of field, the pose your character is striking, any additional effects, and additional stickers. You also have a separate tab to load or save your creations.
Camera
- Camera Type: Switch the type of camera you have available. Options include First-Person and Drone
- Preset: Allows you to switch through presets
- Field of View: Allows you to slide the field of view closer or further away from the centre point of the image
- Rotate: Precisely rotate the camera around a subject
Depth of Field
- Enabled: Manually toggle depth of field on or off.
- Auto-Focus: Turns on auto-focus, which automatically focuses the lens on the nearest object in the image
- Aperture: Manually configure how much light enters the image

Pose
- Category: Selects the general category of poses between Idle and Action
- Pose: Alters the character’s pose based on the selection. Poses available are based on the currently selected category
- Muzzle Flash: Turns off and on weapon muzzle flashes (only if holding a ranged weapon)
- Expression: Changes the selection of your avatar’s face
- Look at Camera: Toggleable option for if holding a weapon that determines if the avatar is looking at the camera lens
- Rotate: Rotates your avatar
- Left/Right: Manually adjusts your avatar’s position towards the left or right of the frame
- Close/Far: Adjusts your avatar’s position so that they’re closer or further away from the screen
- Character Visible: Toggles whether the photo shows your avatar or not
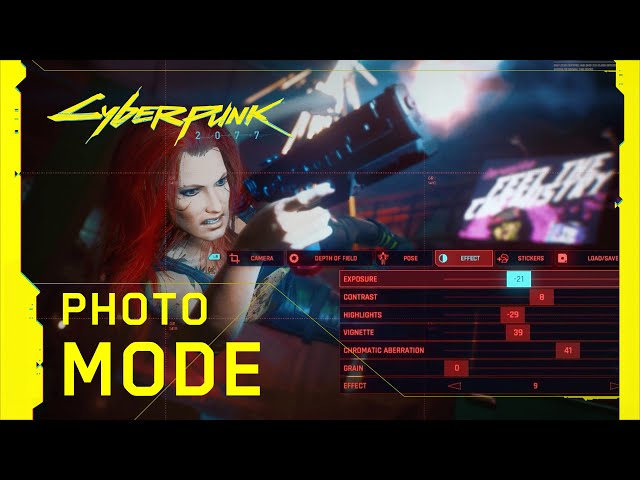
Effect
- Exposure: Raises or reduces the amount of light reaching the camera
- Contrast: Raises and lowers the difference between light and dark areas, altering the colours in the image
- Highlights: Raises or lowers the intensity of the light areas in the photo
- Vignette: Raise or reduce the saturation in an image towards the periphery compared to the image’s centre
- Chromatic Aberration: Stretches the edges of an image
- Grain: A slideable option that introduces more film grain as it goes up
- Effect: Several options to add new effects to the image. There are 15 total effects
Stickers
- Stickers 1 – 5: Add a sticker onto the image. These can be placed manually
- Frame: Choose from a selection of frames
Background: Choose from a selection of backgrounds
And those are all of the controls for Cyberpunk 2077’s photo mode! If you’re looking for the best location to take some snapshots, you can have a look at our Cyberpunk 2077 map guide to plot your next photoshoot. To make your avatar look the coolest they can be, use our Cyberpunk 2077 character creation guide, and outfit them with wares in the Cyberpunk 2077 gear guide. We’re looking forward to seeing the amazing photos you all make in Night City.