What are the Lords of the Fallen bosses? Any soulslike worth its salt must have a collection of powerful foes to defeat, and Lords of the Fallen has bosses in spades. While the vast majority of them can be bested with parrying and patience, we all know that’s easier said than done. If timings aren’t your strong suit, we’ve included the best strategies to reliably deal damage to bosses without putting yourself at too much risk.
Most Lords of the Fallen bosses present a far easier challenge when engaging them in Lords of the Fallen multiplayer, since they’re forced to split their attention between more than one player, so be sure to call upon your friends in the soulslike game. Once defeated, LotF bosses typically drop their signature weapons and armor – vital for the best Lords of the Fallen builds that we praise in our Lords of the Fallen review. Without further ado, here’s every boss and how to beat the earliest challenges on your journey.
Here are all the Lords of the Fallen bosses:
- Pieta, She of Blessed Renewal
- Scourged Sister Delyth
- Gentle Gaverus, Mistress of Hounds
- The Congregator of Flesh
- Mendacious Visage (optional)
- The Hushed Saint
- Crimson Rector Percival (optional)
- Ruiner
- Infernal Enchantress
- Spurned Progeny
- Skinstealer
- Bringer of Stillness/Bringer of Silence/Bringer of Nullity (optional)
- Harrower Dervla, the Pledged Knight (optional)
- Kinrangr Guardian Folard
- Griefbound Rowena (optional)
- The Hollow Crow
- Paladin’s Burden (optional)
- The Sacred Resonance of Tenacity
- Abiding Defenders (optional)
- Blessed Carrion Knight Sanisho
- Tancred, Master of Castigations/Reinhold the Immured
- Abbess Ursula
- Rapturous Huntress of the Dusk (optional)
- Judge Cleric, the Radiant Sentinel
- The Lightreaper (appears before beating Judge Cleric but is mandatory afterward)
- Andreas of Ebb (optional)
- The Iron Wayfarer (optional)
- Damarose the Marked (optional)
- The Sundered Monarch
- Adyr, the Bereft Exile
- Elianne the Starved
Pieta, She of Blessed Renewal
Pieta serves as your first real challenge in Lords of the Fallen, and she’s certainly here to bring the pain. This graceful knight wields a sword imbued with Radiant magic, which she typically swings in a succession of two to four attacks. You can reliably dodge through each attack, though the better option is to parry them in and reduce her posture. Once she’s exhausted her attack pattern, she pauses, leaving you enough time to respond with a few swings of your own – just don’t get greedy if you have a weapon with a slow attack animation.
Alongside her melee attacks, Pieta has two long-range spells that she relies upon at mid-to-long range. The first is a slow-moving trail of Radiant magic that you can reliably avoid by dodging, while the second is a beam of light that she fires from the tip of her sword. The latter is an abrupt cast, so be ready to dodge or block accordingly.
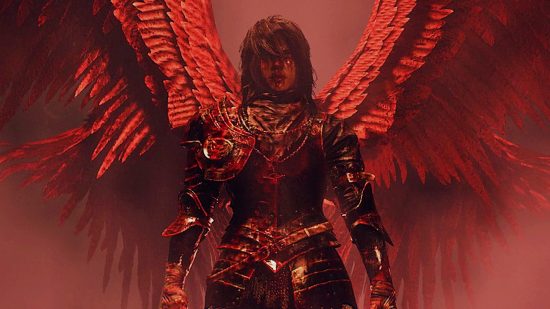
Pieta moves into her second phase after she loses a third of her health, heralded by a dramatic reveal of her angelic wings. During this sequence, she summons two clones to send a hail of blades down the center of the battlefield, so be sure to stay well out of the way when Pieta flies overhead. She’s slightly faster during this phase, and she occasionally summons her clones to attack on her behalf, so be on your guard.
It is possible to summon the Iron Wayfarer for this fight, but we wouldn’t recommend it. Pieta’s sword has incredible reach, and it’s far more challenging to respond to her movements when she’s facing away from you. Instead, you can inflict bonus damage on Pieta by imbuing your Lords of the Fallen weapons with the Fire Salts that you can pick up just outside her boss room.
Gentle Gaverus, Mistress of Hounds
The Mistress of Hounds is an optional boss that challenges your ability to manage multiple targets at once. Gaverus herself is a graceful archer who shuns close-range combat, either rolling out of the way or escaping with a smoke bomb that teleports her to the other side of the battlefield. She isn’t much of a challenge on her own, but her namesake hounds complicate matters as they join the fray to protect their mistress.
Up to three hounds can enter the battlefield at any one time, and more will appear once you kill them. Each hound is clad in armor that must be knocked off them before you can deal significant damage to them. Thankfully, you can easily outrun them by sprinting, so the most reliable method of dealing with Gaverus is by circling her until she’s locked into a ranged animation, then running in for a quick swing.
At close range, Gaverus switches out her bow for her sword, so be wary of it while retreating – if she staggers you, it’s likely her hounds will catch up with you and inflict significant damage. It’s also possible to kite the dogs around near the entrance of the boss room to take them out separately, but be wary of Gaverus’ positioning if you adopt this strategy.
The Congregator of Flesh
The Congregator of Flesh is the second major blockade in Lords of the Fallen, and its lair is only a stone’s throw from your encounter with Gaverus. Your showdown takes place in a huge cesspit of poison and rot, though the Congregator takes up a lot of space within it.
This highly aggressive boss loves to use its size against you, leaping into the air and throwing itself to the ground. It also has a devastating reach thanks to its mutated left arm; while the forward swipe attack is fairly easy to dodge, its overhead swing has a slight delay that can easily catch you out, so we highly recommend relying on your block. Thankfully, any withered damage you accrue is easily reversed thanks to the Congregator’s long recovery time after its attacks.
The Congregator of Flesh has an Umbral parasite attached to it, as indicated by the blue node to the left of its health bar. It generally hovers just behind its shriveled leg on the right, so wait until it pauses between its attacks to dispel it using your Lords of the Fallen Umbral lamp.
The Congregator’s most disruptive attack is a poison wave that deals damage and poison build-up. Thankfully, it’s possible to avoid it by dodging through it or sprinting out of range, but the stagger it inflicts can leave you open to a follow-up attack from the Congregator. It also has a rapid attack where it throws itself across the ground in an attempt to swallow you whole, so be prepared to utilize your invincibility frames and dodge through the animation.
Outside of its poison wave, the Congregator also loves to generate an AoE poison pool around itself. Be sure to load up on poison cures just in case. We also recommend bringing Pieta along, who can pull aggro away from you while you’re trying to dispel the Umbral parasite and let you get some free hits in while you’re at it. Again, Fire Salts come in handy here.
Mendacious Visage
The Mendacious Visage shouldn’t pose too much of a challenge, but it does represent a crash course in soul flaying enemies. While closed, its stone mask prevents any frontal damage, but you can still get in some free swings by baiting it into a body slam and then rolling to position yourself behind it where it’s vulnerable.
However, your best opportunity to defeat it arises when the Mendacious Visage opens its mask to reveal its true form. Before it begins to vomit Umbral maggots, perform a soul flay using your lamp to temporarily disable it, then run in to deal a front stab. You can even squeeze in an additional charged attack while it recovers, but be sure to get well out of the way once it’s back on its feet.
You can recharge your soul flay by siphoning the Umbral blisters on the boundaries of the boss room, though there’s obviously a limit to this number. However, it’s possible to access the upper level of the boss room by destroying the Umbral entity. It might seem counterintuitive to invite those patrolling enemies into the fight, but they’re also ripe for soul siphoning. This area can also give you a brief reprieve from the Mendacious Visage if you need the space to heal or get in a few ranged attacks.
The Hushed Saint
The Hushed Saint is an exercise in patience. This corrupted knight is joined by its faithful war charger, which loves to climb aboard and gallop from one side of the battlefield to the other. If timed correctly, magic and ranged users can deal damage to him during these phases, but your first priority should be avoiding being trampled under its hooves – especially if you’re a melee user. He also has a penchant for throwing his spear as he dismounts his horse, so be prepared to dodge out of the way.
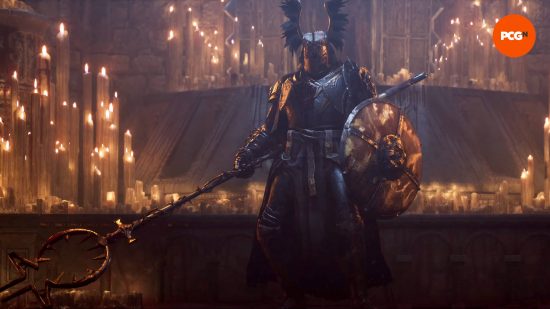
The Hushed Saint is no less dangerous on foot. His spear has extraordinary reach, so your best bet is to stick close to him and parry his swings. Watch out for his devastating forward thrust attack, in particular; if he successfully impales you, he’s guaranteed to take most – if not all – of your health in one fell swoop. His moveset includes an AoE attack that summons an ever-expanding ring of thorns. This applies withered damage to half of your health pool when blocked, so it’s best to roll through and avoid it entirely.
We recommend summoning Pieta if required since her Radiant magic and high aggro can keep the Hushed Saint focused on her, leaving you free to get behind him and bring the pain. Finally, if you’ve been thrown into Umbral at any point during this fight, you might have noticed the parasites that litter the battlefield. Don’t panic – they aren’t actually connected to the Hushed Saint, but they can be destroyed to inflict major poise damage on him when he’s within range.
Ruiner
Much like the Taurus Demon in Dark Souls, your showdown against Ruiner takes place on a bridge with limited space, so be prepared to roll through his attacks. You can bait out his charge by keeping at a distance, but be aware of your own positioning; you don’t want to get caught between Ruiner and a solid wall. Instead, take the moment to get behind him for a few free hits, then rinse and repeat.
Ruiner can dish out a staggering amount of fire damage, so we highly recommend kitting yourself out with armor that prioritizes high fire and physical resistance. He also routinely places a fire totem, which buffs his damage significantly, so you should destroy it as quickly as possible. Its uptime is based on posture, so use charged attacks to take it out as fast as possible.
In general, it’s best not to stay directly in front of Ruiner for too long. Not only does his shield absorb most attacks, but he can also imbue it with fire to create a devastating flamethrower. You’re fairly safe to engage him in close quarters when his shield isn’t glowing if you’re partial to parrying, but we wouldn’t recommend it.
Spurned Progeny
This colossal-sized boss is a relatively simple one if you know what to do, but it has multiple phases that may catch you off-guard if you’re not careful. Begin the fight by slashing at the giant’s legs, watching for any slam or swiping attacks. Eventually, the boss will begin vomiting magma. This is your cue to run toward the stairs and stand in one of the three arenas.
The Spurned Progeny will then begin walking up to you. Your main windows of attack at this point are after dodging the slam attacks and after the third swipe from the giant’s mouth-claw. When it begins vomiting magma again, move to the next arena on the wall. At some point, the boss will begin charging for a deadly AoE attack, so run up to it and attack it as much as you can to stagger it, or time to dodge this fiery shockwave. You should then have ample time to finish off the boss and claim the victory.
The Hollow Crow
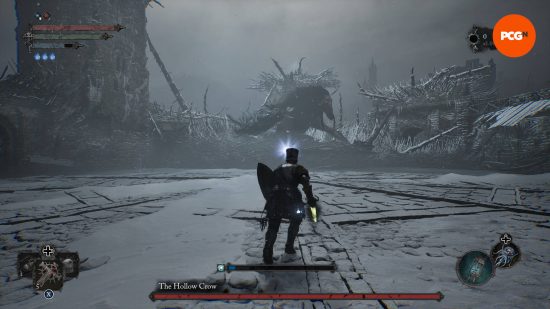
This is a gimmick boss that relies on your Umbral Lamp. We highly recommend that you upgrade this as soon as you can to have at least three charges. The ghost girl floating around the arena will summon Remnants and wolves, so try to kill the wolves off first before going for the soulflay on the floating light. She’ll disappear for a time, causing the Hollow Crow to surround the edges in a severe snowstorm. Stay in the middle and fight the Remnants until she reappears. Soulflay her again to potentially get her health so low that you defeat her. This will automatically cause the main boss to take a third of its health in damage.
The Hollow Crow will then begin casting spells for you to dodge. The slow-moving ice shards erupting from the ground will bounce back and forth, so keep an eye on where that is as you dodge the faster shard waves and other ice attacks. Eventually, the Hollow Crow will revive the ghost girl.
Phase two has the same objective – defeat the girl and dodge the crow’s attacks. The only difference here is that the wolves have been replaced with the banshees. This second phase is the most dangerous, so it’s best to ignore the banshees where possible and defeat the ghost girl to wipe all summoned enemies away. The third and final phase replaces the banshees with the Vikings, who are easier to dodge yet hit like a truck. Repeat the strategy as before, and you should win.
That said, here are some final notes: If you ever need to recover soulflay charges, there are blue nodes on the edges of the battlefield that you can absorb. If you do enter the Umbral, you can hit the ghost girl without needing to soulflay her, but you will encounter far greater numbers of Remnants in this phase. Summoning a friend or NPC will make this fight significantly easier, too.
Tancred, Master of Castigations
At this point in Lords of the Fallen, you should have some grasp on when to parry attacks if you use a shield. Many of Tancred’s attacks can be parried with great effect, as his overall poise isn’t as good as other bosses. This will help you against any of his spear attacks, but it’s better to dodge his shield at all times as it leaves him open to counterblows. His attacks with his spear inflict bleed, so be sure to keep curative items on hand if the bleed bar gets too high.
If he waves his spear smoothly in the air, he’s summoning a homing holy attack that blasts anyone nearby with magic. They have a set rhythm, so you should be able to dodge them easily, though Tancred can still attack independently. If he holds his spear back and it begins to glow, he’s about to fire a devastating beam of light. Dodge this to avoid instantly dying.
Defeating Tancred will awaken his attached brother, Reinhold the Immured. His attacks are far more chaotic, including leaps and charging attacks. He has some tells, but it can be difficult to decipher exactly what Reinhold’s planning until he begins charging or leaping, so keep your distance and use rolls to effectively avoid taking damage. Whenever you see him stagger on two legs, dodge around him until he falls, as this is your best window to attack him.
After losing over half his health, Reinhold will begin spewing magma as part of his attacks, and this is where he’s at his most dangerous. You’ll need to ensure that whenever you attack him, you don’t accidentally burn yourself. Patience will be a virtue here. If you find this fight tough, summon a friend or an NPC to help distract Reinhold where possible, but note that they may perish before this phase of the boss encounter.
Judge Cleric, The Radiant Sentinel
This two-phase fight is one of the hardest in the game. You’ll need to have expert parry timing or enough spellpower to blast her away without her getting close. If you have any poison spells, they’re highly effective against both phases, with sustained damage slowly draining her health bar.
In the first phase, she’ll use plenty of parryable attacks but will soon begin to use an enchantment spell to buff her attacks with holy arrows. Use this opportunity to soulflay her with the Umbral lamp to get extra damage. Once she’s down to about half health, she’ll begin summoning archers to fire on your position. This will happen three times and in fairly quick succession, so it’s not worth attacking her while this happens. Other attacks will also summon arrows, but they’re far easier to dodge. She also has a fairly easy-to-dodge AoE attack, but you should be no stranger to these kinds of attacks at this point.
After her first health bar is gone, she’ll show her true, corrupted self. Gone are the annoying soul arrows, and in their place are inferno-based fire attacks. Parrying most of these is essential, but there are sword attack combos that end with her erupting the ground beneath her, so it’s best to dodge rather than deflect. Her AoE will burst outward, then collapse in on itself, so you need to dodge it twice to avoid losing a lot of life. She also has a spell that causes flaming boulders to bounce around the screen. Dodging toward her when she casts this will let you avoid damage and get some extra hits on her.
At around a third of her health gone in this phase, she’ll zip around the battlefield and plant her spear into the ground. You can choose to destroy the spear, but it’s far easier to dodge her attacks and watch for any crystal formations that appear as they explode on contact. Like the arrows in the first phase, this will disappear after a time. When her health decreases beyond the halfway mark, her attacks become more erratic, so focus on dodging these and only attack when absolutely sure you can parry or avoid follow-ups. With some amount of luck, you’ll win and get to the final beacon.
Now that you know how to beat the earliest Lords of the Fallen bosses, you should be free to progress in the action-adventure game. If you’re in need of a further helping hand, Lords of the Fallen crossplay allows you to pull pals from other platforms into your world. Finally, check out how long Lords of the Fallen is expected to take for the average playthrough, as well as the Lords of the Fallen beacon locations, to keep you on the right path.
